1 Create / Edit 3D Spaces
1.1 MetaBuilder
1.1.1 MetaBuilder Overview
The Metabuilder serves as the engine of Mext and is the core of the platform. It facilitates the creation and editing of **fully customized 3D immersive spaces. **Designed for ease of use, the Metabuilder empowers users from anywhere, regardless of their technical expertise, to effortlessly create their own 3D immersive spaces.
Mext Metabuilder offers 3 main buttons and 3 blocks to streamline your immersive space creation:
Buttons:
1. "Choose Scene": you can choose a scene if you have a multiscene subscription (Professional).
2. "Enter Metaverse": Enter your 3D immersive space and metaverse as a visitor.
3. "AI-Generated": Utilize our AI-generated engine to create your 3D immersive space with Generative AI.
Blocks:
**1. "Store side bar": **Access free and paid templates and 3D models.
2. "Element Management top bar": Easily add and rearrange elements such as screens, video players, AI assistants, partner spaces, and define collision and teleportation areas.
3. "Scene Element List side bar": View a comprehensive list of all elements in your scene, including 3D models, screens, video players, games, polls, and AI assistants.
1.1.2 Choose a scene
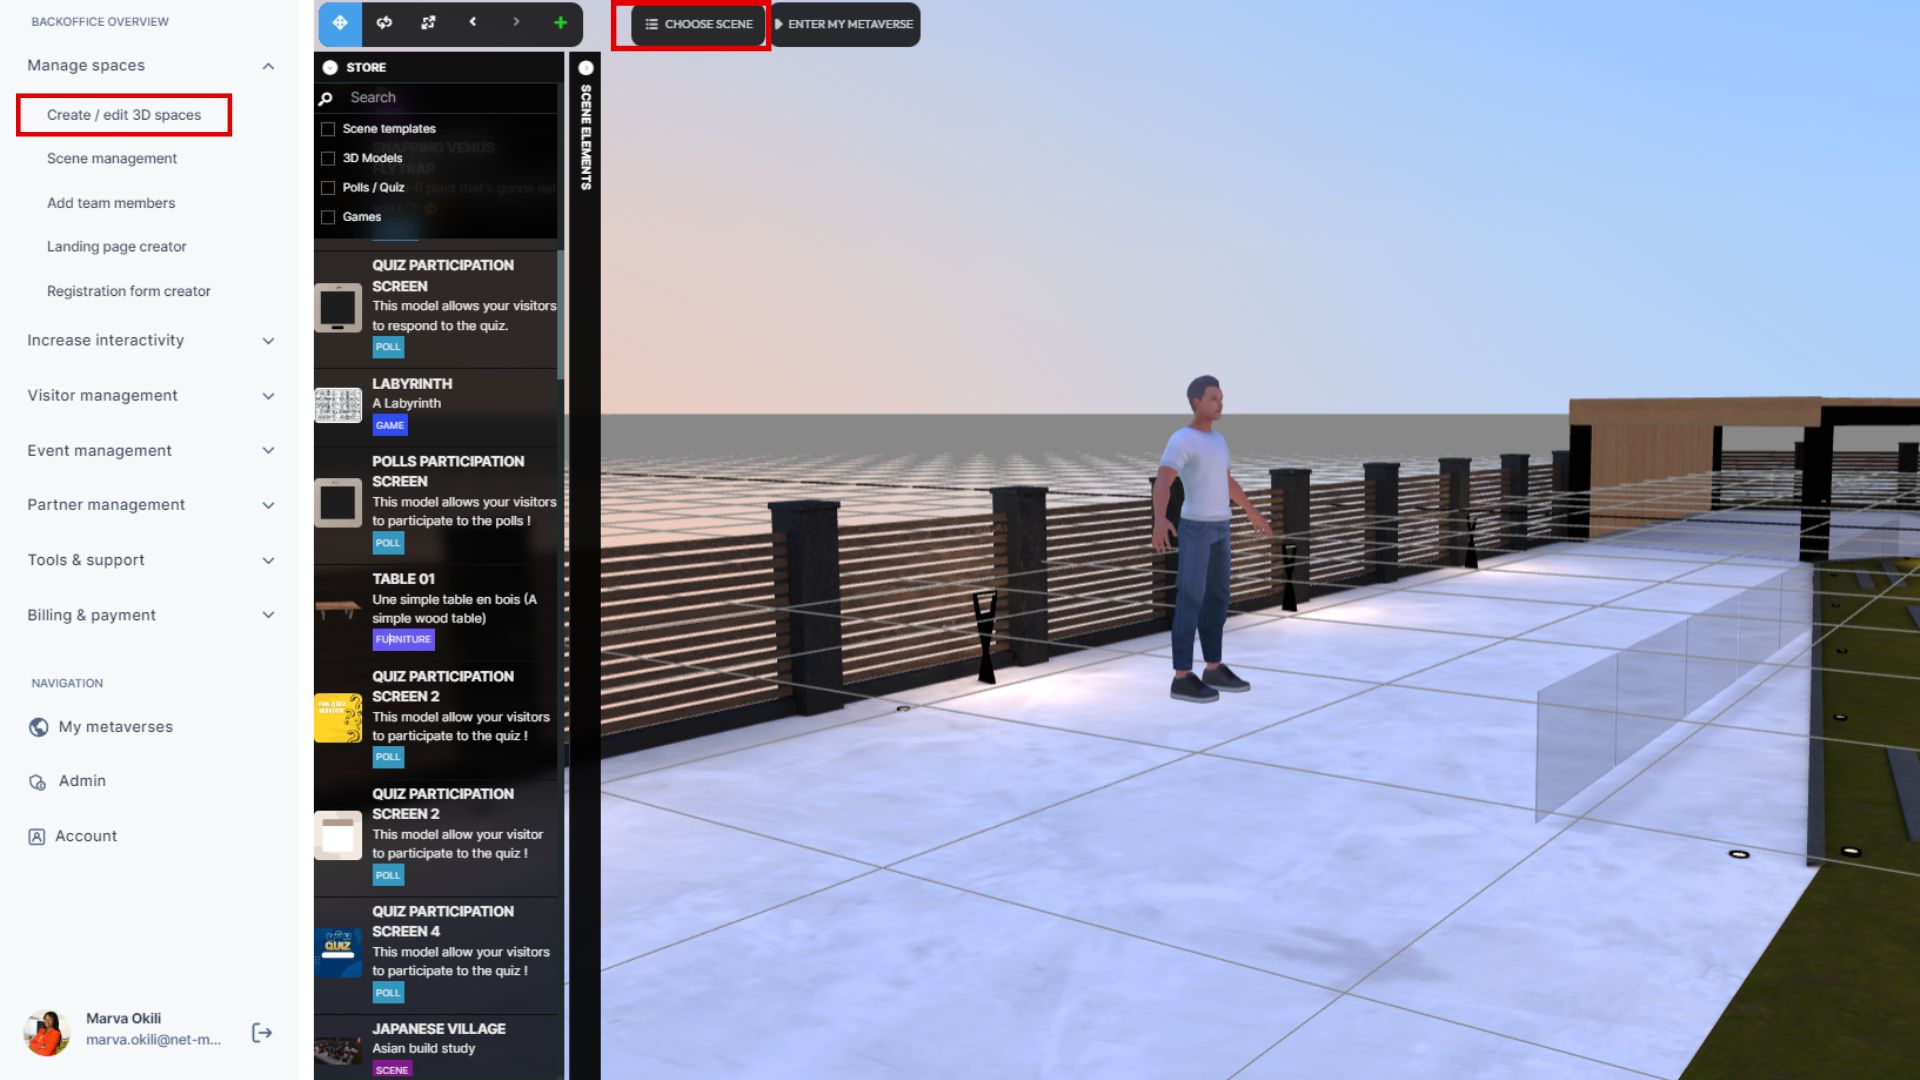
With the Discovery, Professional, and Enterprise packages, you can create multiple scenes. To edit a specific scene, simply select it in the Metabuilder. Click on the "Select a Scene" button located at the top left of your Metabuilder screen, then choose the scene you wish to modify.
1.1.3 Access Your Metaverse
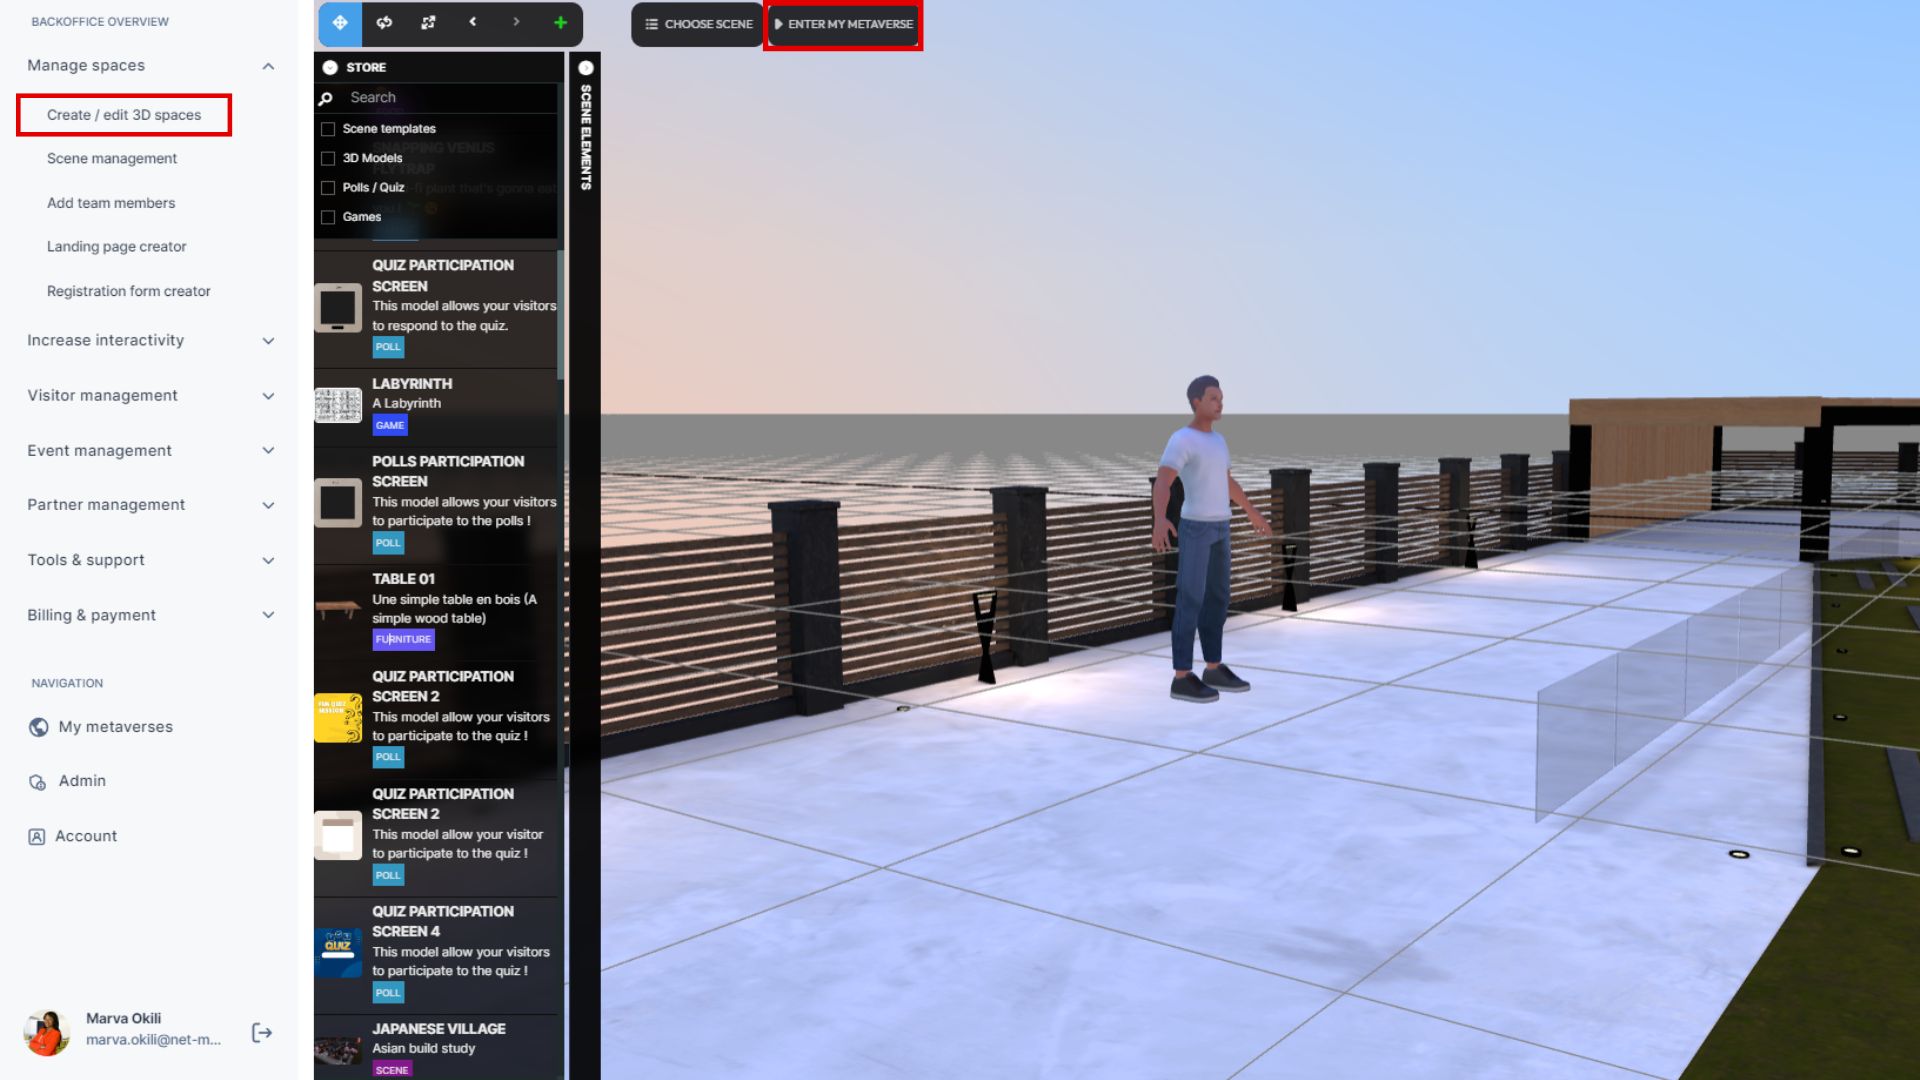
To enter your 3D immersive space and experience it as a visitor, simply click on the "Enter Metaverse" button located at the top left of your Metaverse screen.
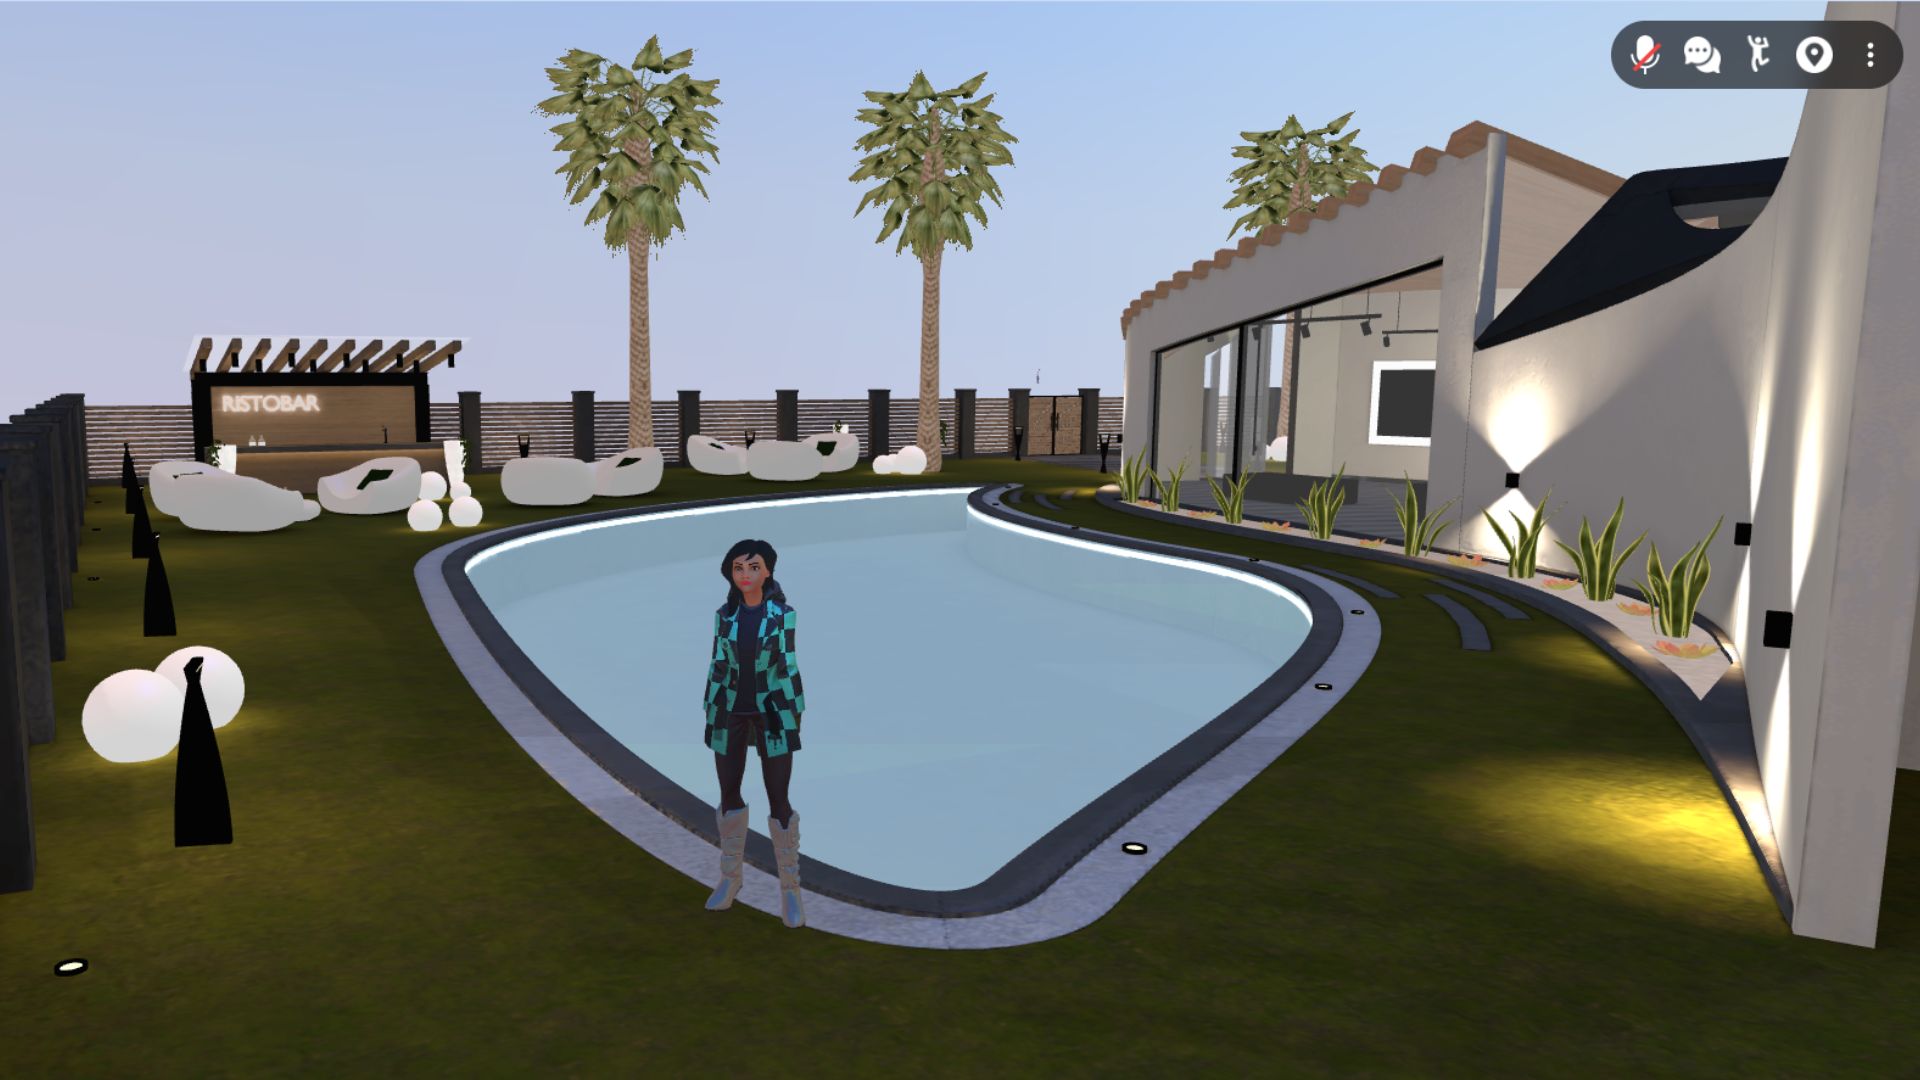
A new browser window will open, allowing you to navigate with your avatar within your 3D immersive space, just like any other visitor.
1.1.4 Store
1.1.4.1 Search bar
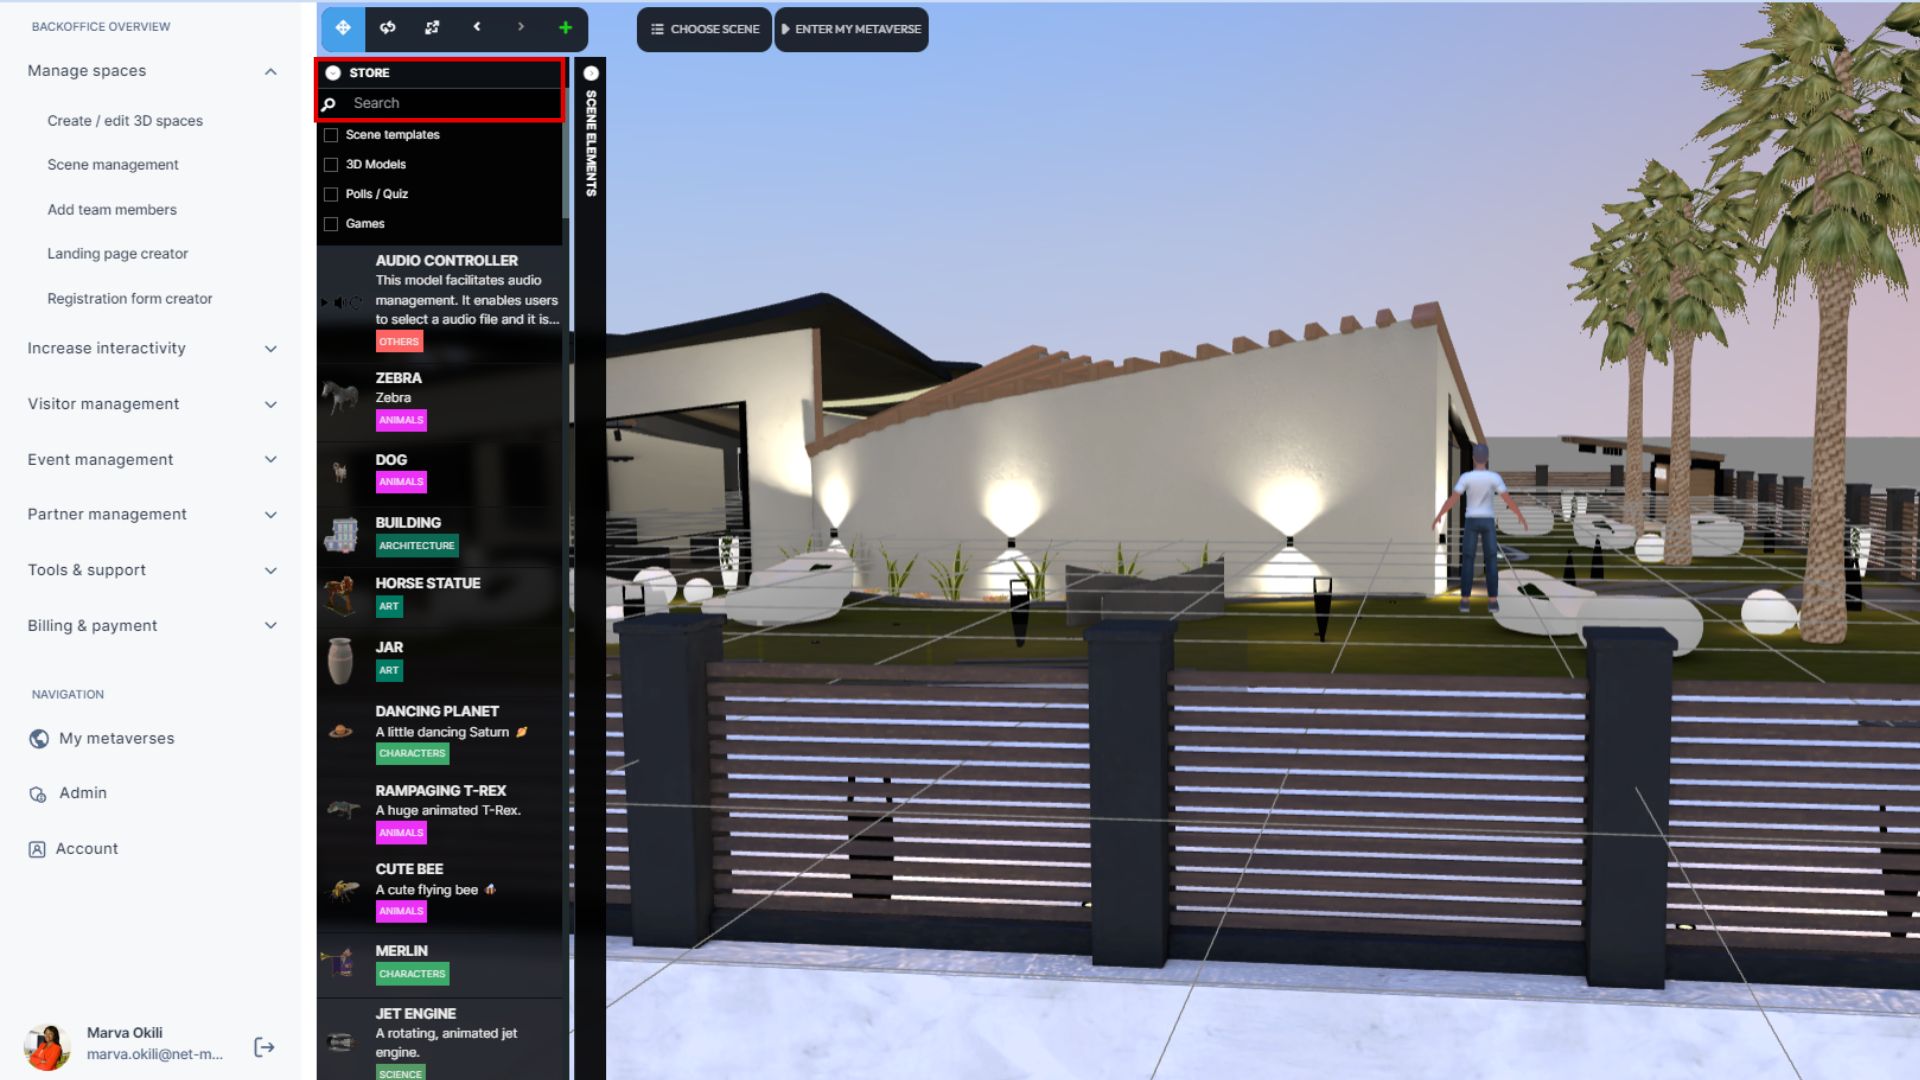
Easily find and select scene templates and 3D models by typing relevant keywords into the search bar.
1.1.4.2 Scene Templates
Choose from tens of scene templates for different purposes like learning, e-commerce, events, product launches, and more.
To select a template, browse through the store or use keywords in the search bar to find what you need. Once you've found the right one, click on it, and it will appear in your Metabuilder either instantly or after a short delay.
You can also import your own template by following these steps:
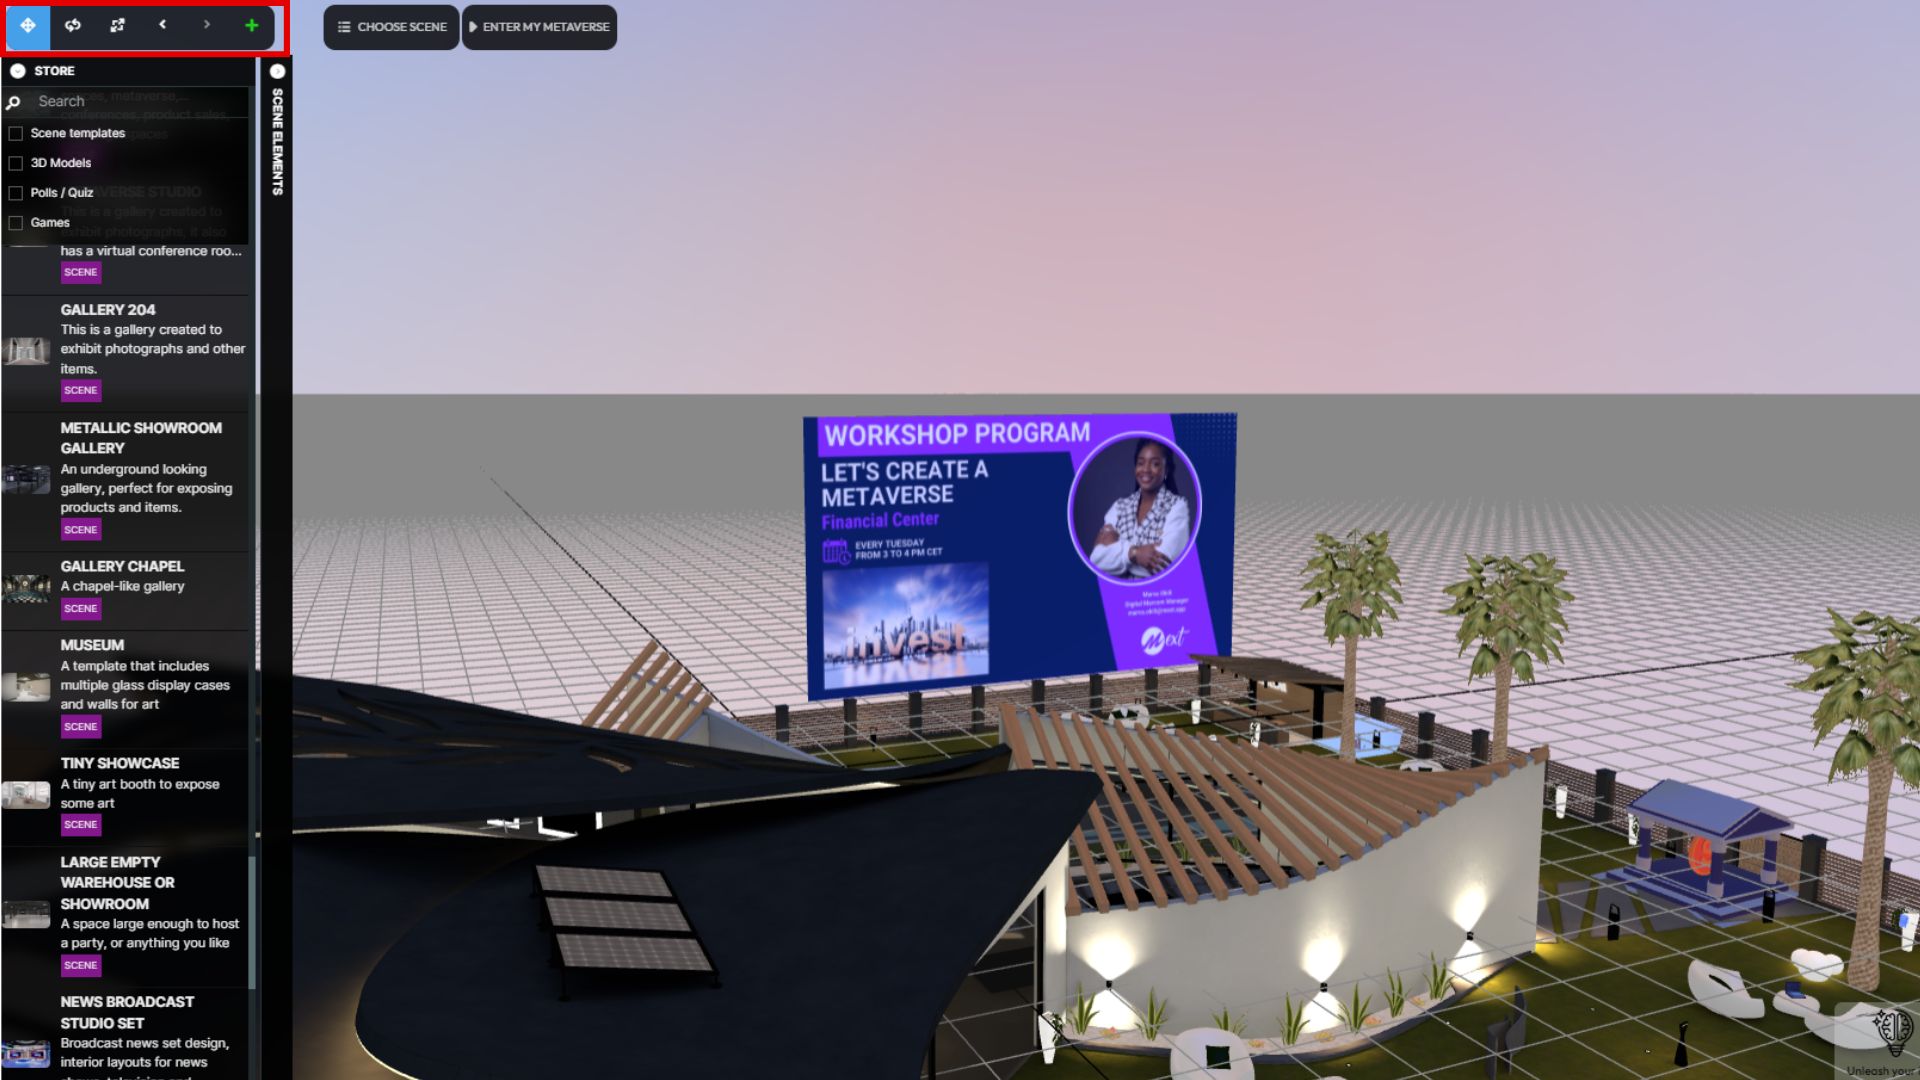
1. Click on the "+" icon in the element management bar at the top left of your Metabuilder screen.
2. Select “My imported models” from the dropdown menu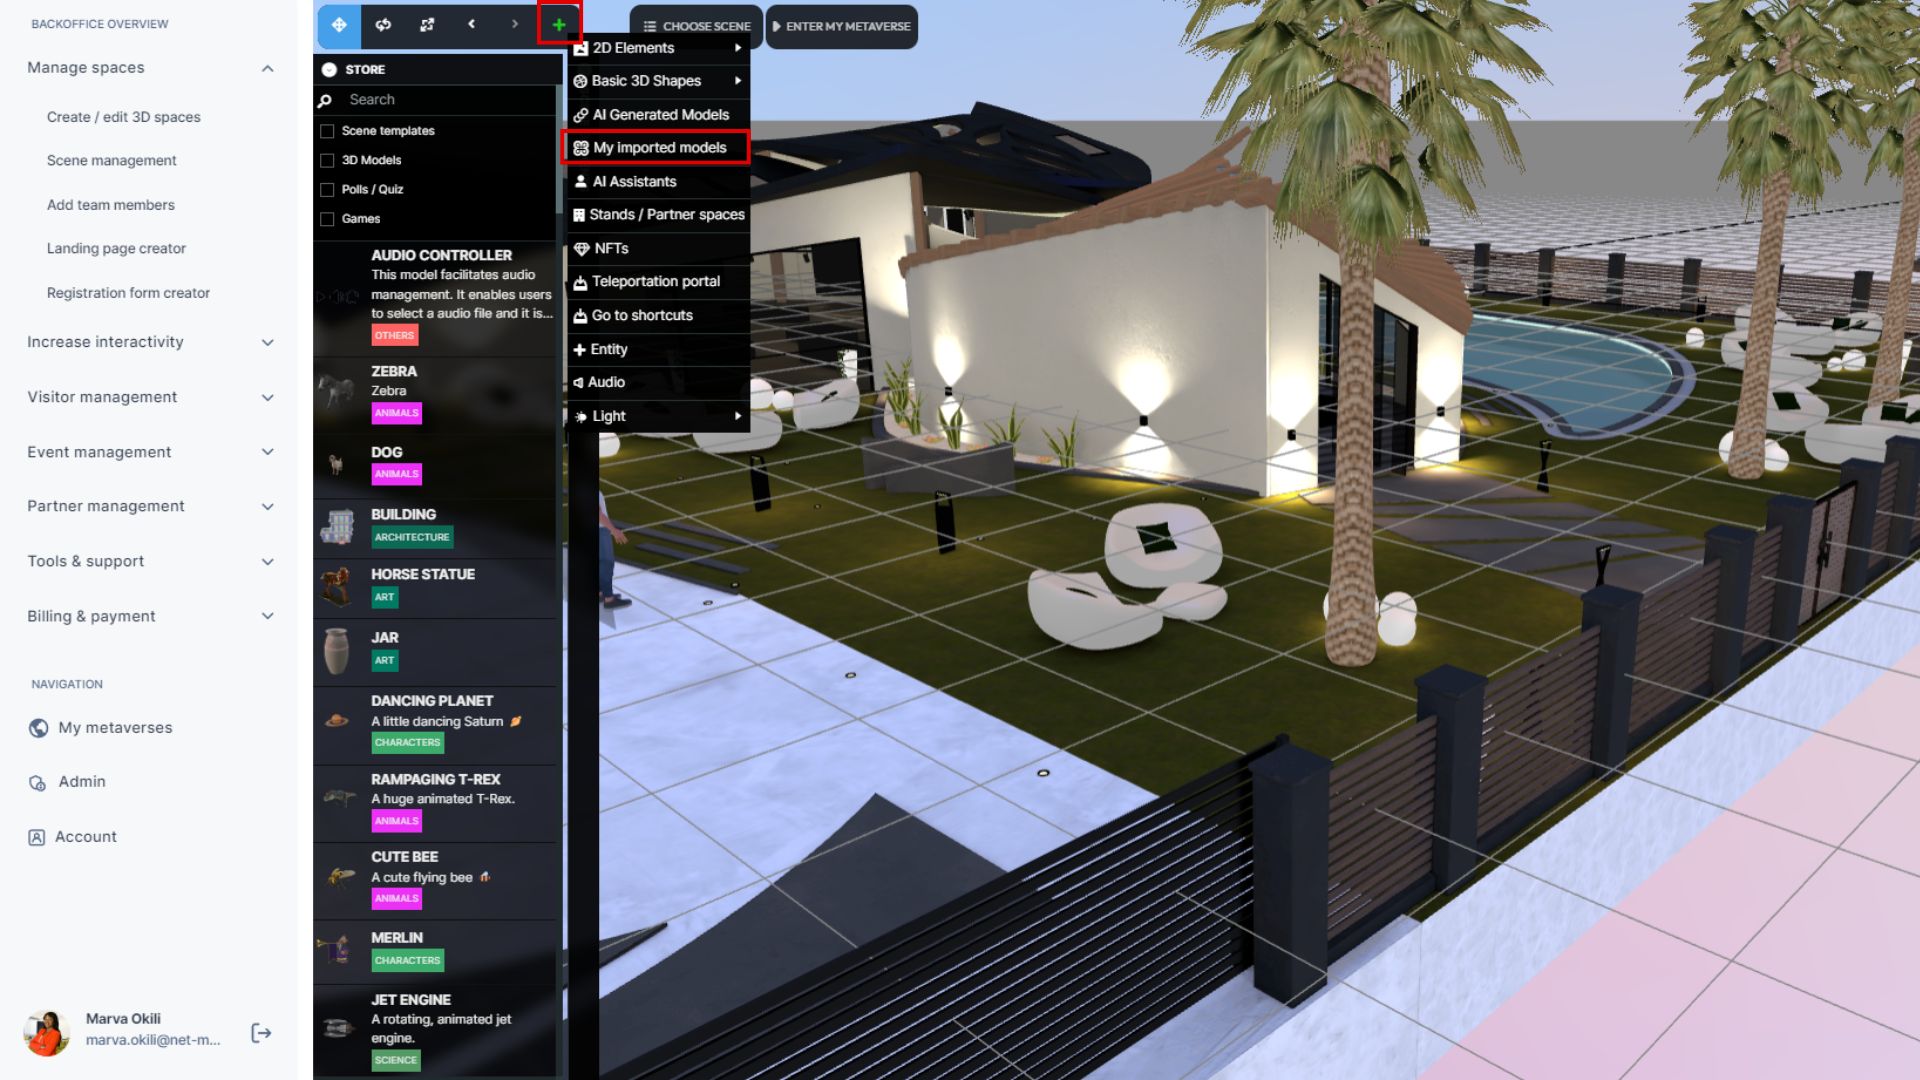
3. Click on the dashed rectangle with a plus sign in the middle.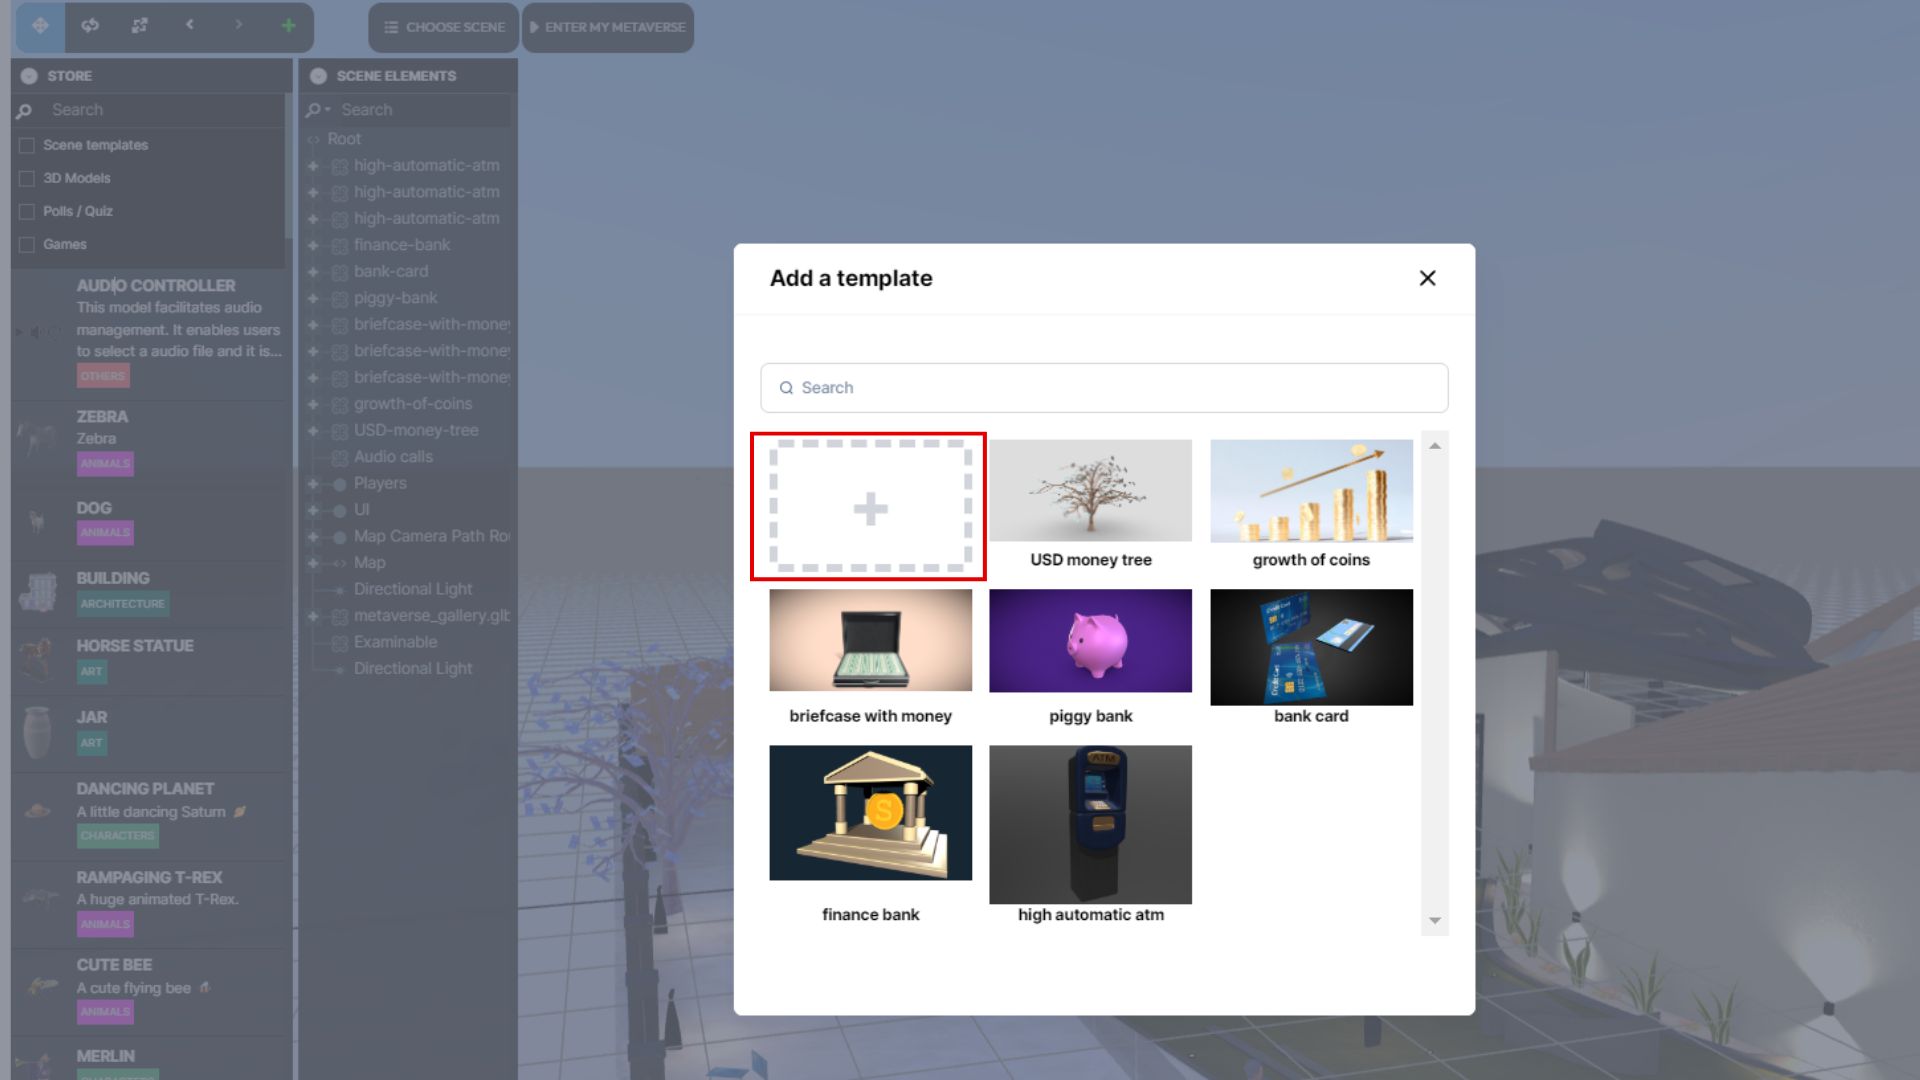 4. Fill out the form by providing a name for your model, uploading a thumbnail image (PNG, JPEG, or GIF with a size limit of 2MB), and loading your 3D model file. Then confirm to load your model.
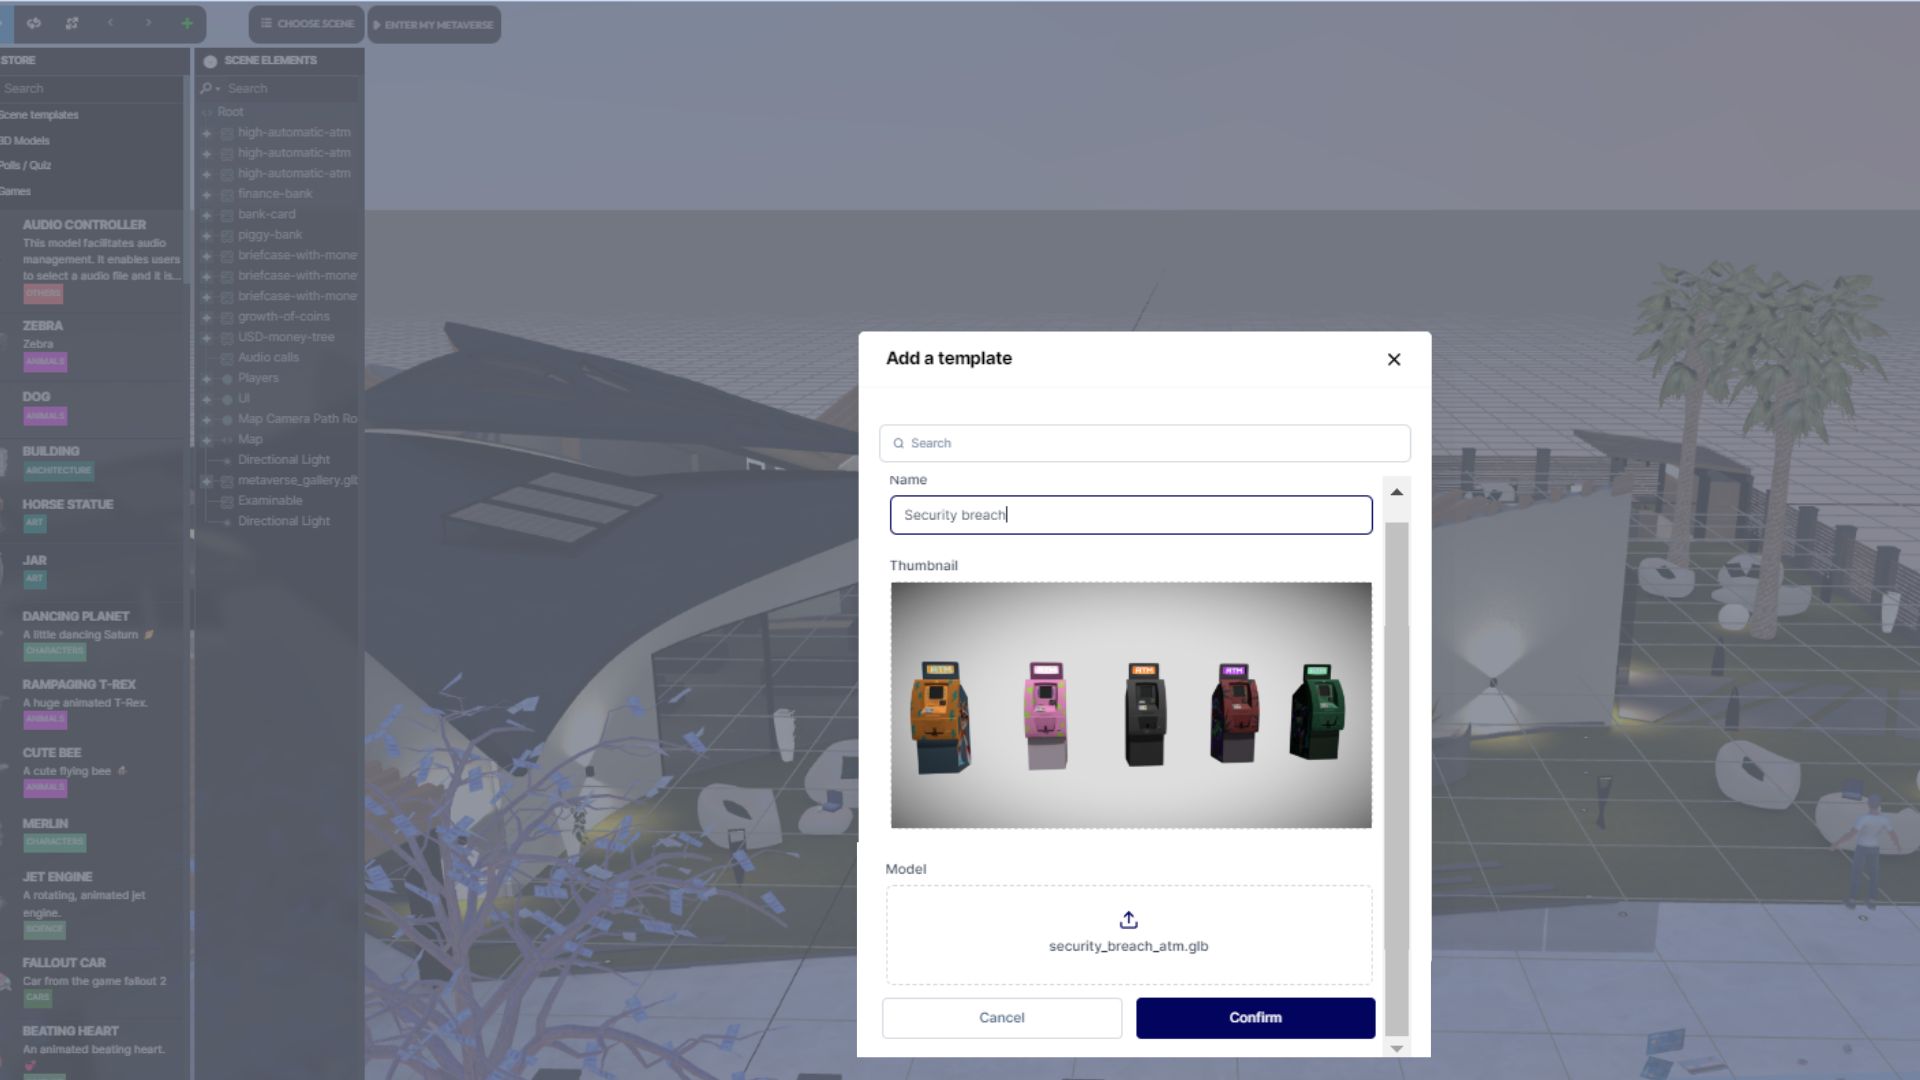
5. Once your scene model is available in "My imported models," simply click on it to add it to your empty scene.
Please note that while you can always switch to a new scene template, doing so will result in the loss of any modifications made in the previous template.
1.1.4.3 3D Models
Tutorial: Adding 3D Models to Your Metaverse
1. Explore the Mext Metabuilder Store: Browse through hundreds of 3D models, conveniently categorized by type such as buildings, plants, animals, and transportation vehicles. You can use keywords in the search bar to find specific models.
2. Select and Add a Model: Once you've found the desired 3D model, simply click on it to add it to your Metabuilder. Depending on your internet speed, it may appear instantly or after a brief delay.
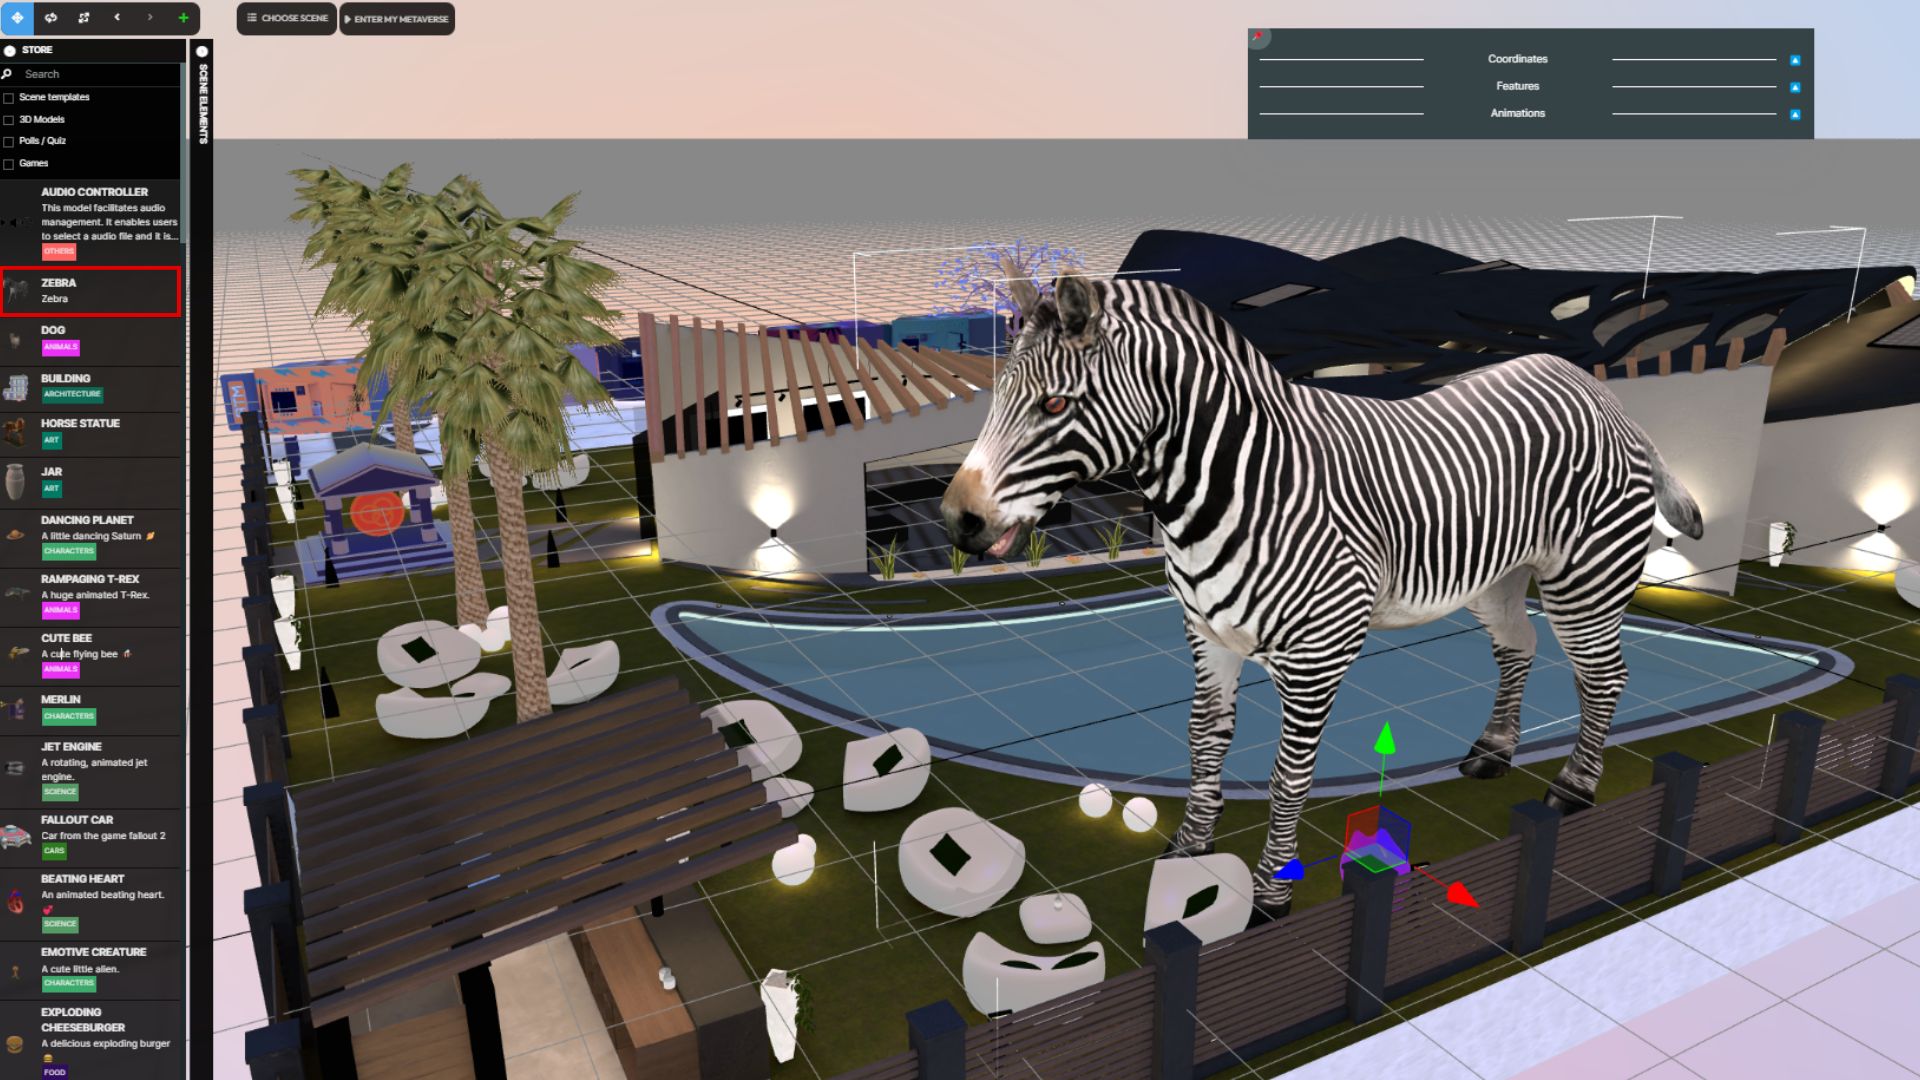
3. Manage Your Model: After adding the model, use the "Manage Element" menu located at the top left of the Metabuilder screen. Here, you can adjust the size and position of your 3D model to place it precisely within your immersive space and metaverse.
A VIDEO TO SHOW HOW TO RESIZE AND MOVE YOUR 3D ELEMENT
You can also import your own 3D models by following these steps:
1. Click on the "+" icon in the element management bar at the top left of your Metabuilder screen.
2. Select “My imported models” from the dropdown menu
3. Click on the dashed rectangle with a plus sign in the middle.

4. Fill out the form by providing a name for your model, uploading a thumbnail image (PNG, JPEG, or GIF with a size limit of 2MB), and loading your 3D model file. Then confirm to load your model.

5. Once your 3Dmodel is available in "My imported models," simply click on it to add it to your empty scene.
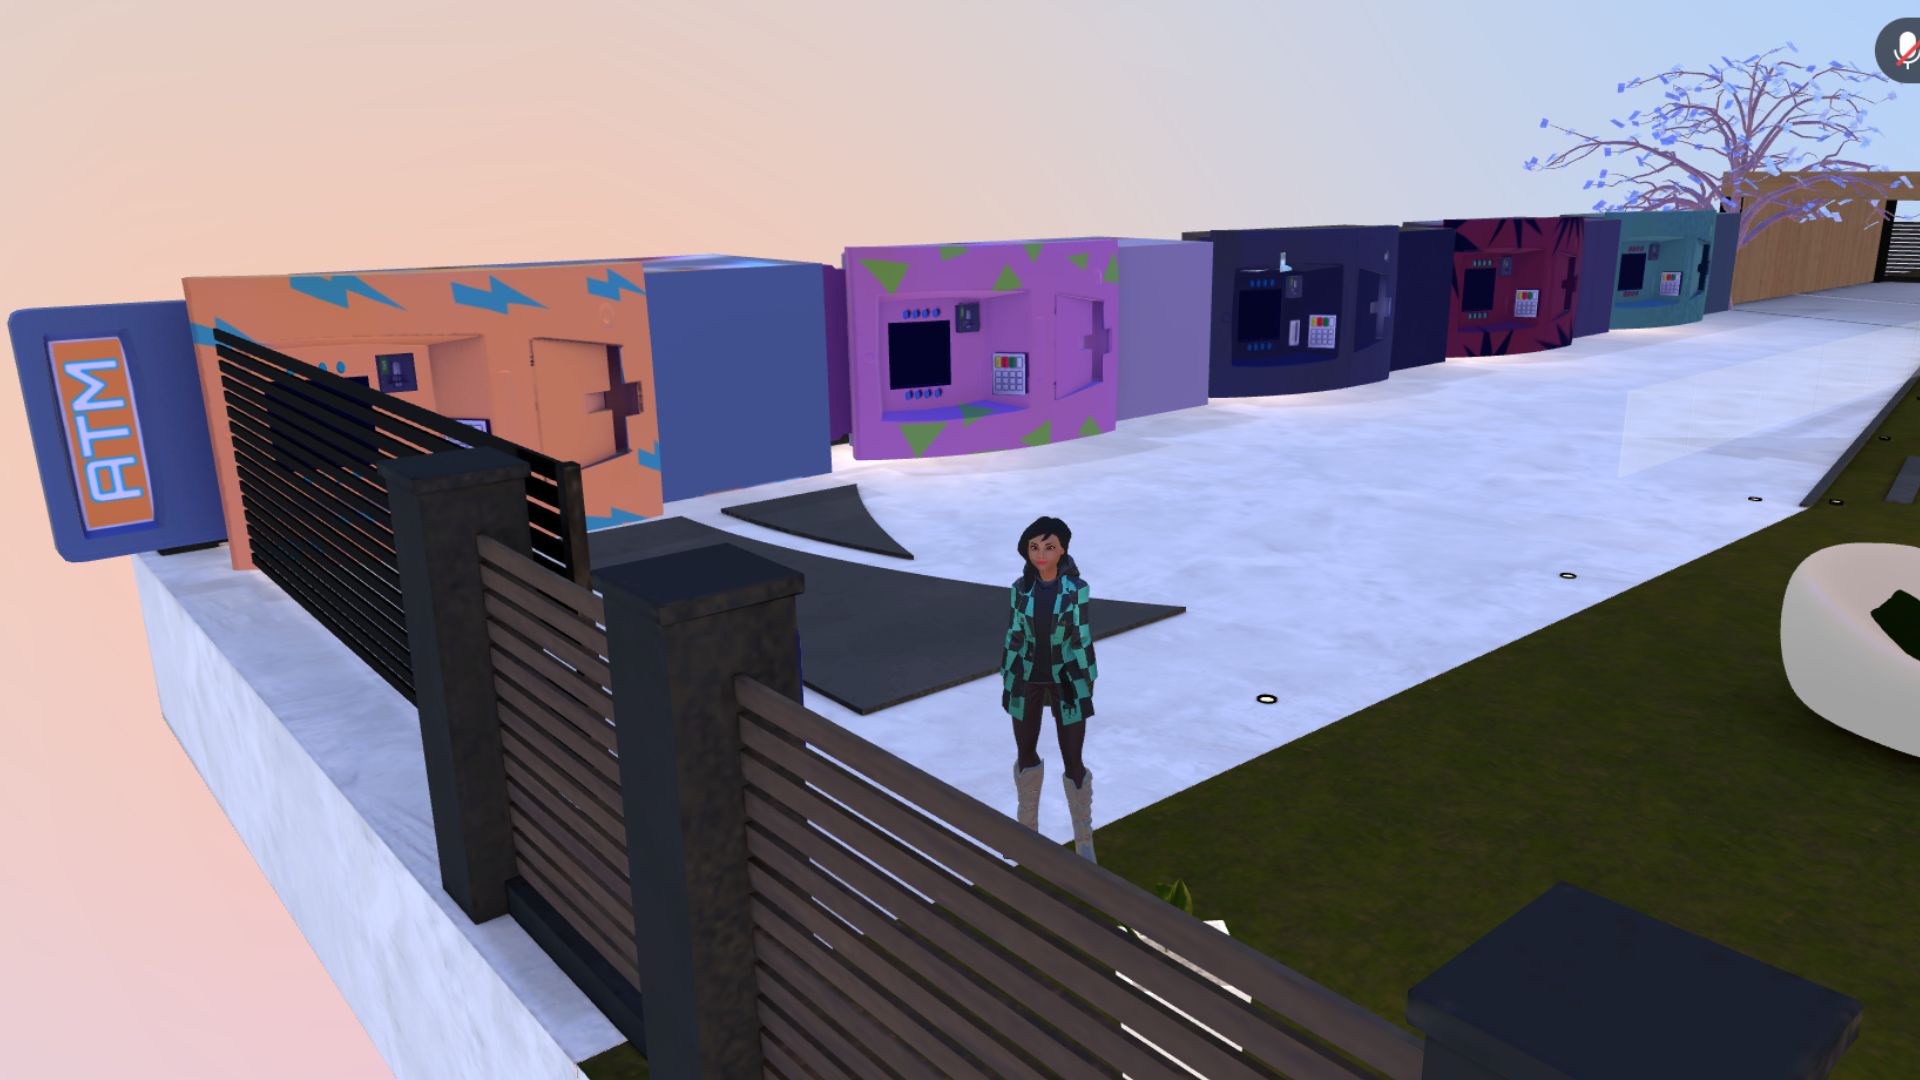
When importing your models, opt for low-size 3D models to prevent your scene from becoming excessively heavy, potentially affecting navigation and performance.
1.1.4.4 Polls/Quiz Templates
Once you've created a quiz or poll in the admin back office, whether in the Polls section for Polls or in the Games section for Quiz, you can integrate it into your 3D immersive space. To begin, navigate to the Metabuilder and explore the Poll/Quiz templates available in the Mext Metabuilder store. Choose the appropriate Poll or quiz template, then click to add it to your Metabuilder. Depending on your internet speed, it may appear instantly or after a brief delay.
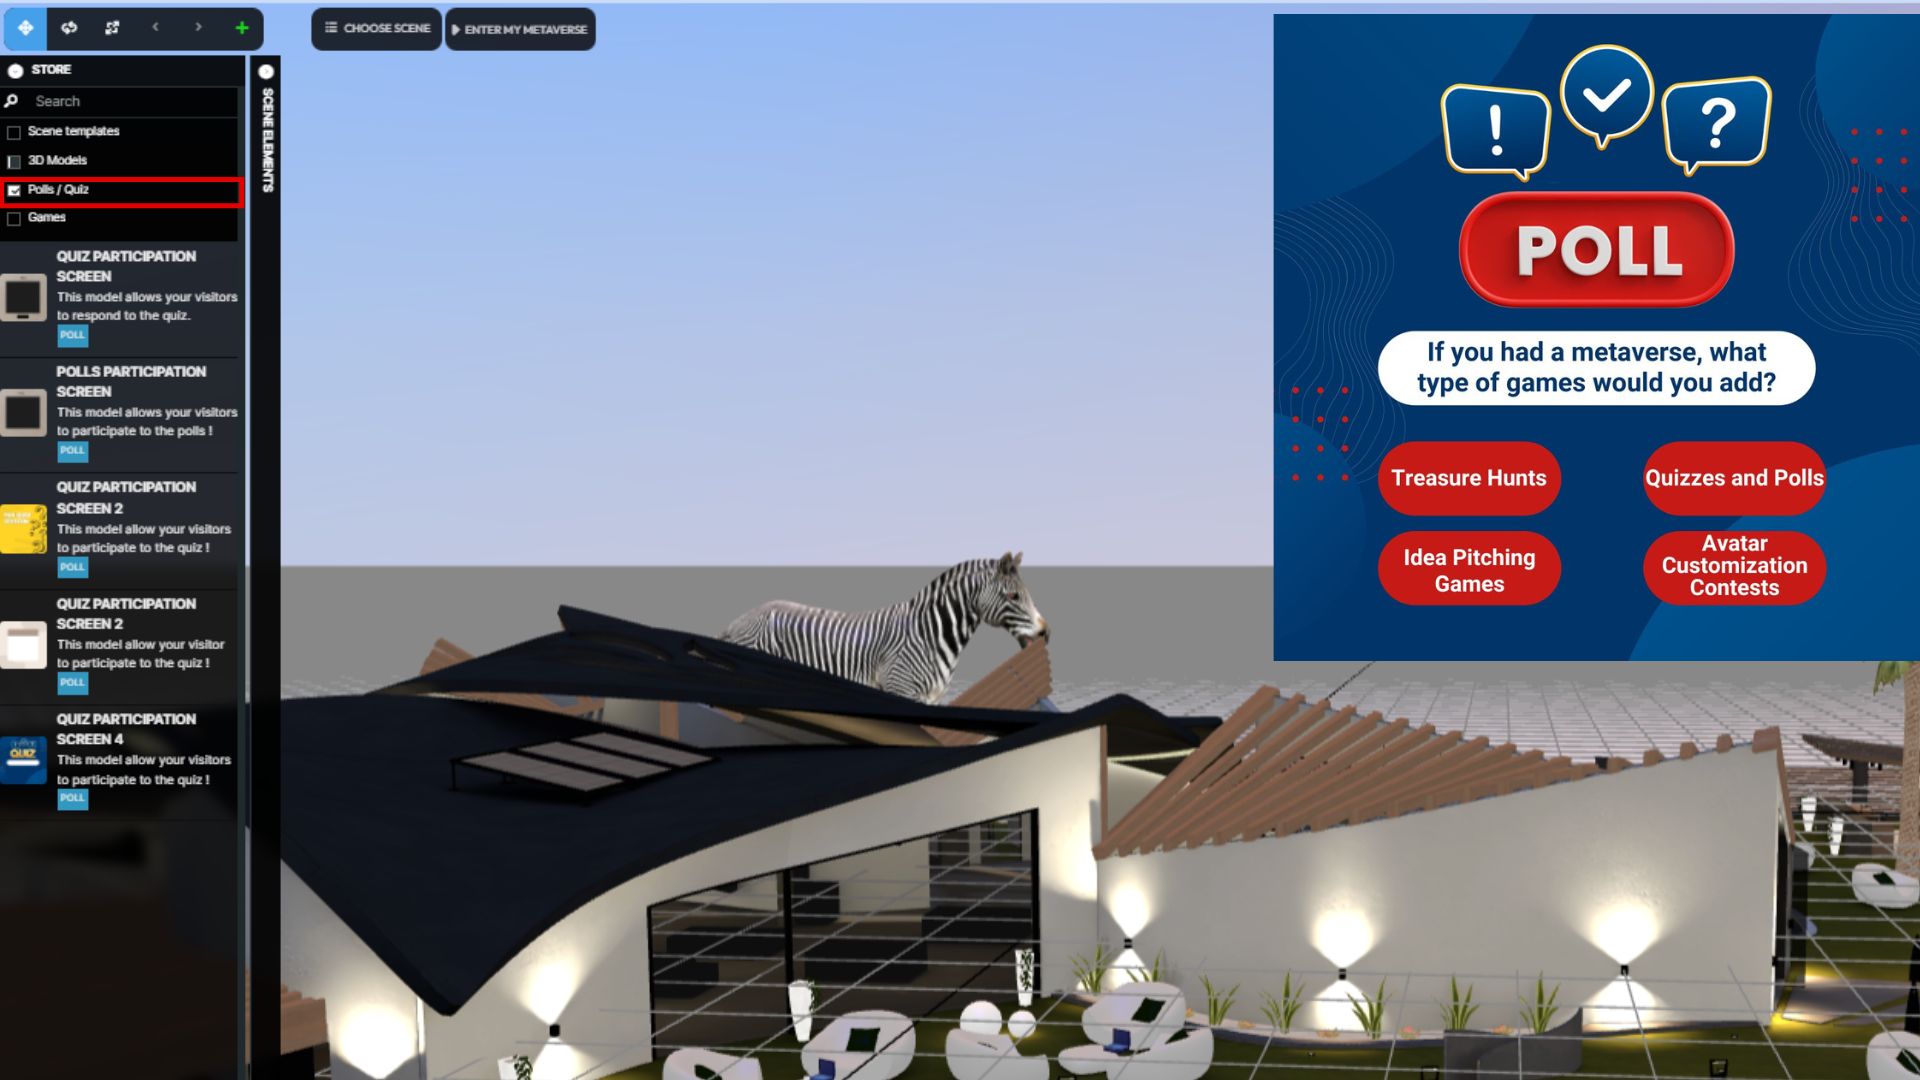
After adding the model, utilize the "Manage Element" menu at the top left of the Metabuilder screen. From here, you can adjust the size and position of your 3D model to precisely position it within your immersive space and metaverse.
1.1.4.5 Games
1.1.5 Element Management
1.1.5.1 Translate Button
When you select a 3D element and click on the “Translate” button, it displays three arrows for movement along the** X, Y, and Z axes:**
****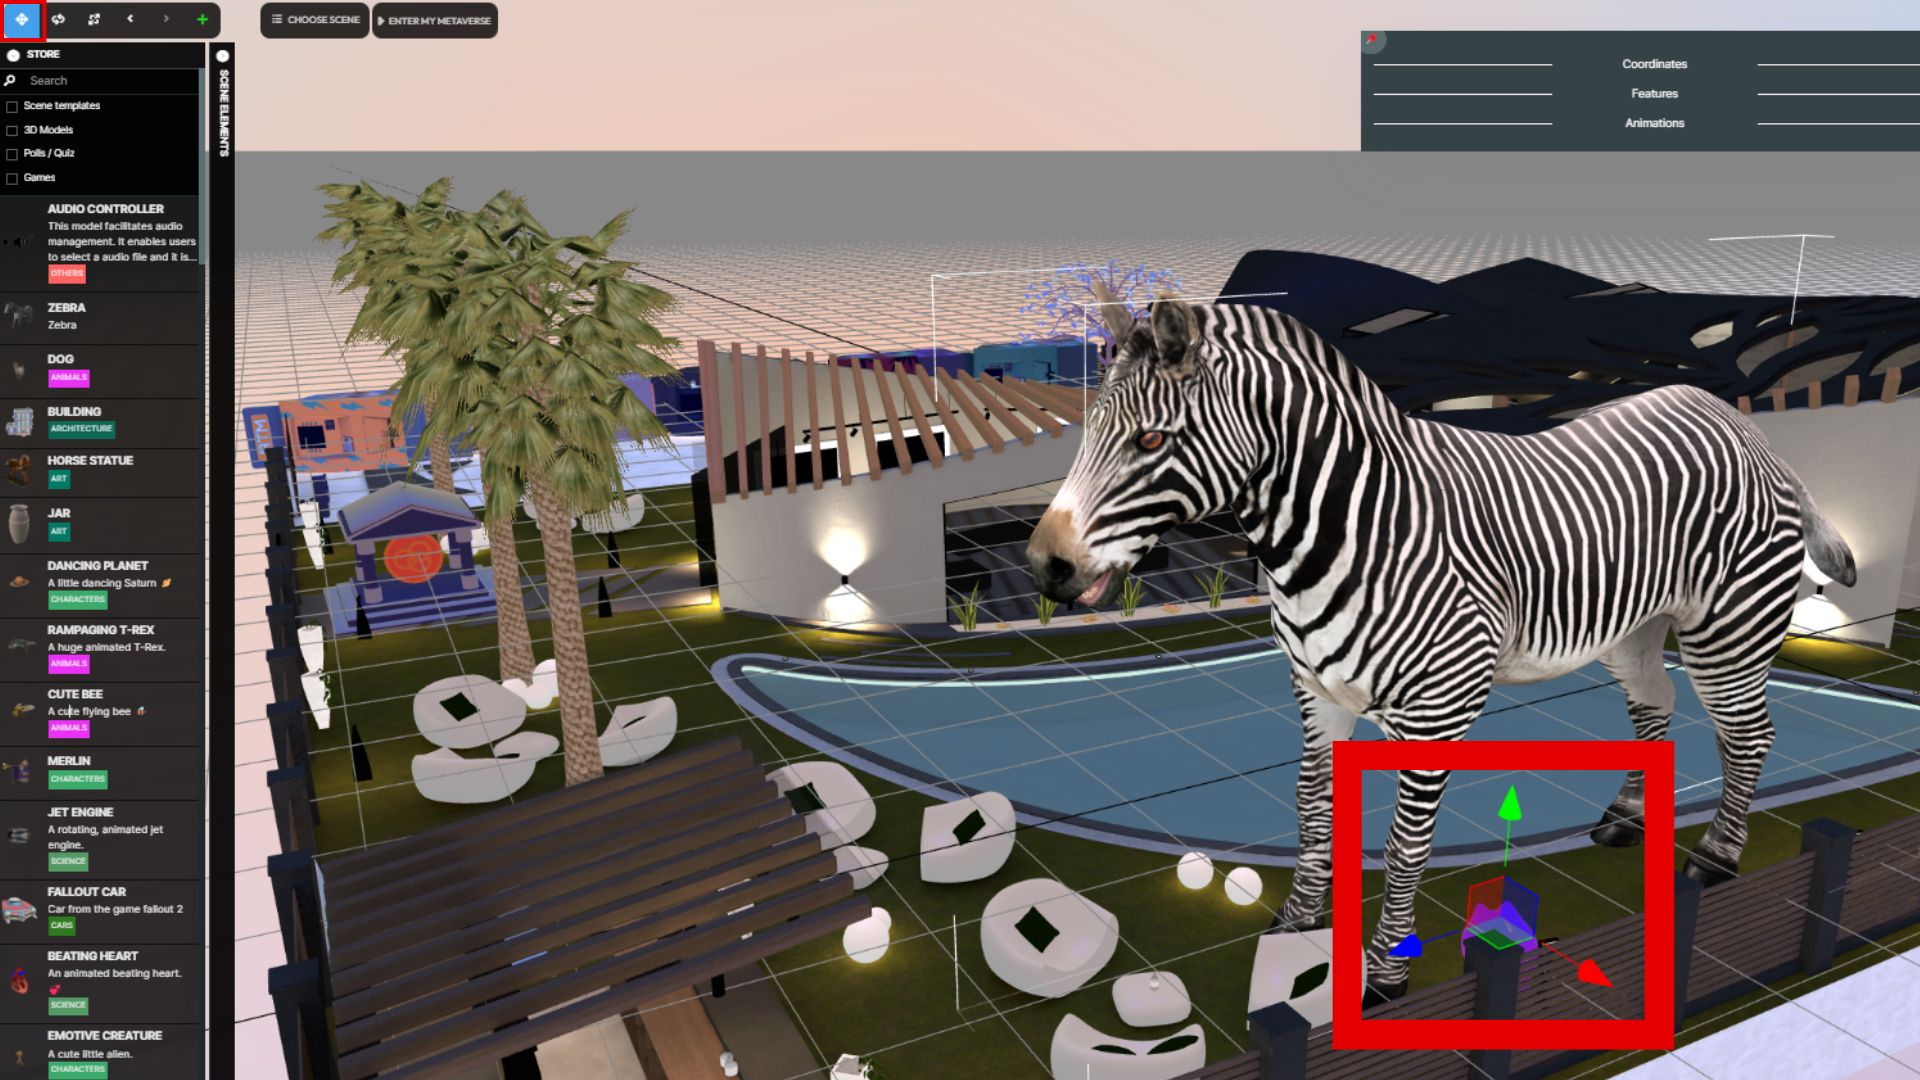
1. The X-axis red arrow repositions the element, bringing it forward or pushing it backward.
2. The Y-axis green arrow moves the element vertically, up or down.
3. The Z-axis blue arrow shifts the element horizontally, left or right.
4. By clicking at the intersection of these arrows, you can move the element in any direction.
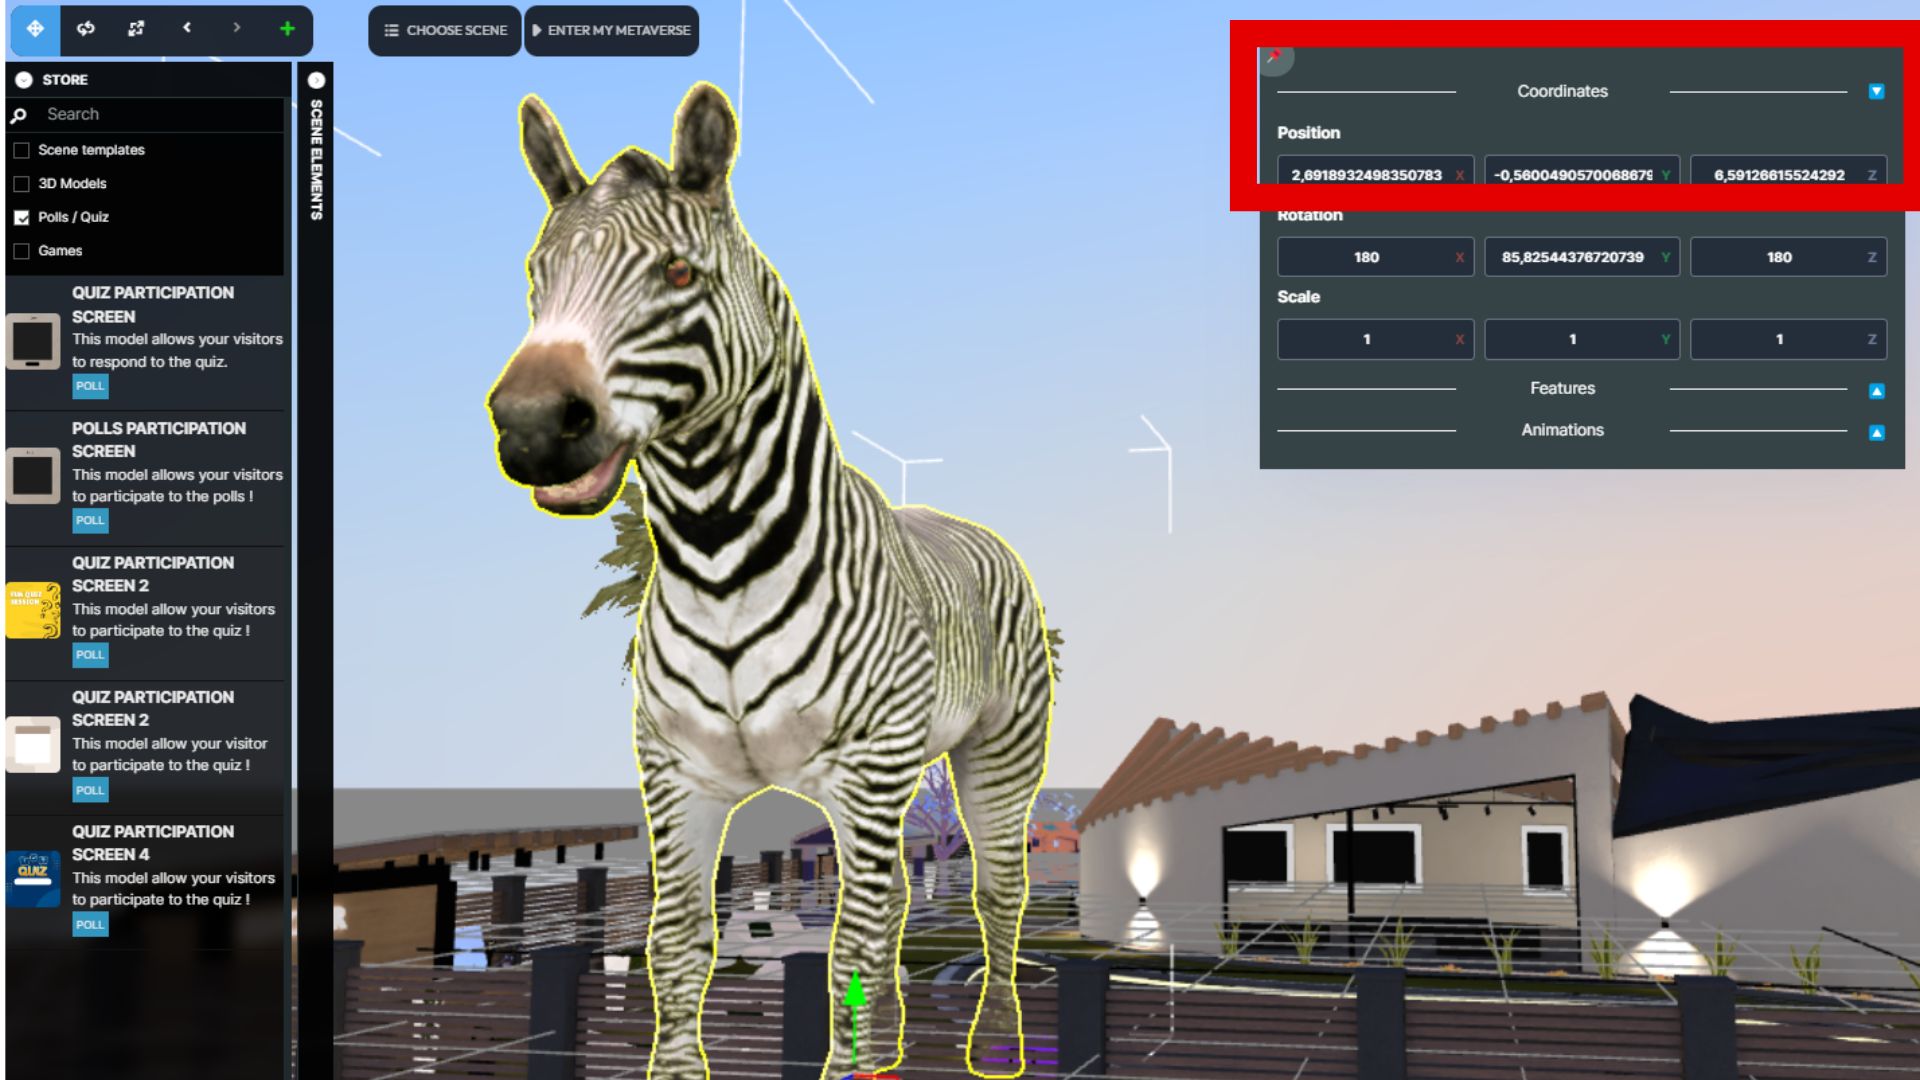
5. For more precise translation, input the desired coordinates “Position” section in the black window associated with the selected element, visible when clicked.
****
1.1.5.2 Rotate button
When you select a 3D element and click on the "Rotate" button, three circles appear to assist you in rotating your elements along the three axes of rotation around an element:
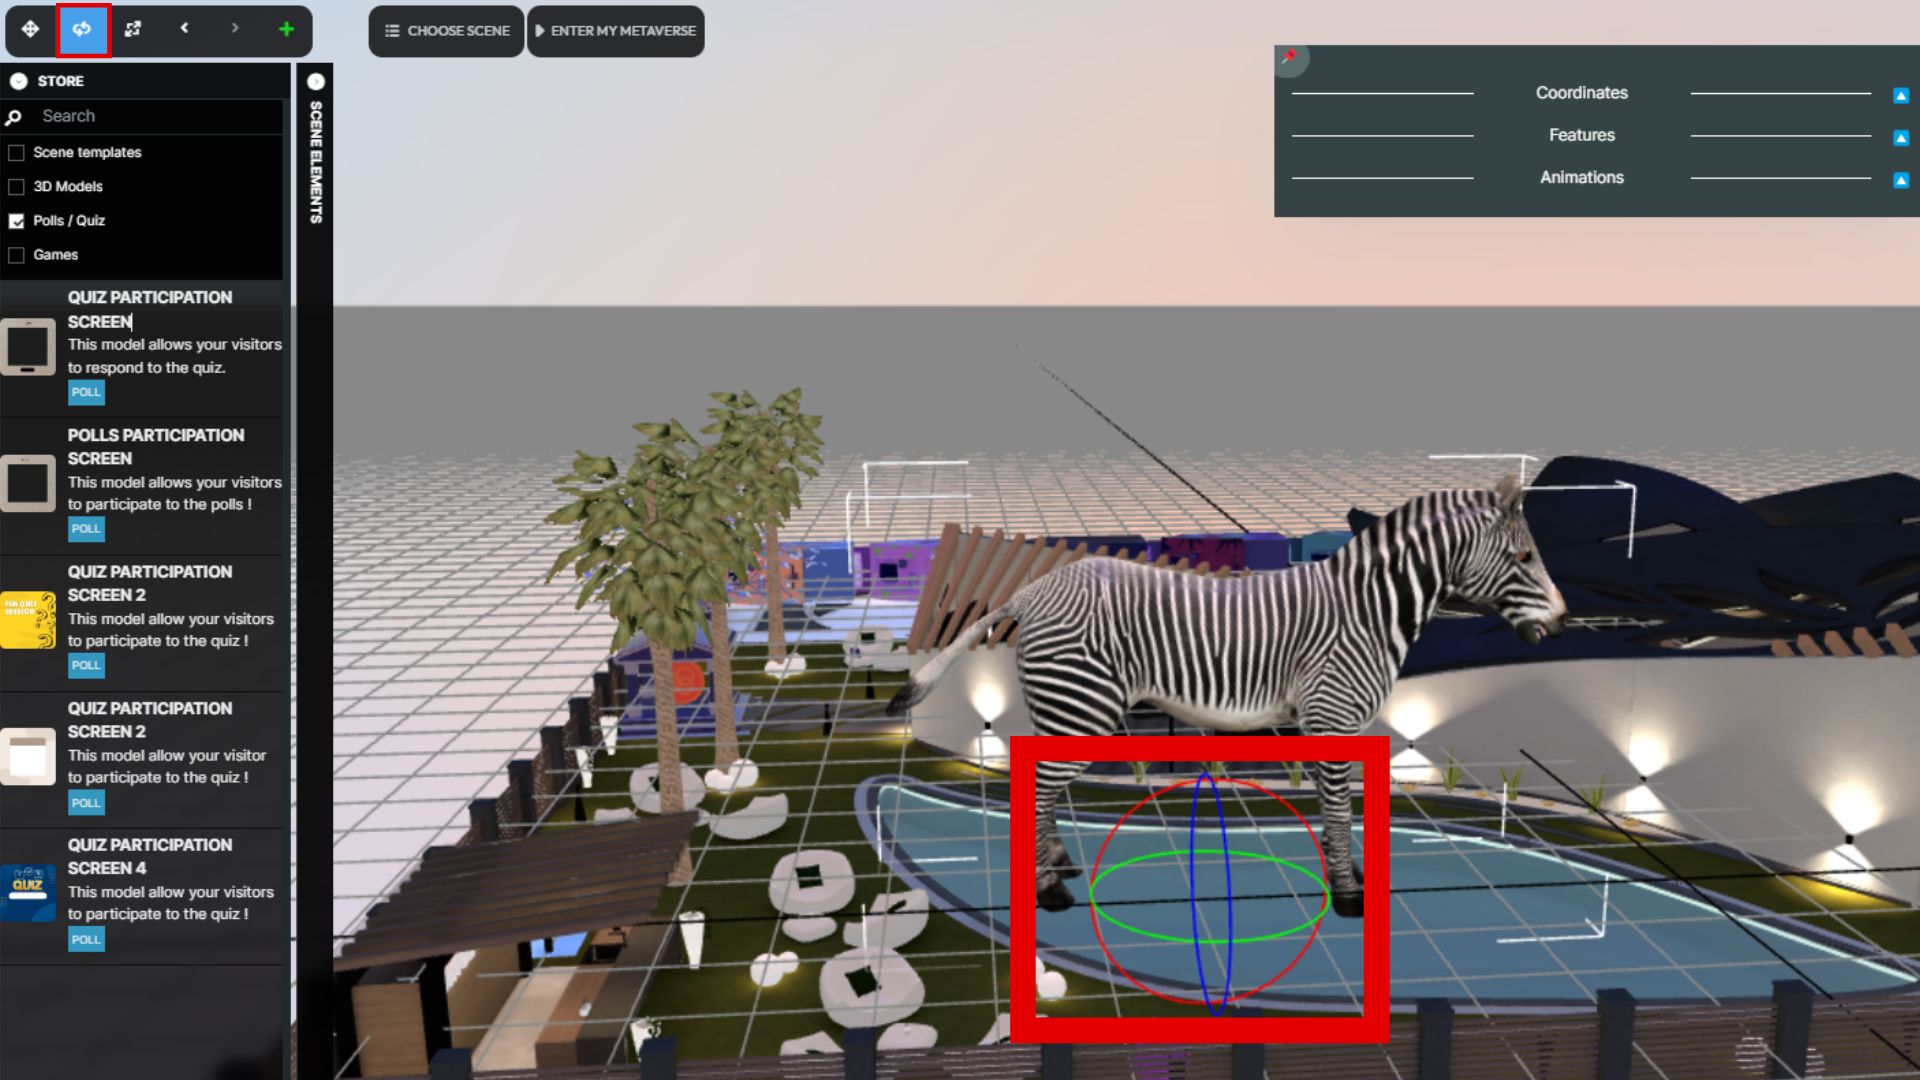
1. The X-Red Axis: Rotates around the horizontal axis, from left to right or vice versa.
2. The Y-Green Axis: Rotates around the vertical axis, upward or downward.
3. The Z-Blue Axis: Rotates around the axis perpendicular to the surface of the screen, clockwise or counterclockwise.
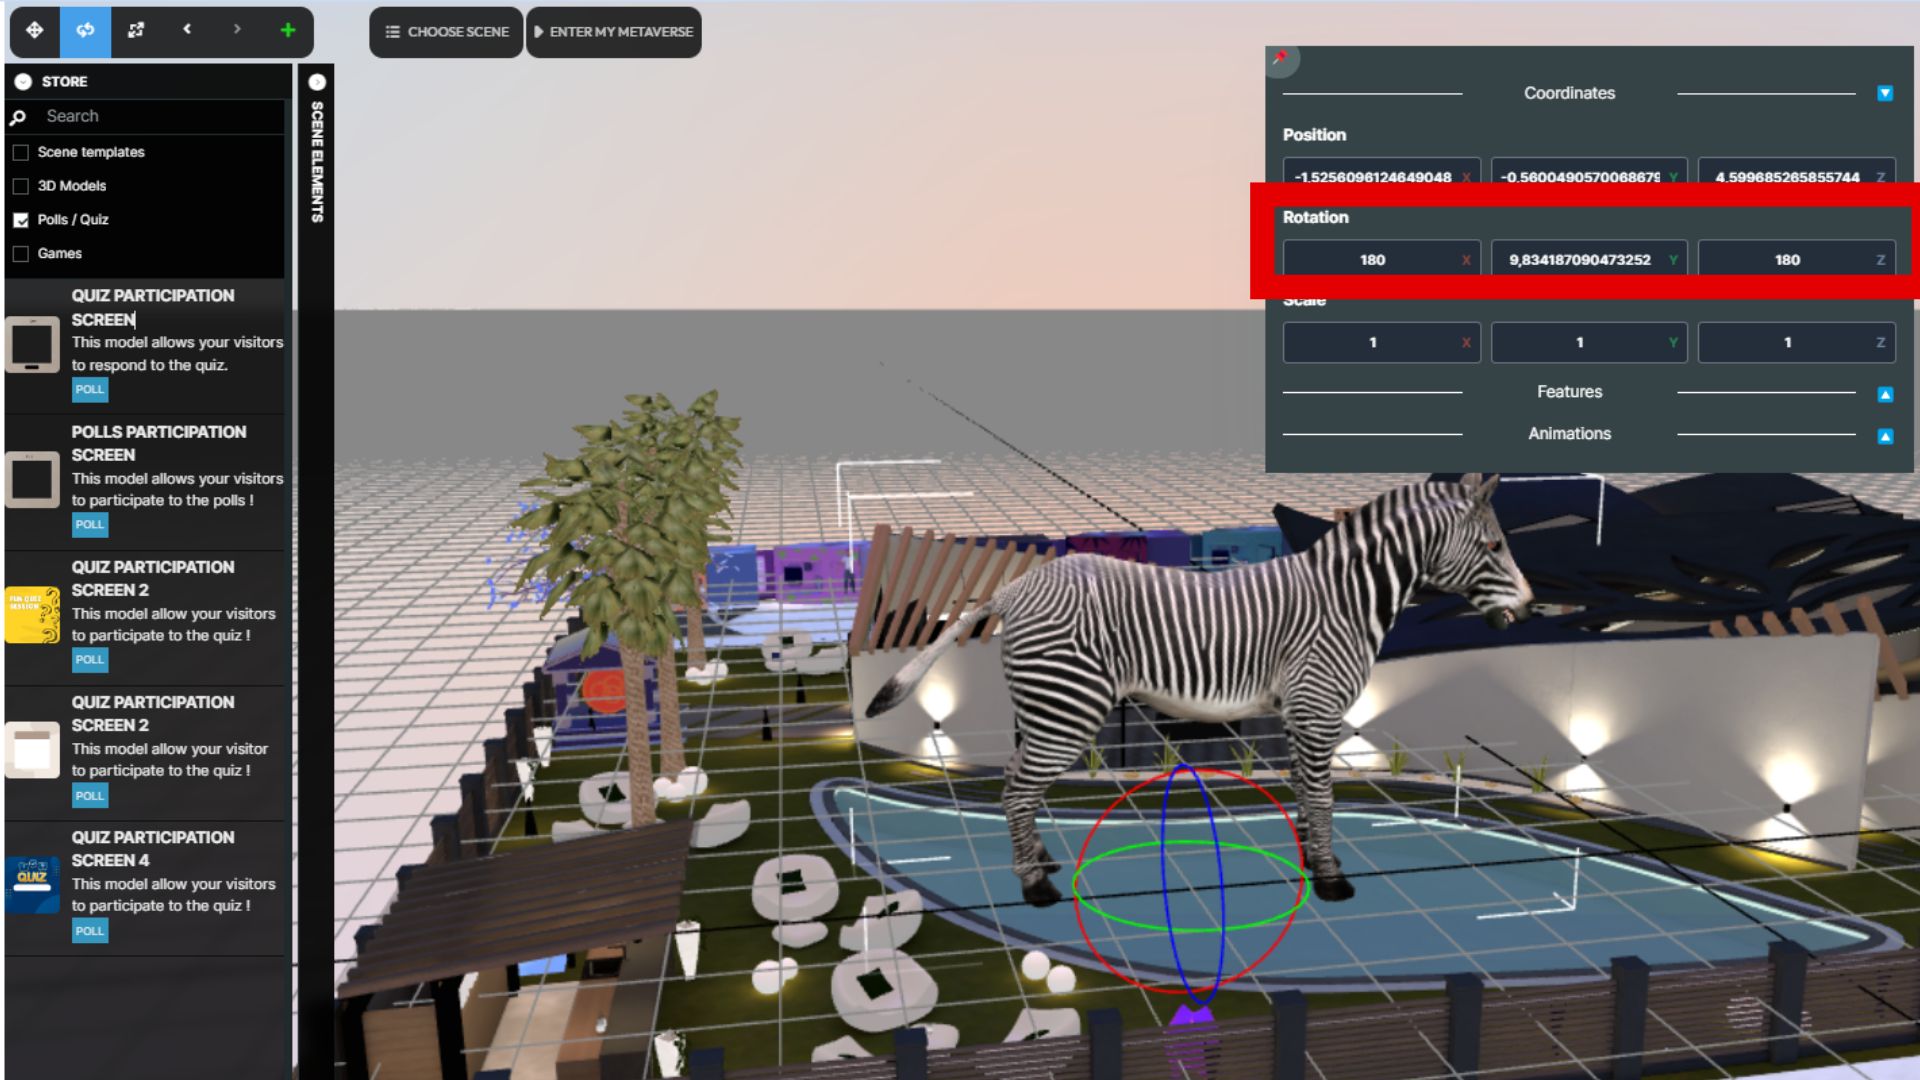
4. For more precise rotation, you can input the desired coordinates in the "Rotation" section of the black window associated with the selected element, visible when clicked.
****
1.1.5.3 Scale button
When you select a 3D element and click on the “Scale” button, it displays three axes ending with cubes, allowing you to resize the element along the X, Y, and Z axes:
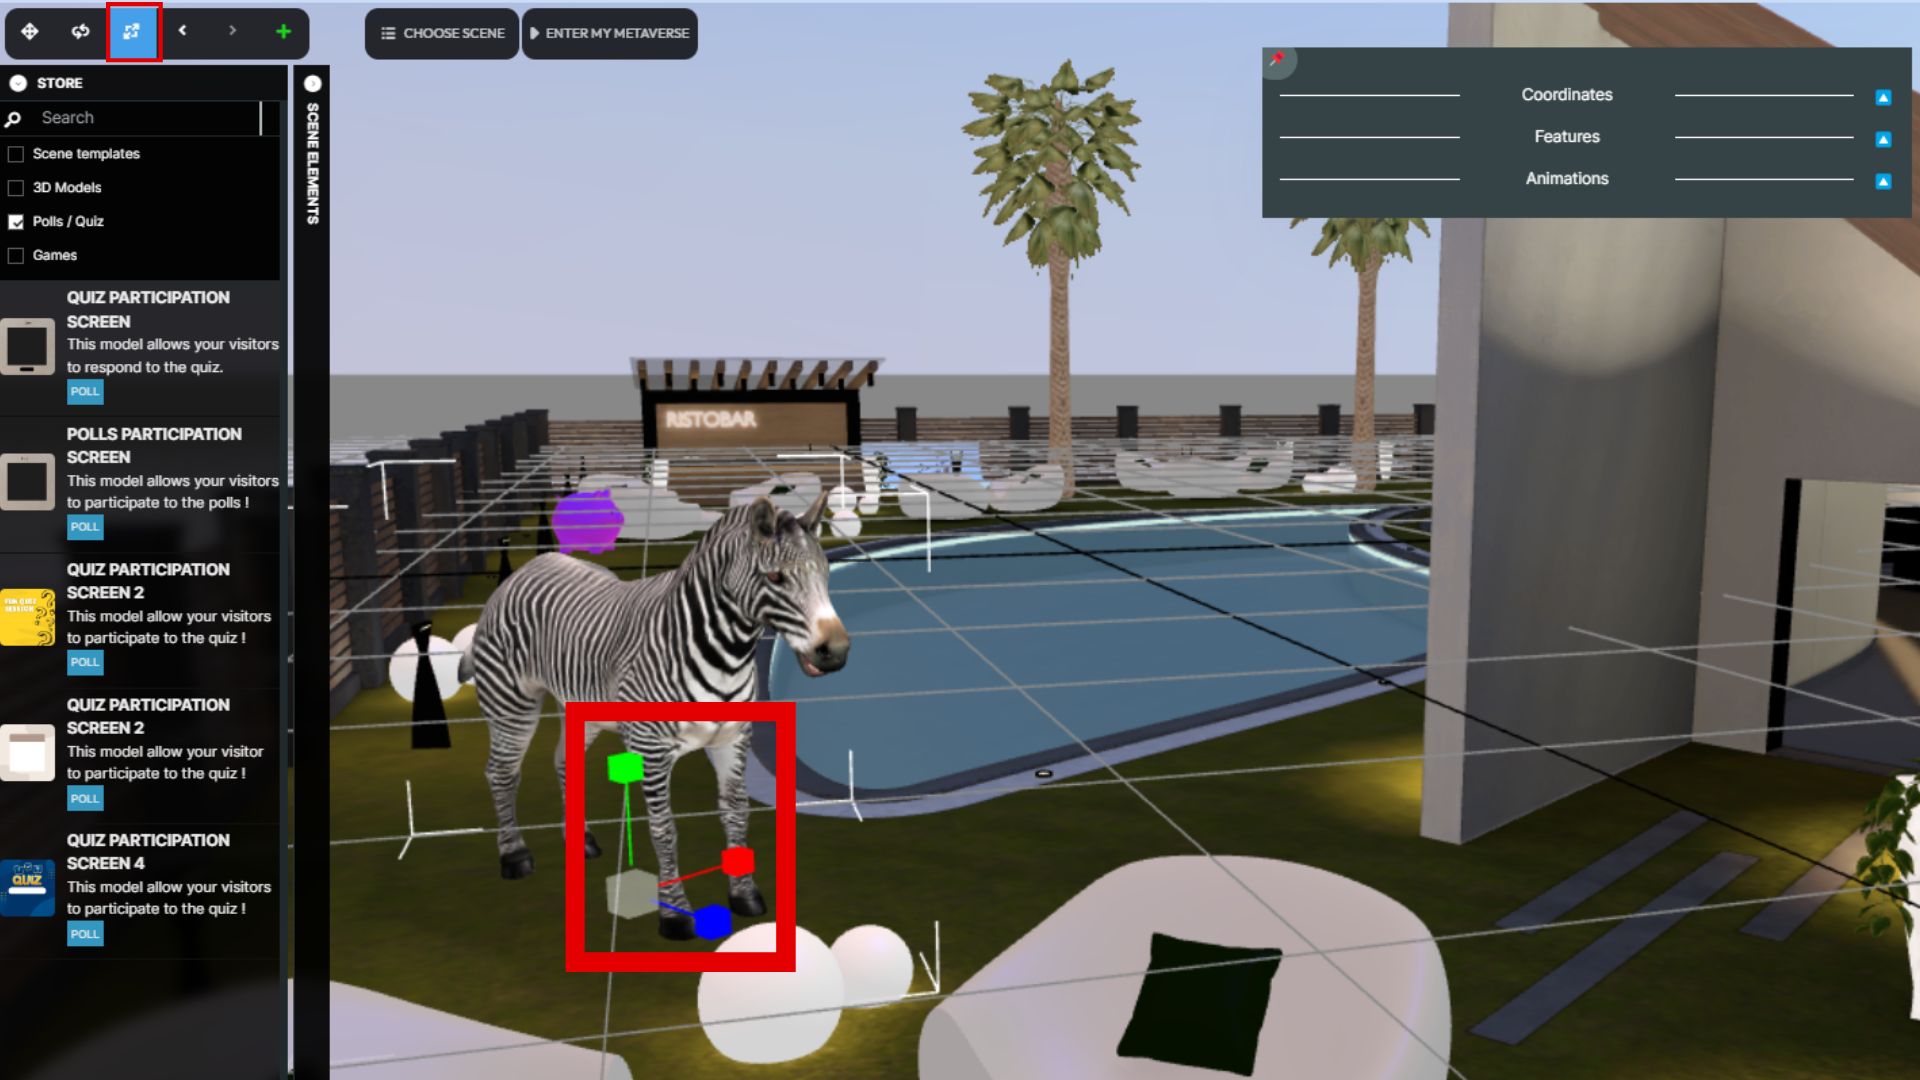
1. X-axis (red cube): Increases or decreases the size of the object horizontally, from left to right or vice versa.
2. Y-axis (green cube): Increases or decreases the size of the object vertically, upward or downward.
3. Z-axis (blue cube): Increases or decreases the size of the object in depth, forward or backward.
4. Clicking at the intersection of these axes enables proportional resizing in all directions.
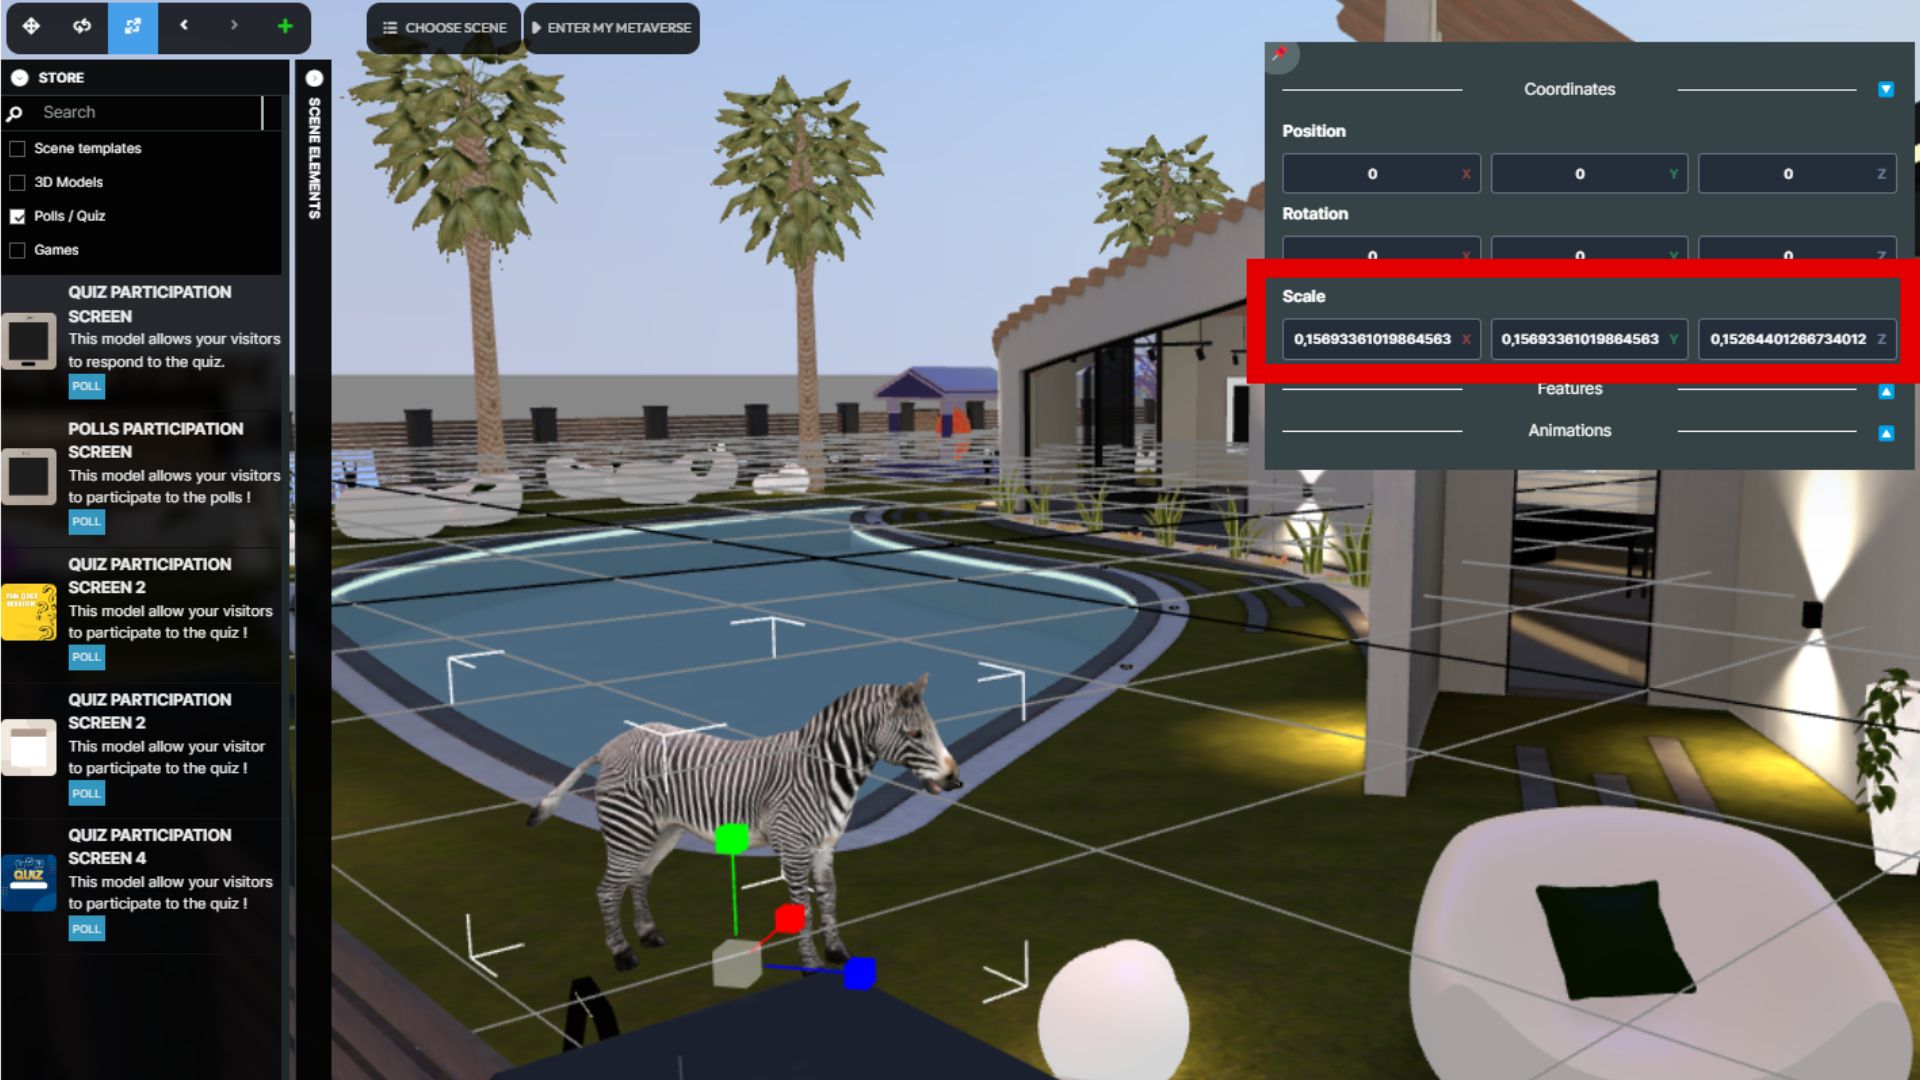
5. For precise size adjustments, input the desired coordinates in the “Scale” section of the black window associated with the selected element, visible when clicked.
****
1.1.5.4 Undo buttons
You have two undo buttons "Redo" and "Undo"
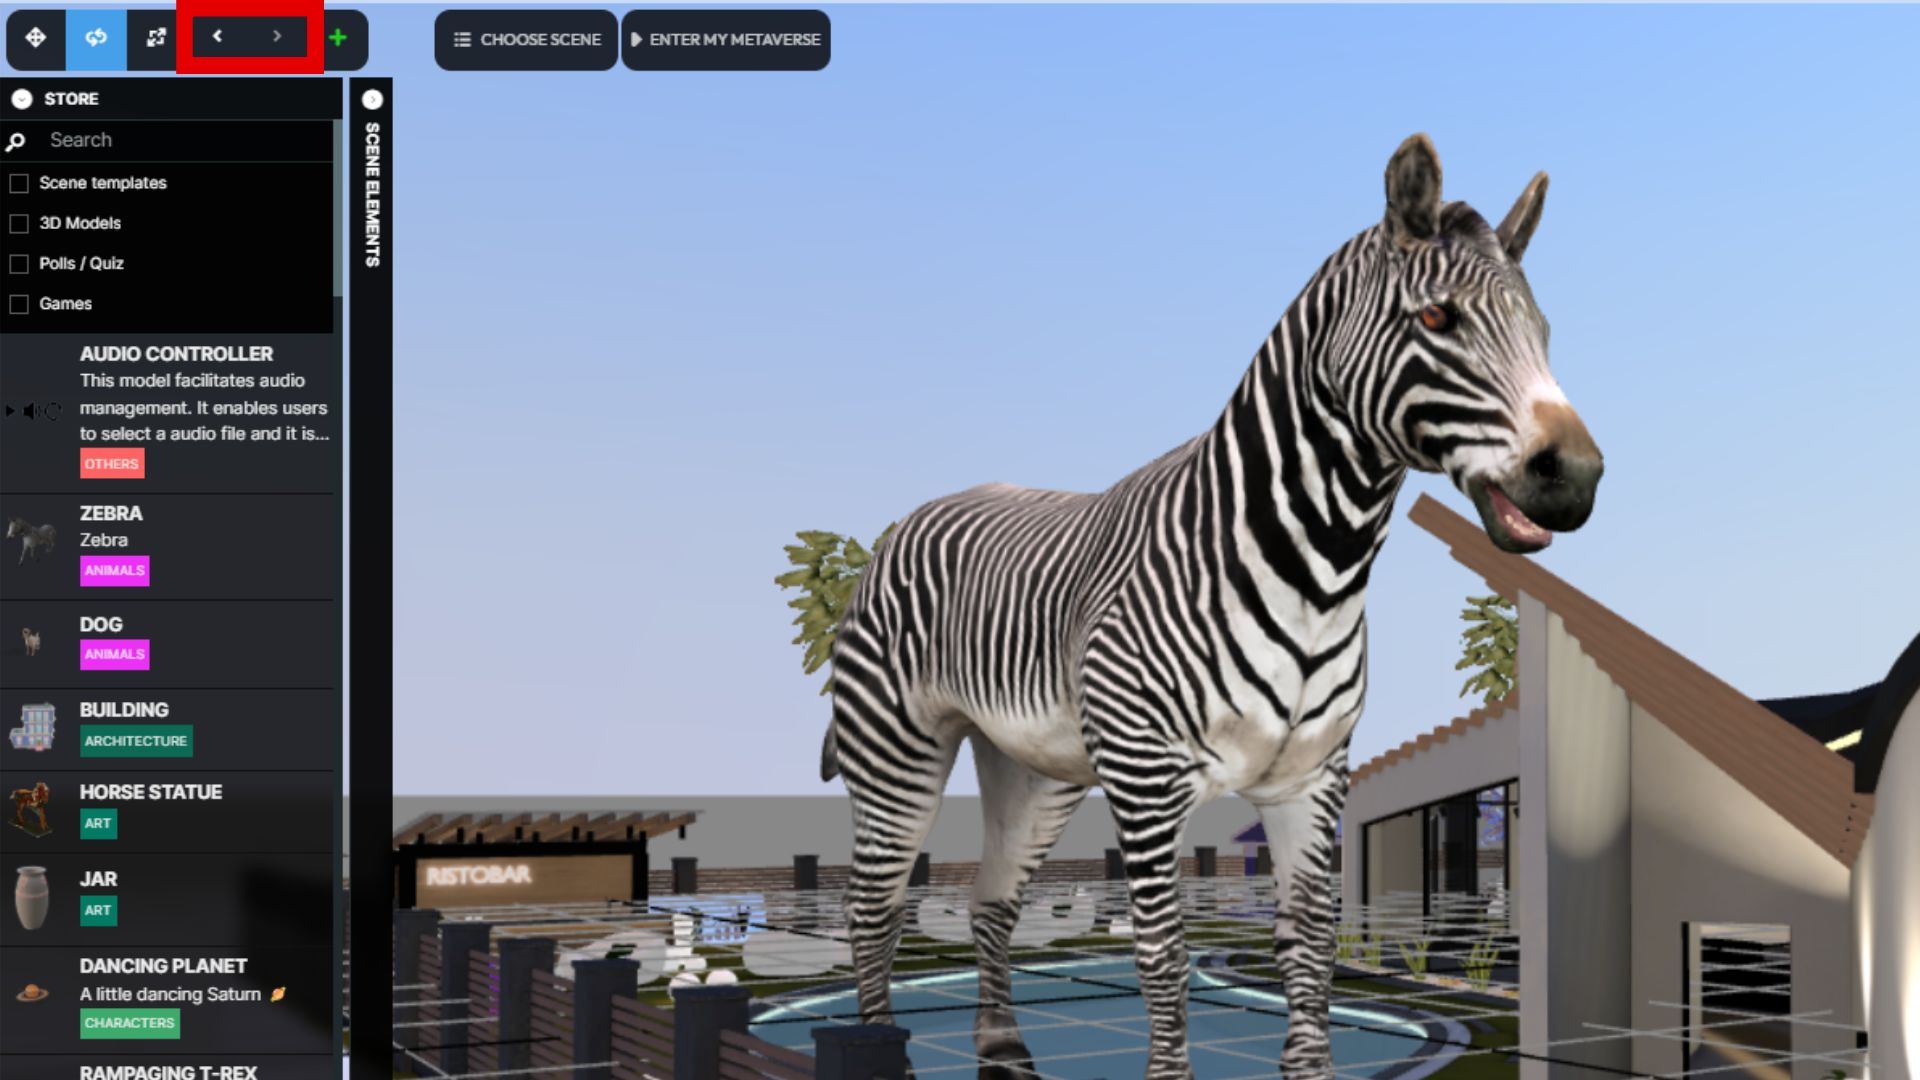
1.1.5.5 « + » Menu
1.1.5.5.1 Add 2D Element
1. To add a panel for an image or poster:
a. Navigate to the "+" icon, then select "2D Elements", and finally choose "Panel".
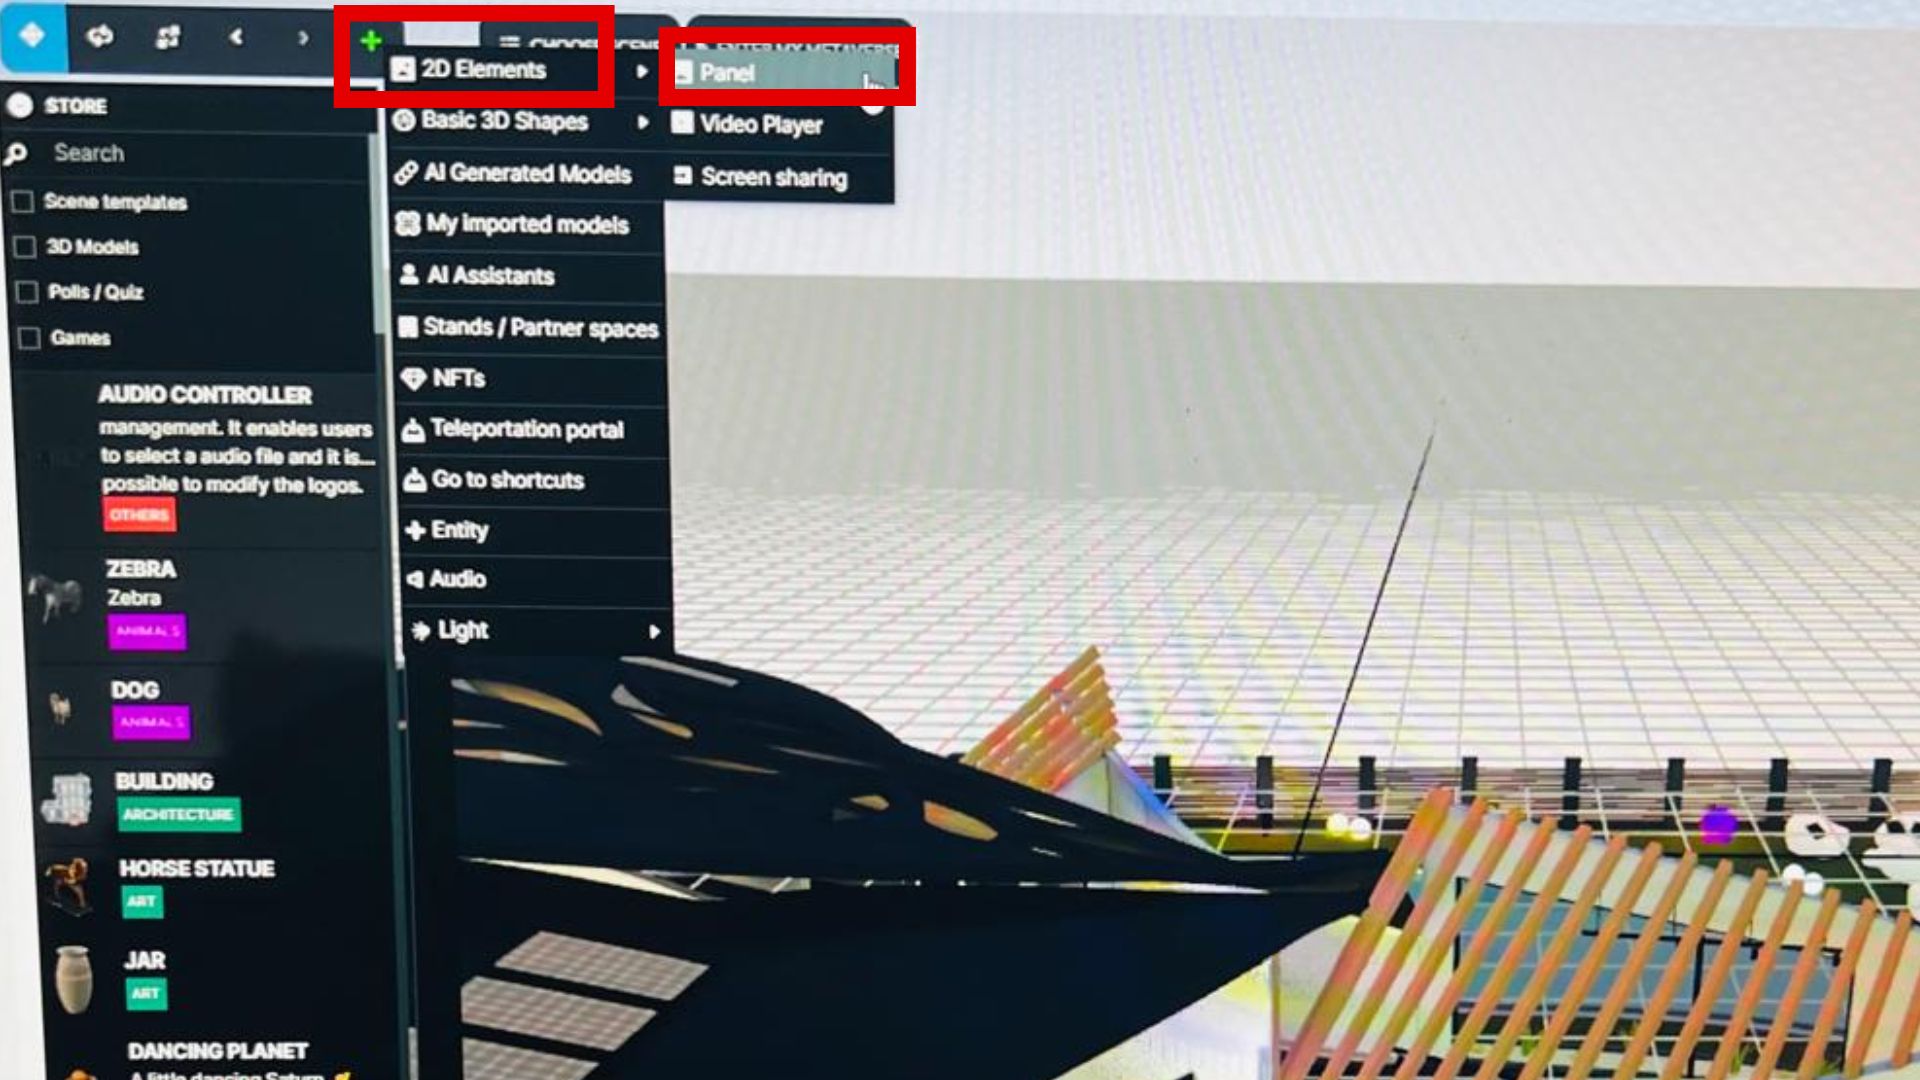
b. Click on "Photo" to add the panel.
-9fc6e0a9d3b53b4cc1b35ebb2fbd0969.jpg)
c. Click outside the screen and then click again on the screen to reveal the element black window related to the newly created panel.
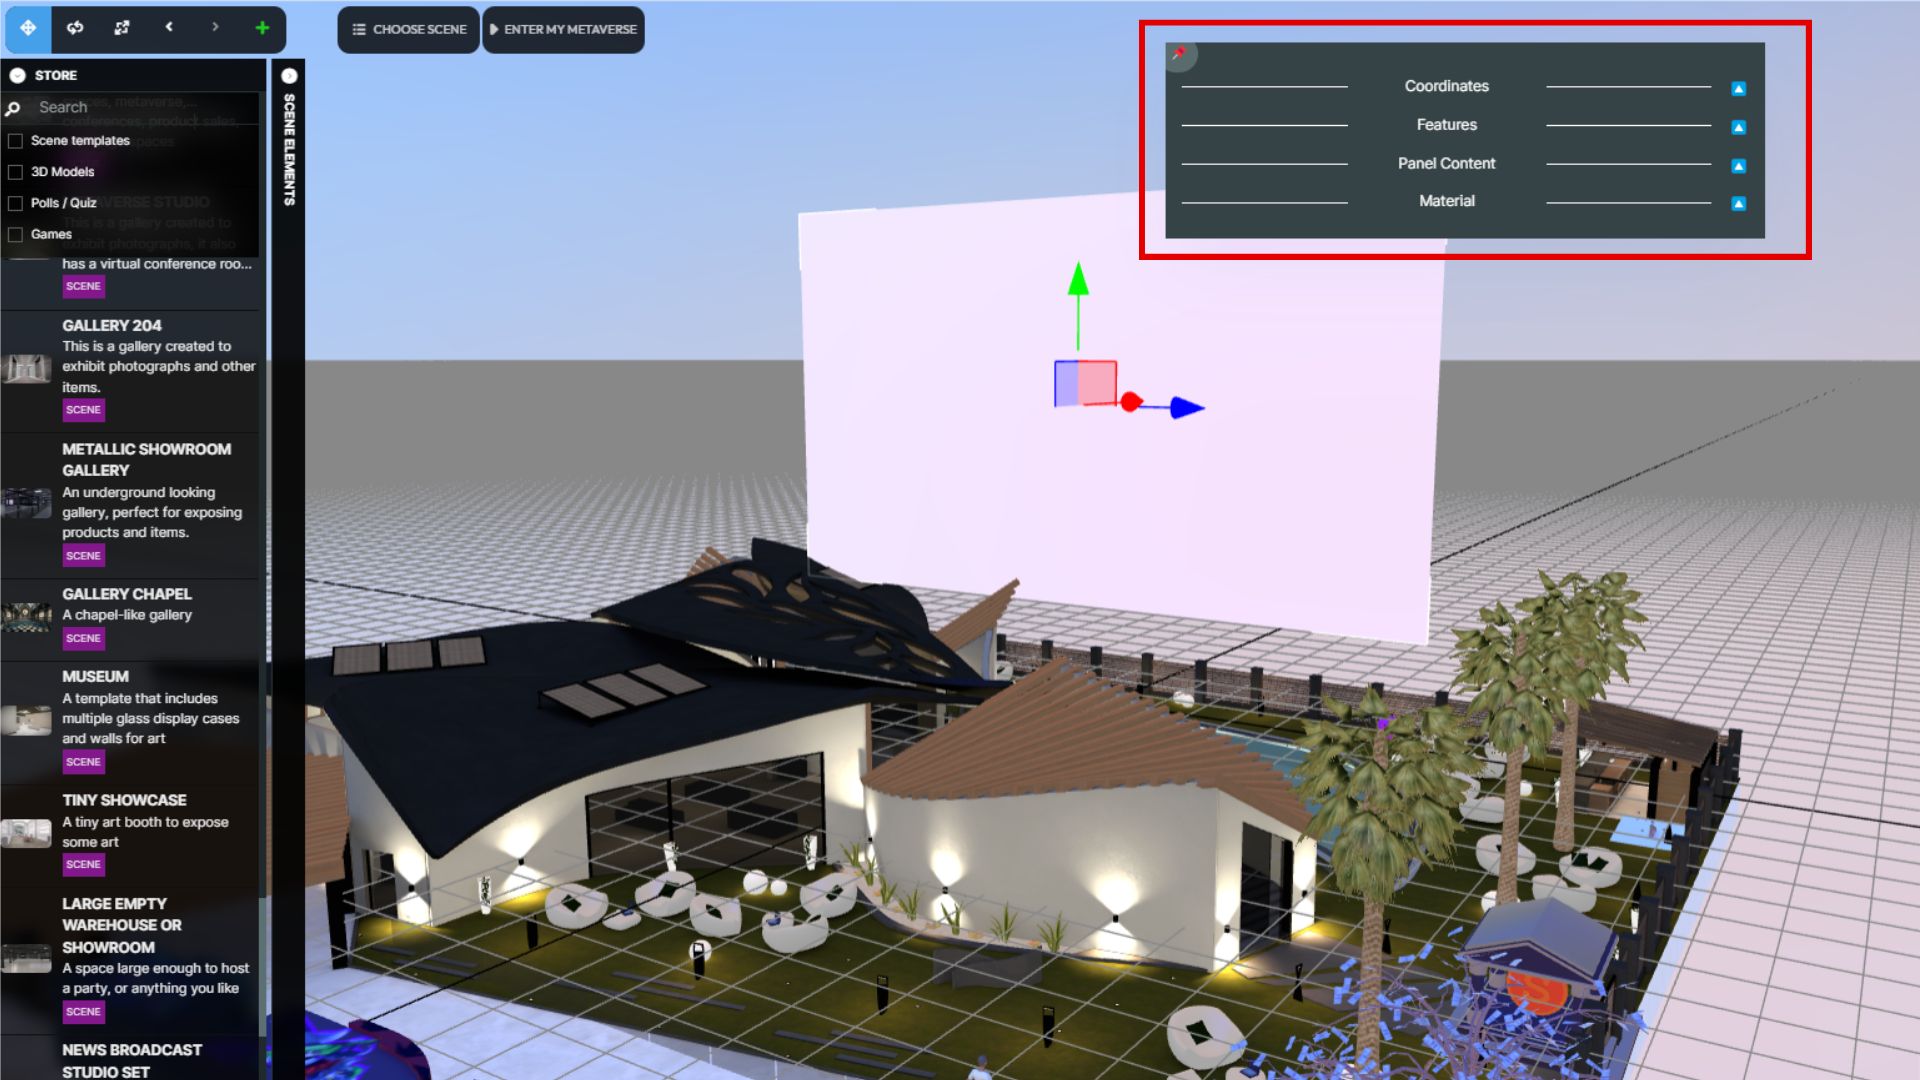
d. Open the panel content block to upload your picture or photo.
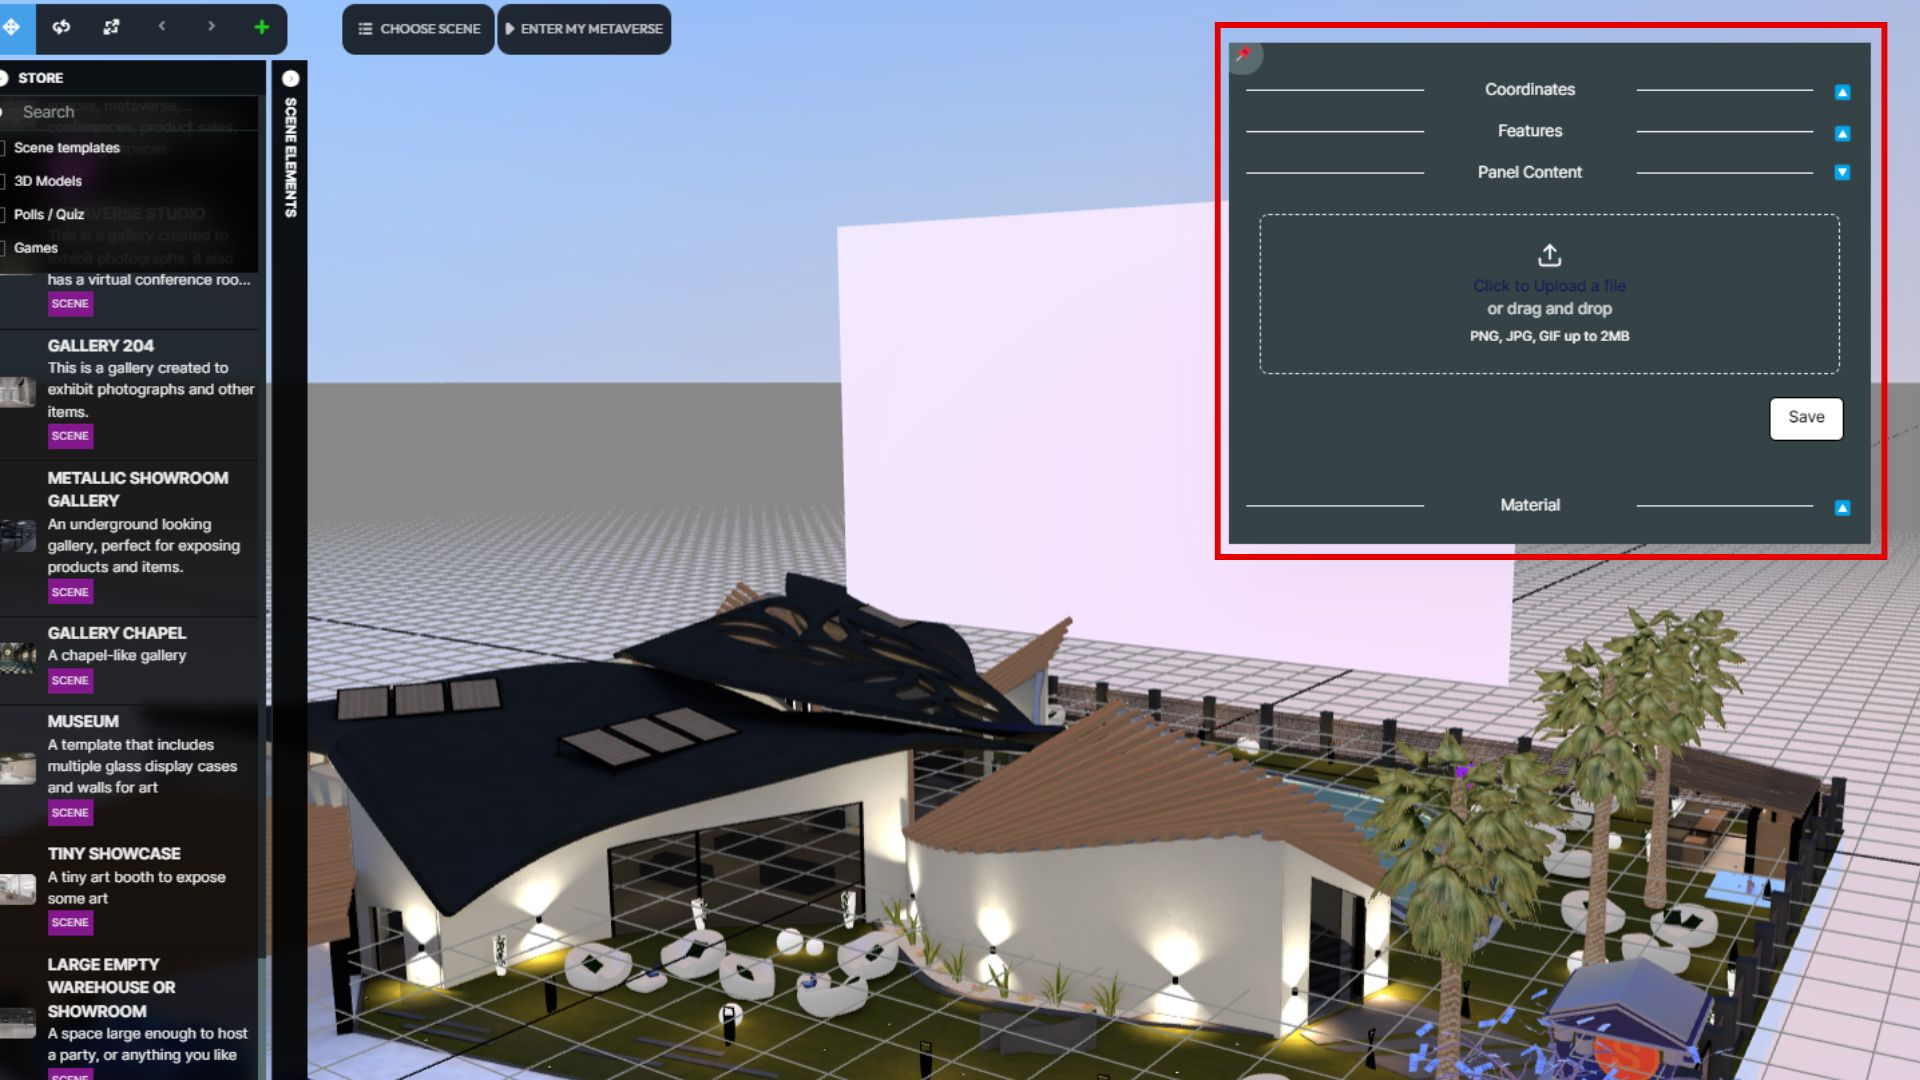
e. Upload an image in PNG, JPEG, or GIF format, with a maximum size of 2MB. b. Once uploaded, a preview of your panel will appear.
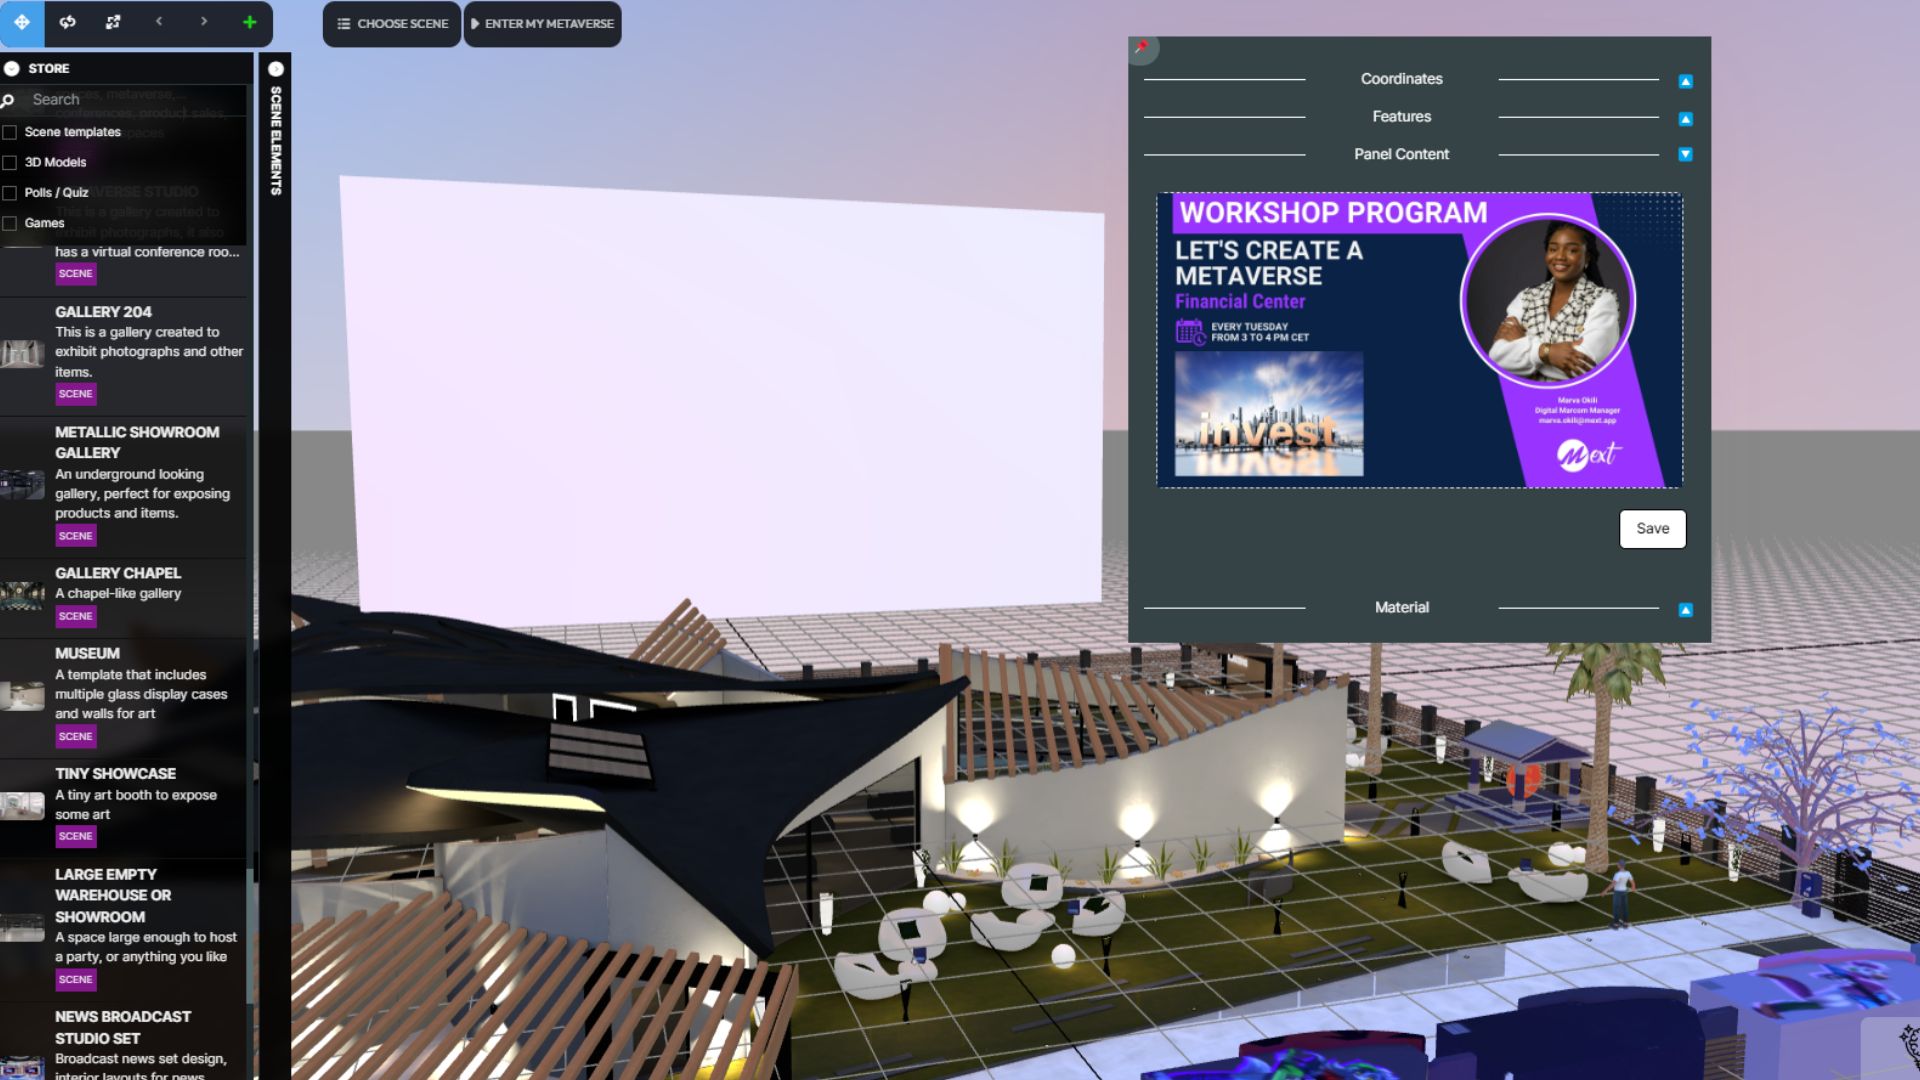
f. Click "Validate" to confirm and add the image to your panel.
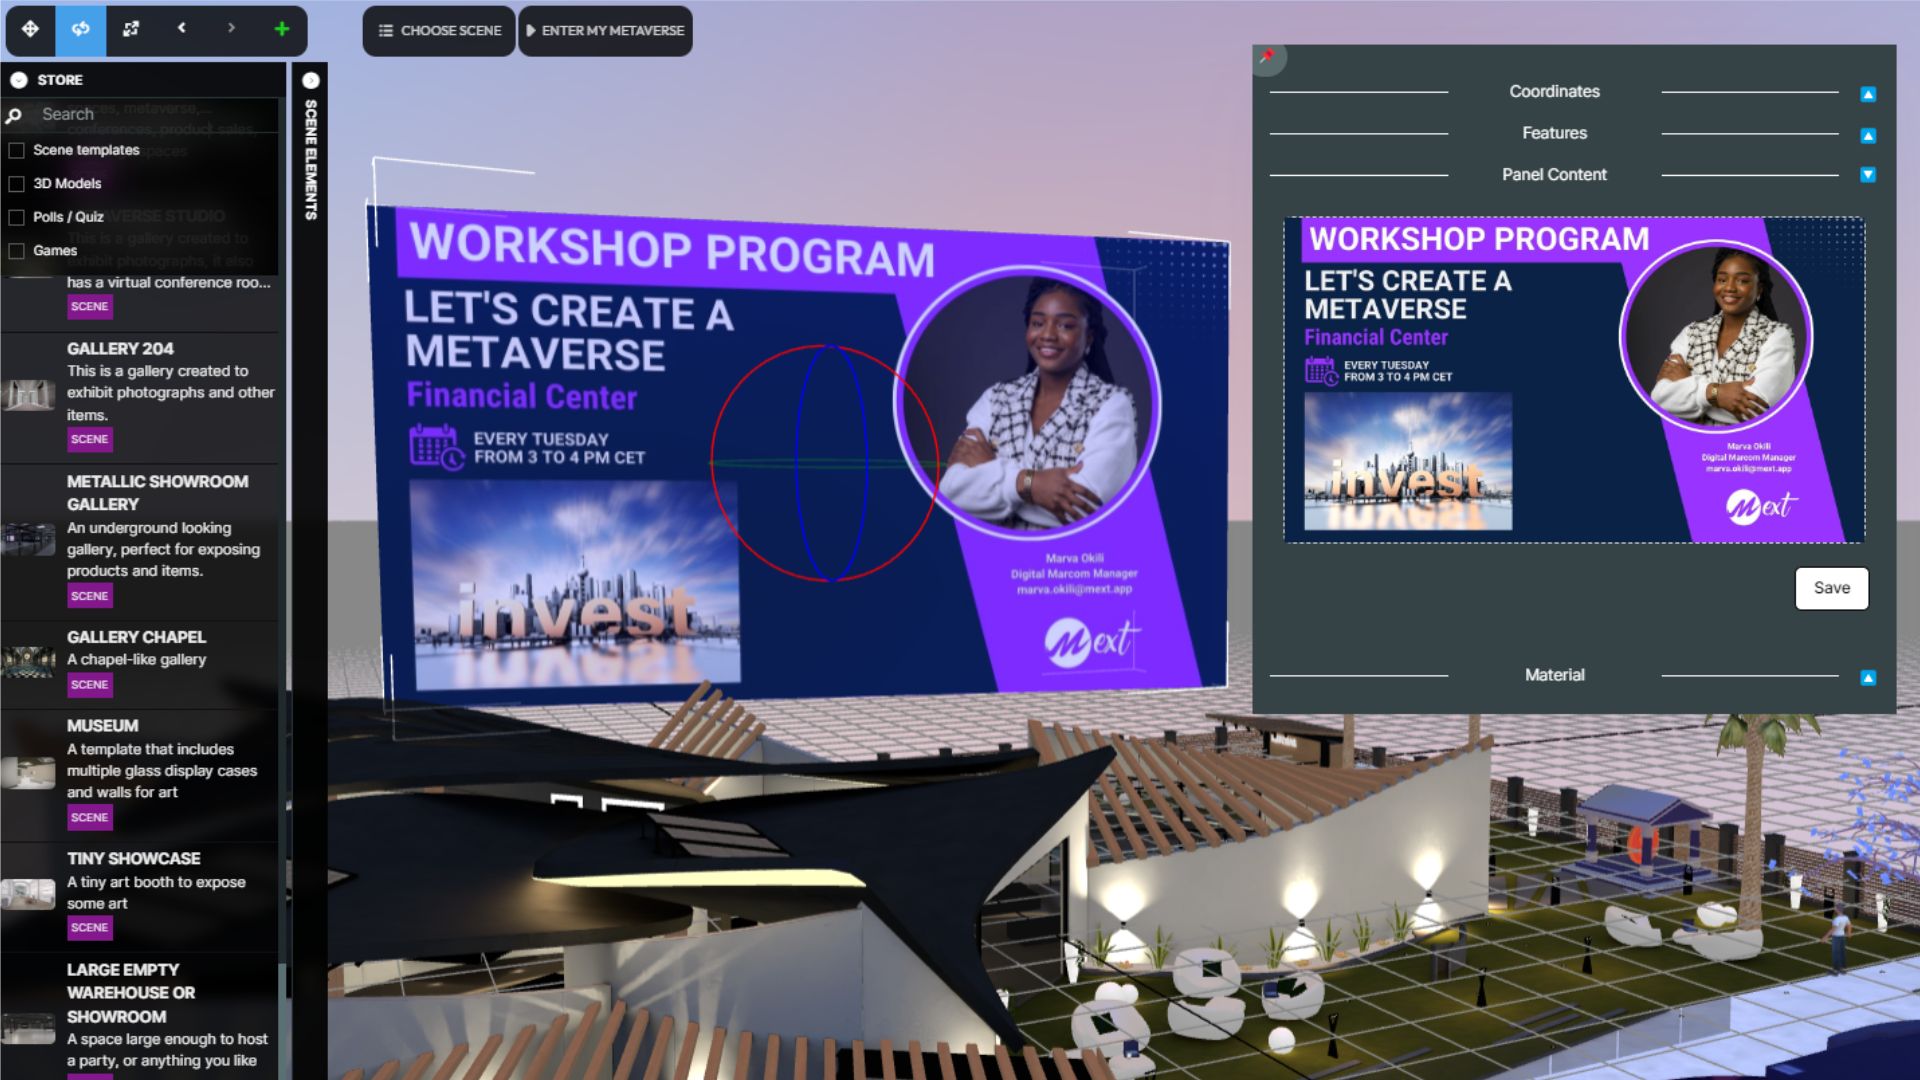
g. Use the "Element Management" menu at the top left of the Metabuilder screen to scale, rotate, and move your panel to the desired position.
2. To add a video player
a. Navigate to the "+" icon, then select "2D Elements", and finally choose "video player".
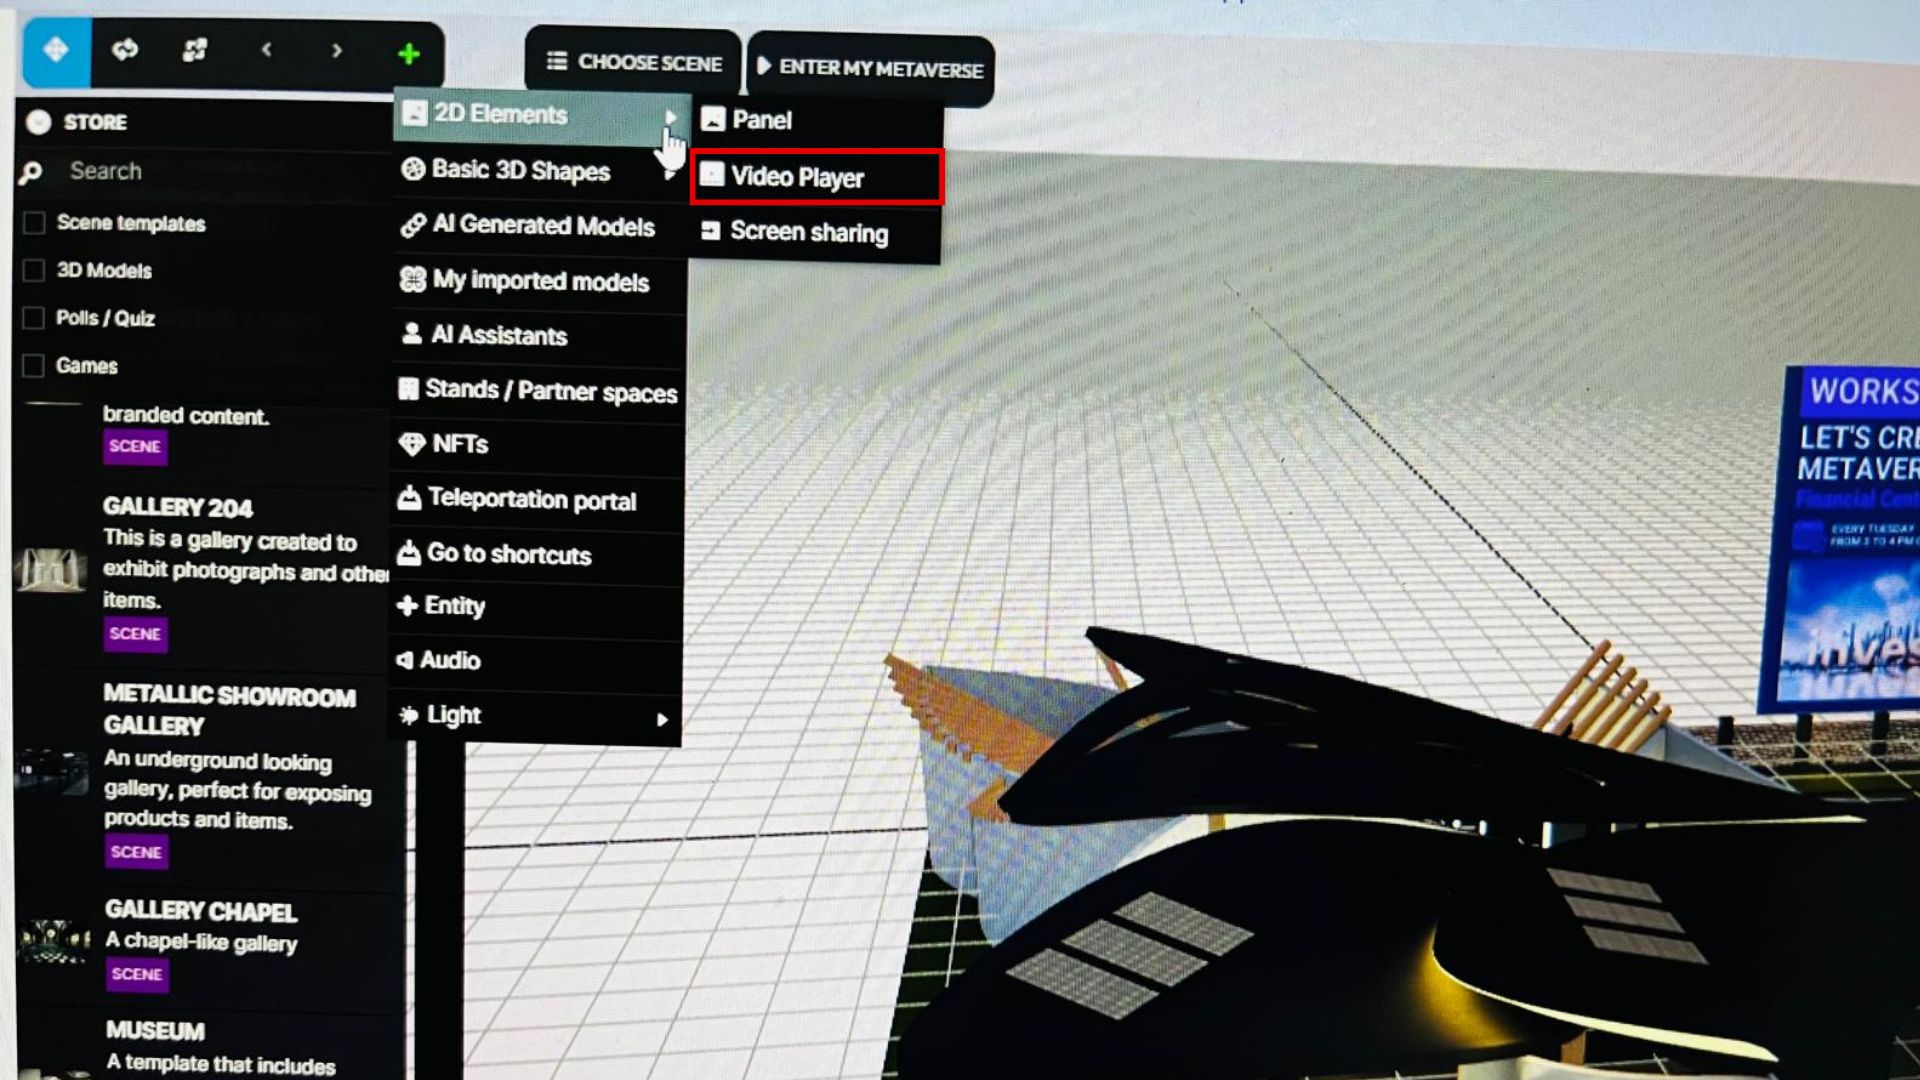
b. Click on "Video Player" to add one.
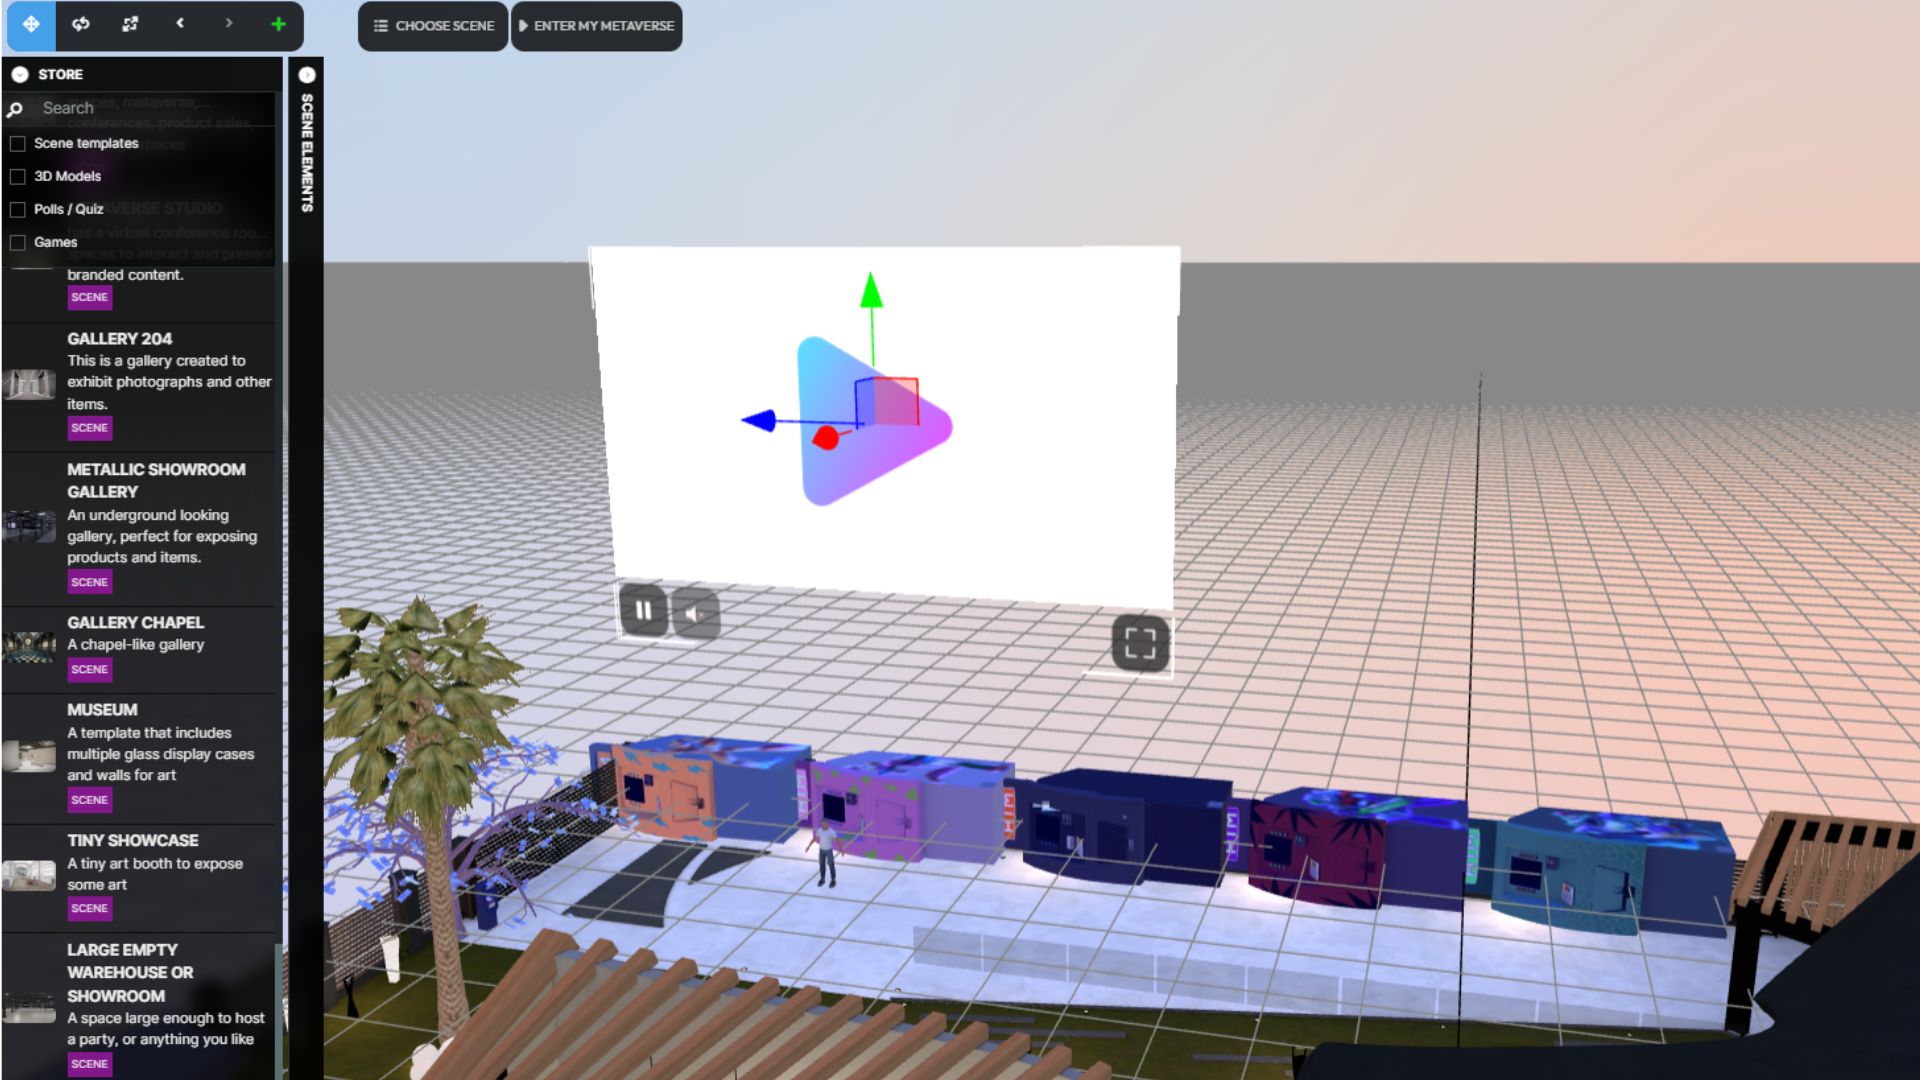 c. Click on the video panel screen and then to reveal the black window of the element related to the newly created video player.
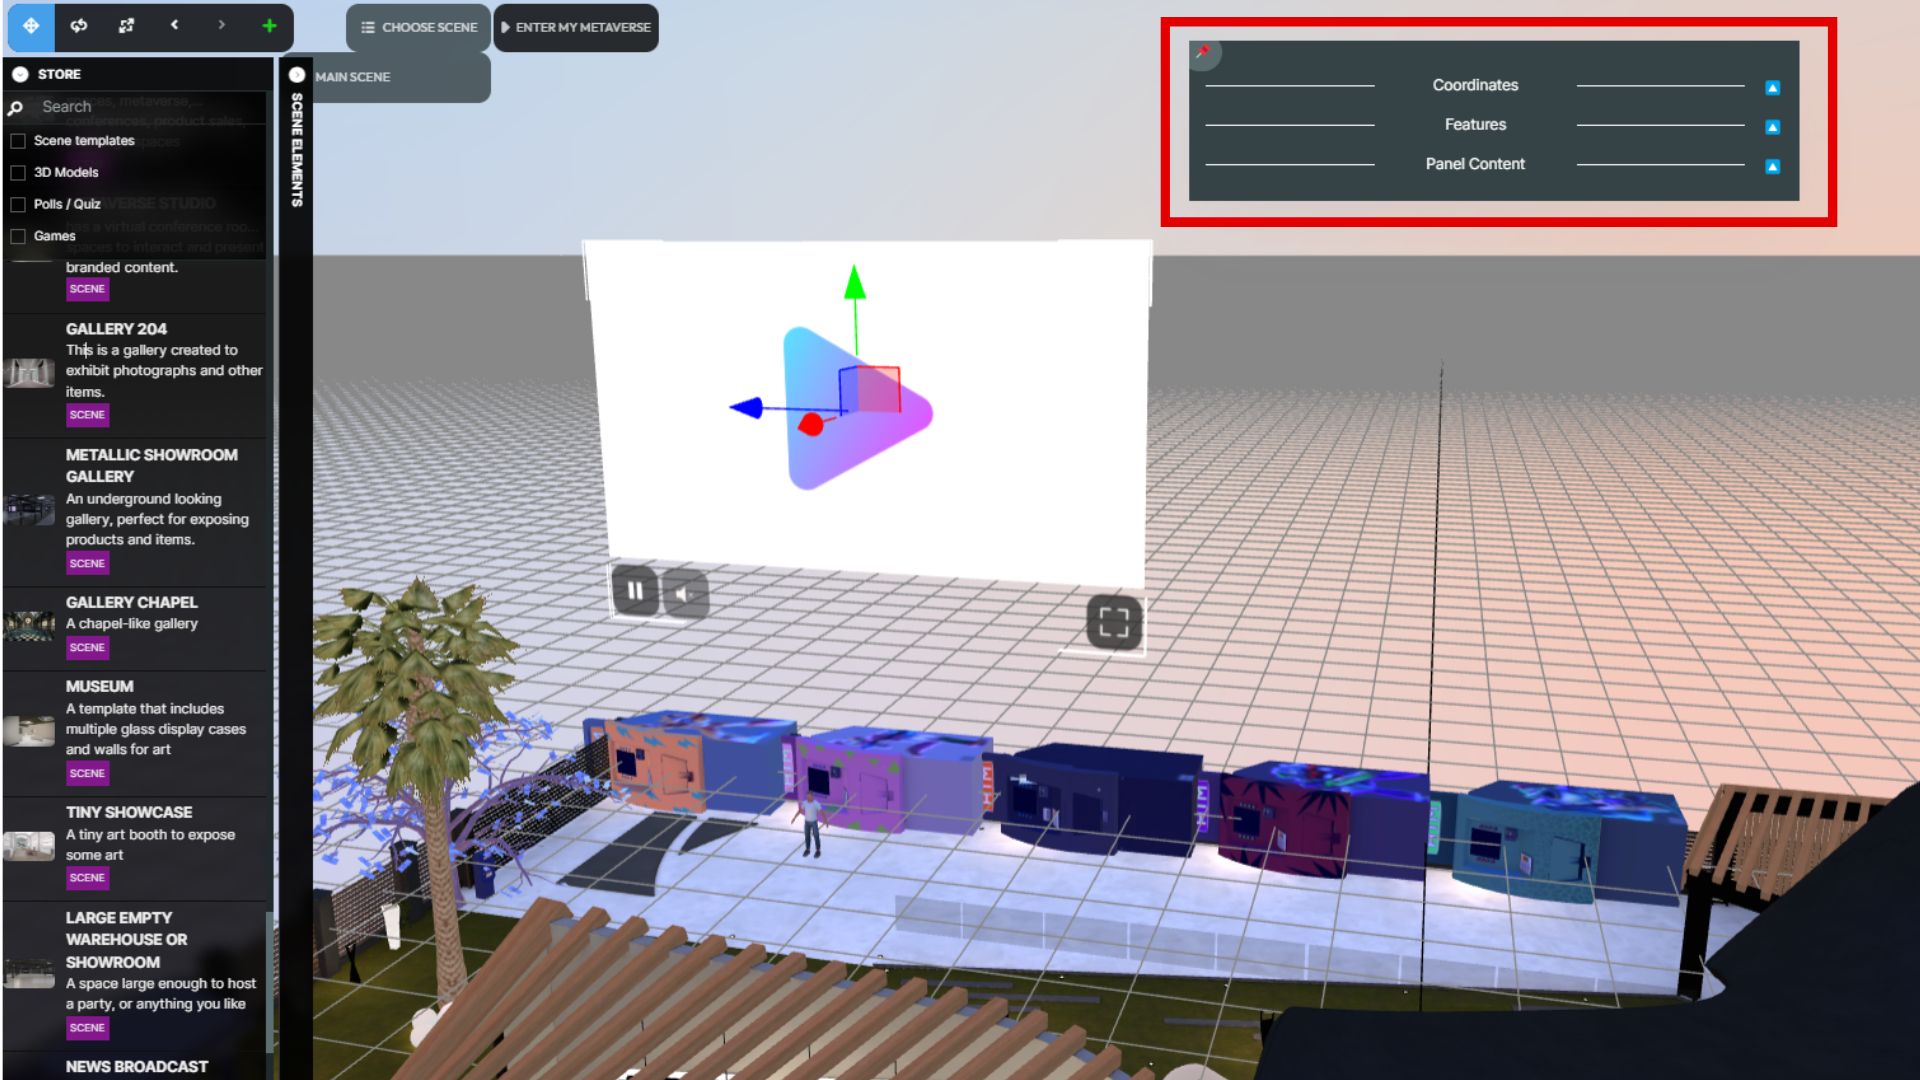
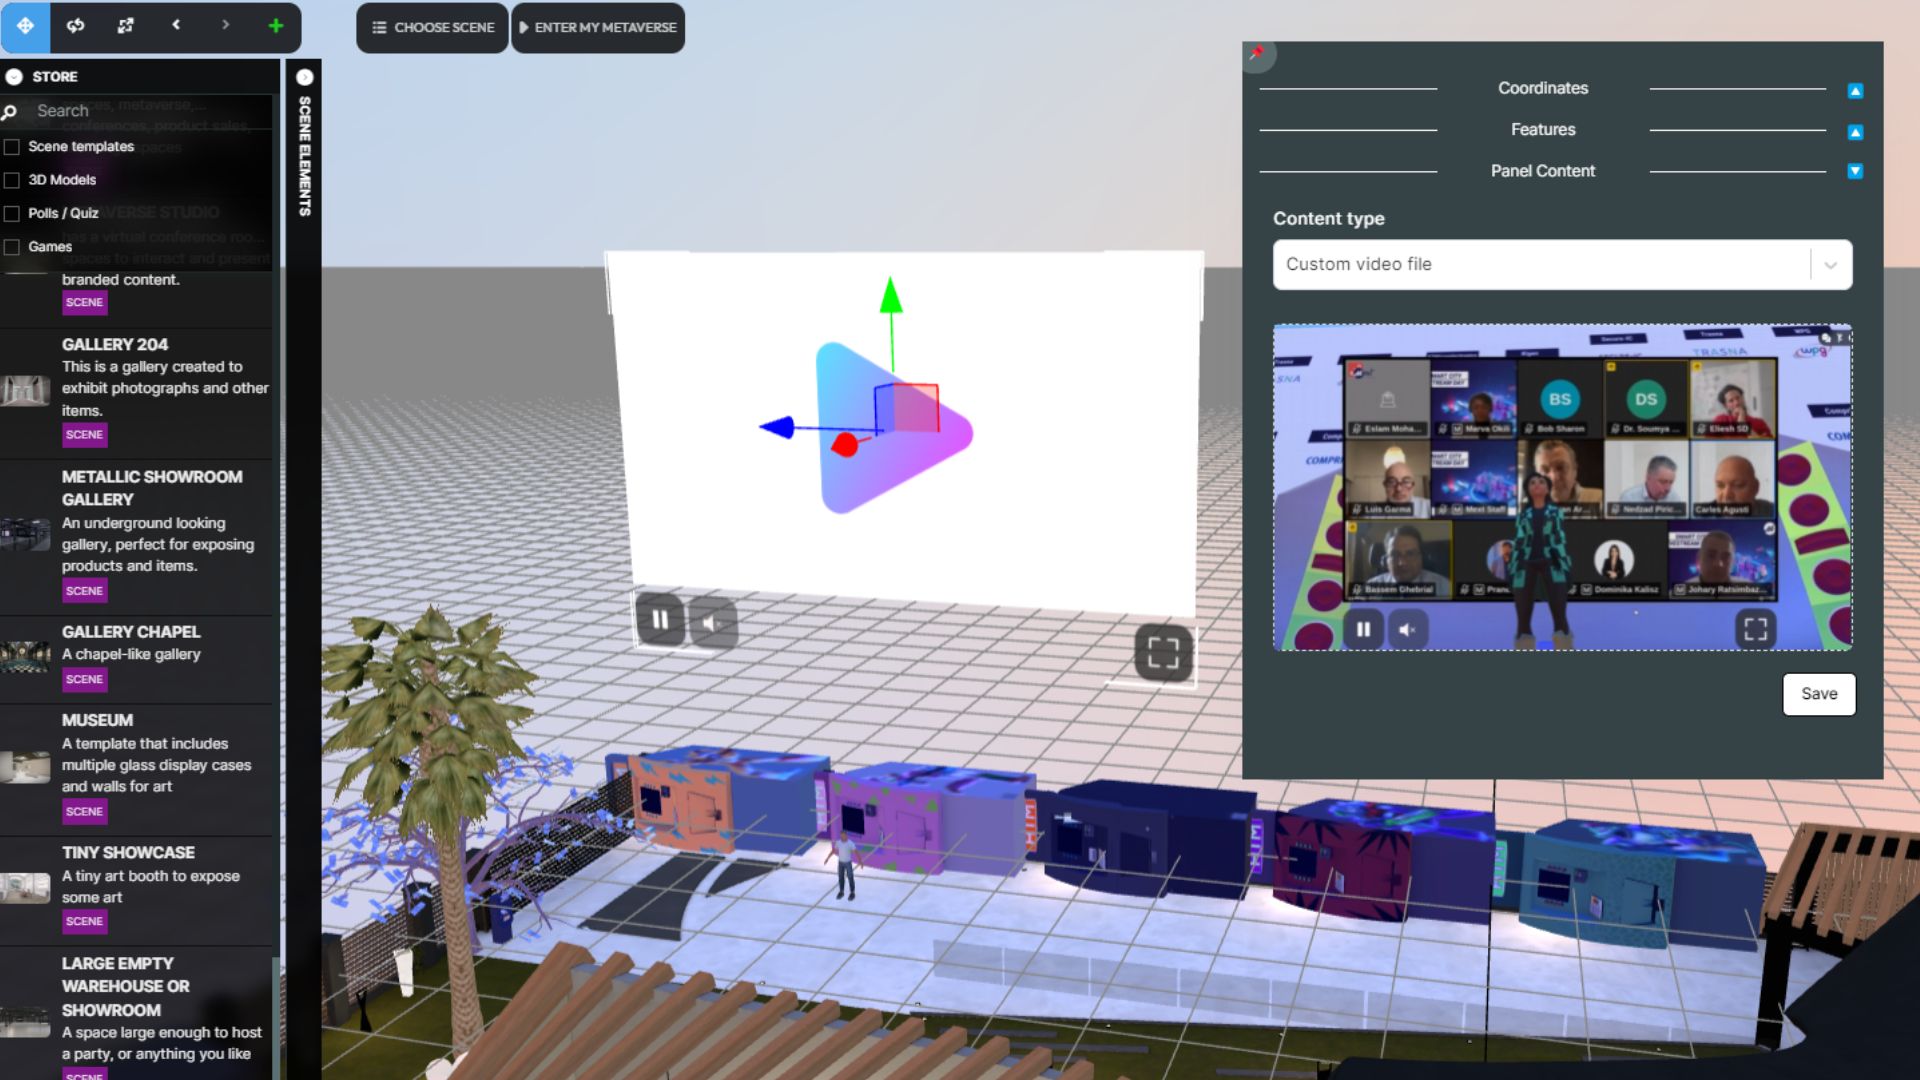
d. Open the panel content block to upload your video file or past a link.
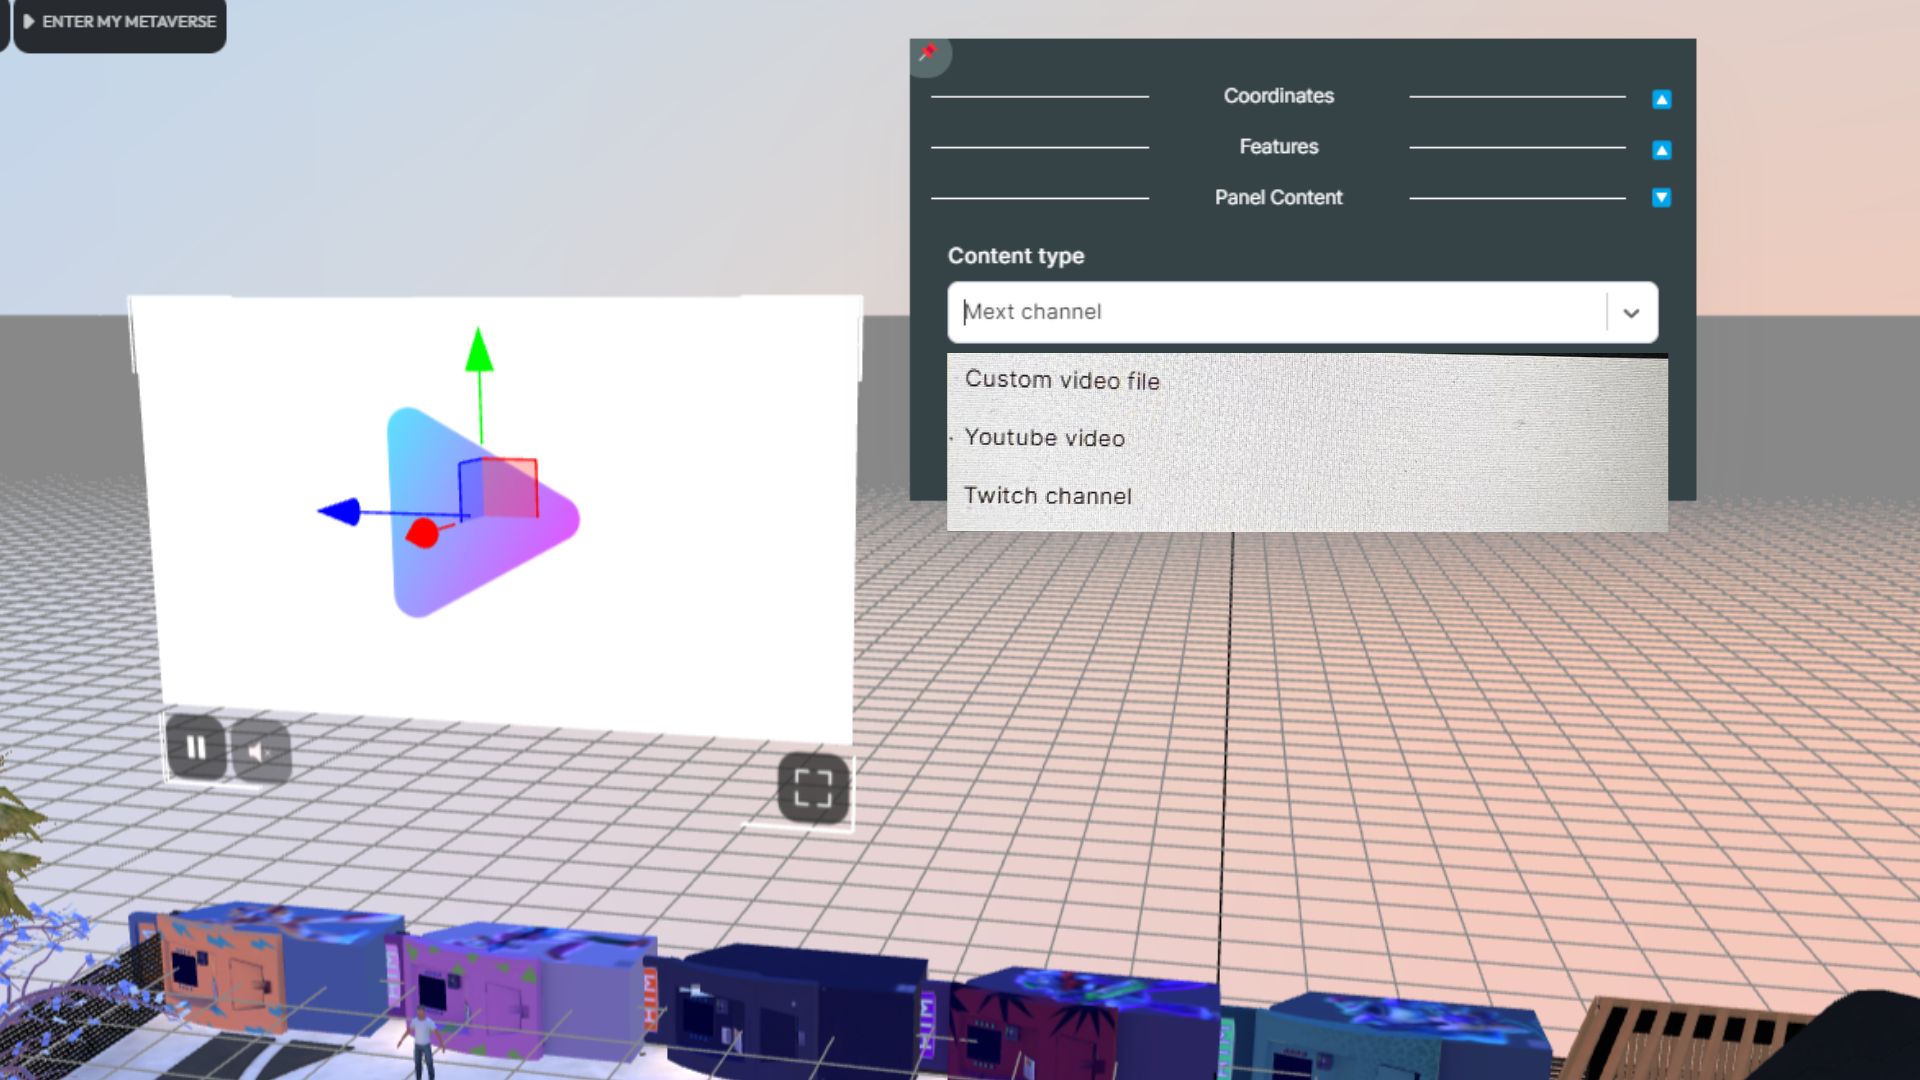
e. You have multiple choices
1. Mext Channel, you can xxxxxxx to broadcast through the screen , Mext broadcast channel à configure avavant ;…
2. Custom video to upload your video file
****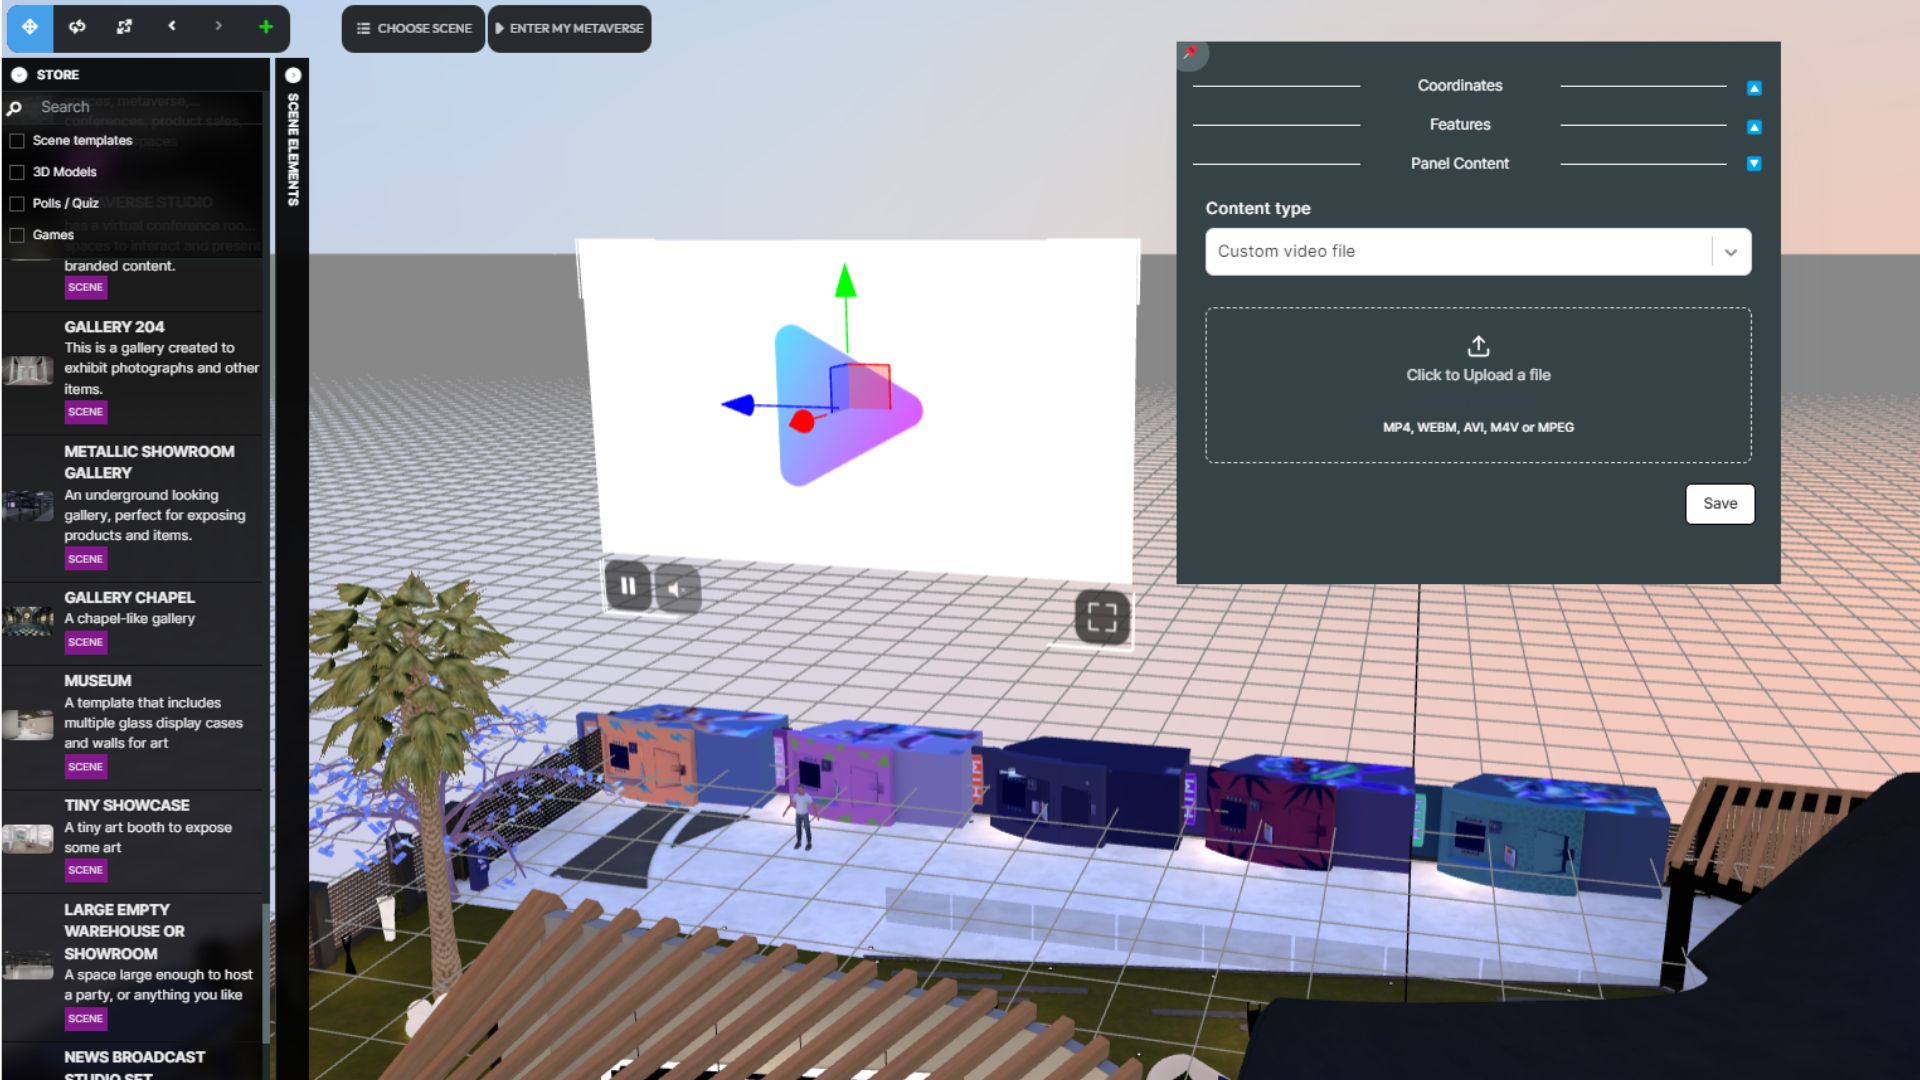
Click "Validate" to confirm and add the video.
3. Add YouTube URL
4. Add Twitch URL
f. Use the "Element Management" menu at the top left of the Metabuilder screen to scale, rotate, and move your video player to the desired position.
3. To add a Screen sharing
a. Navigate to the "+" icon, then select "2D Elements", and finally choose "Screen sharing".
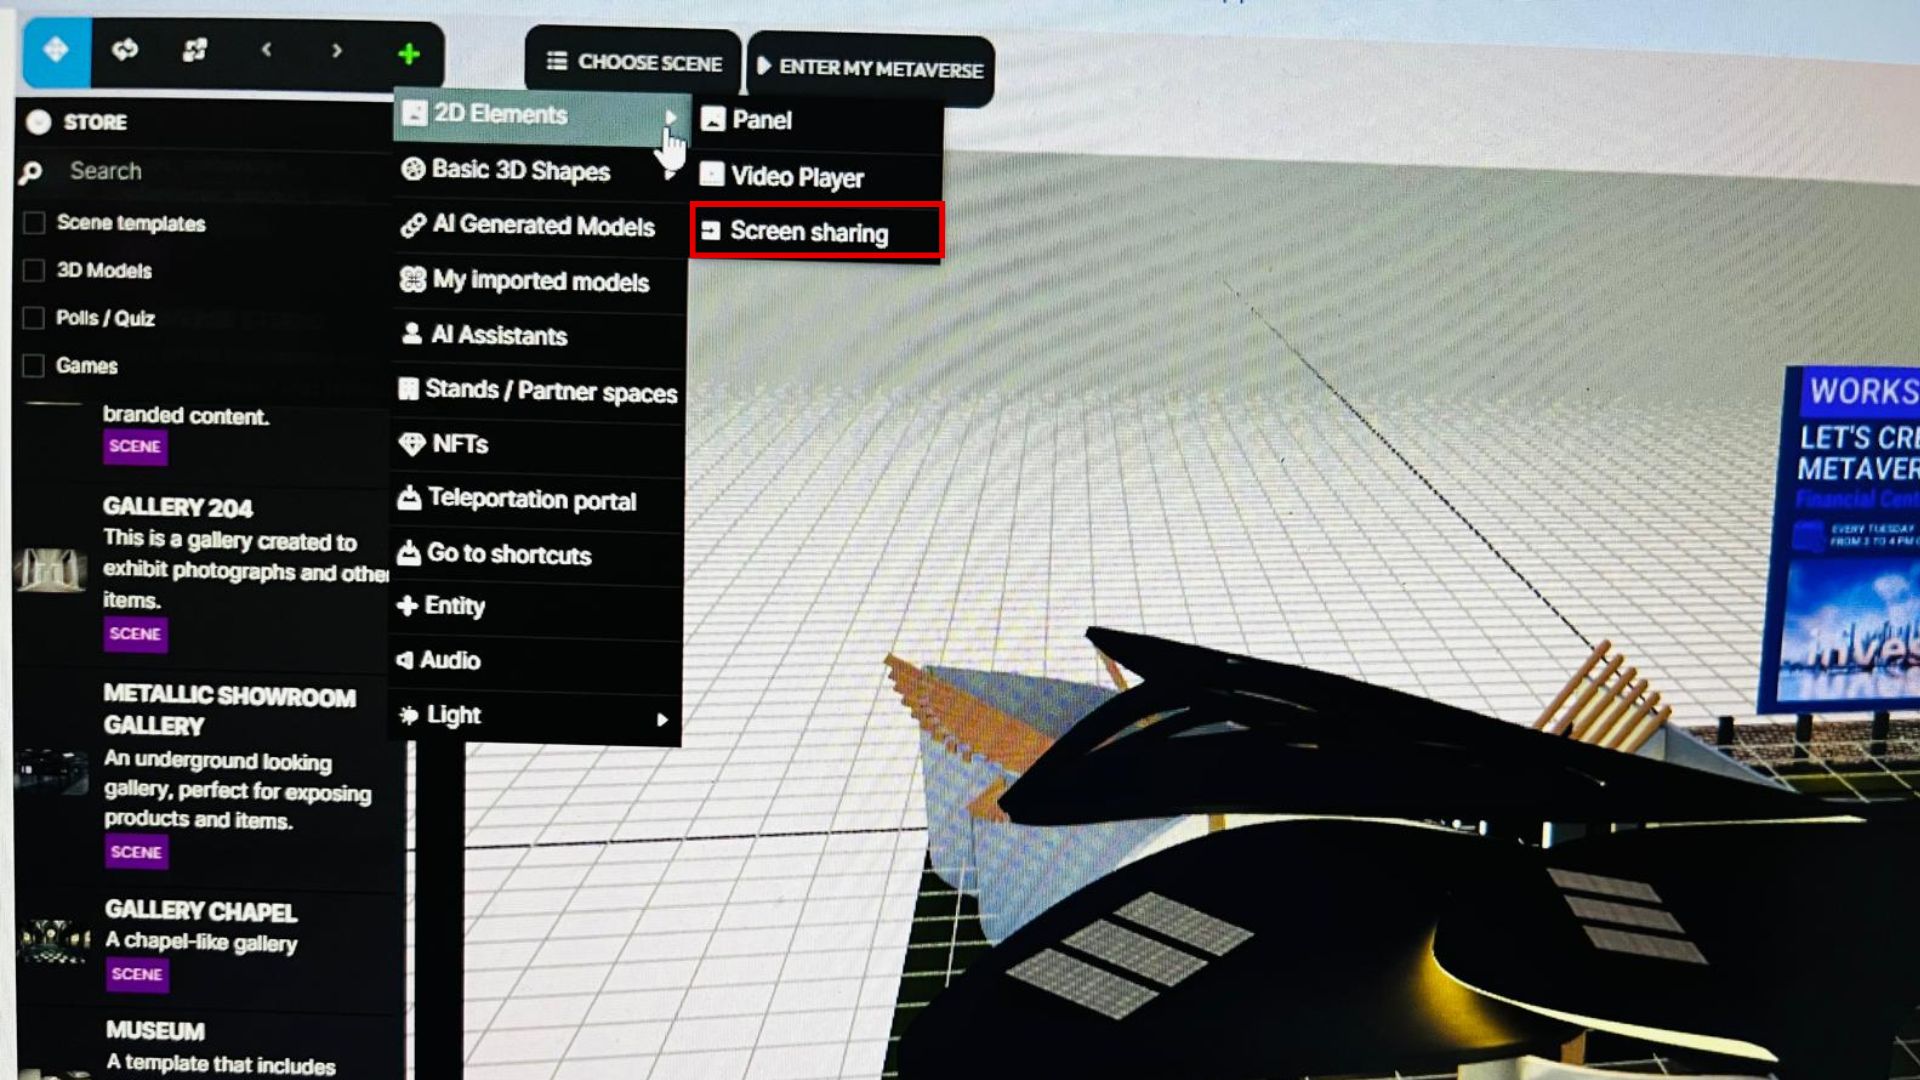
b. Click on "Screen sharing" to add the it.
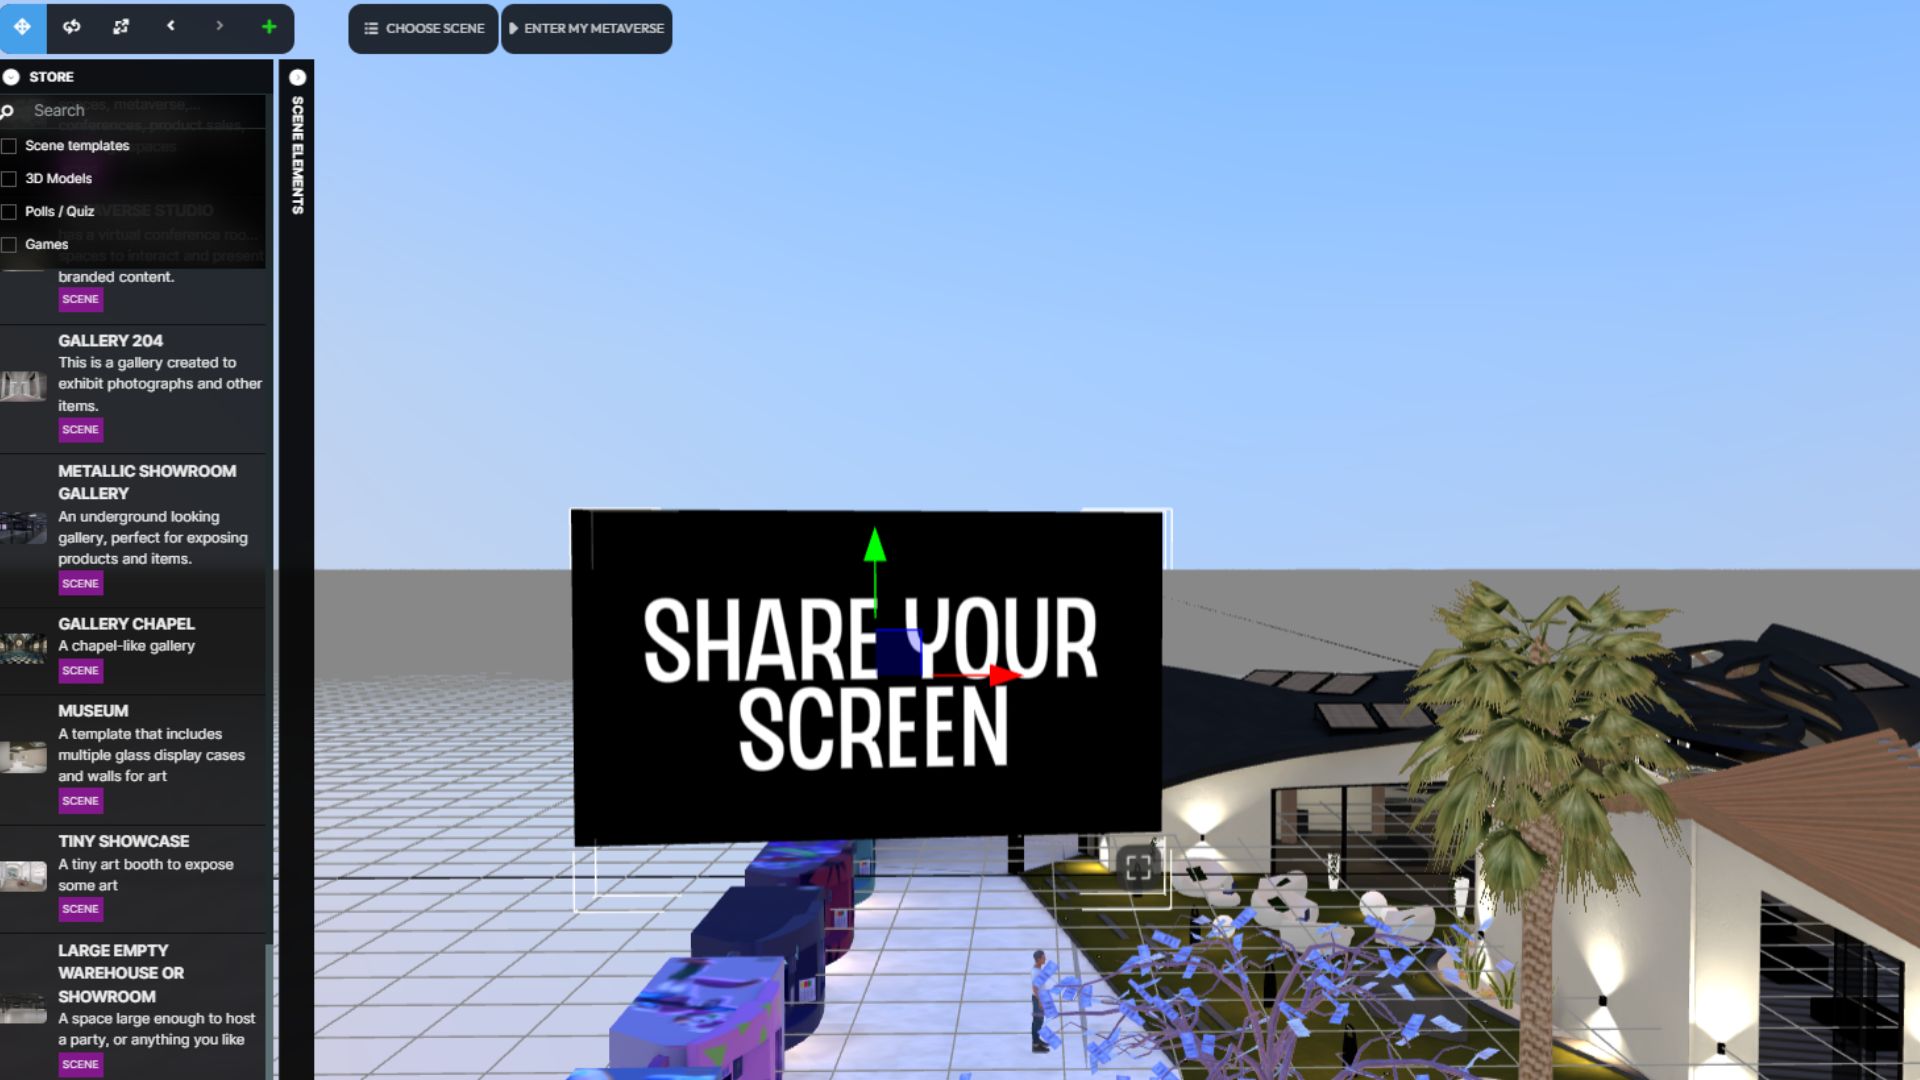
c. Click again on the screen to reveal the element black window related to the newly created panel.
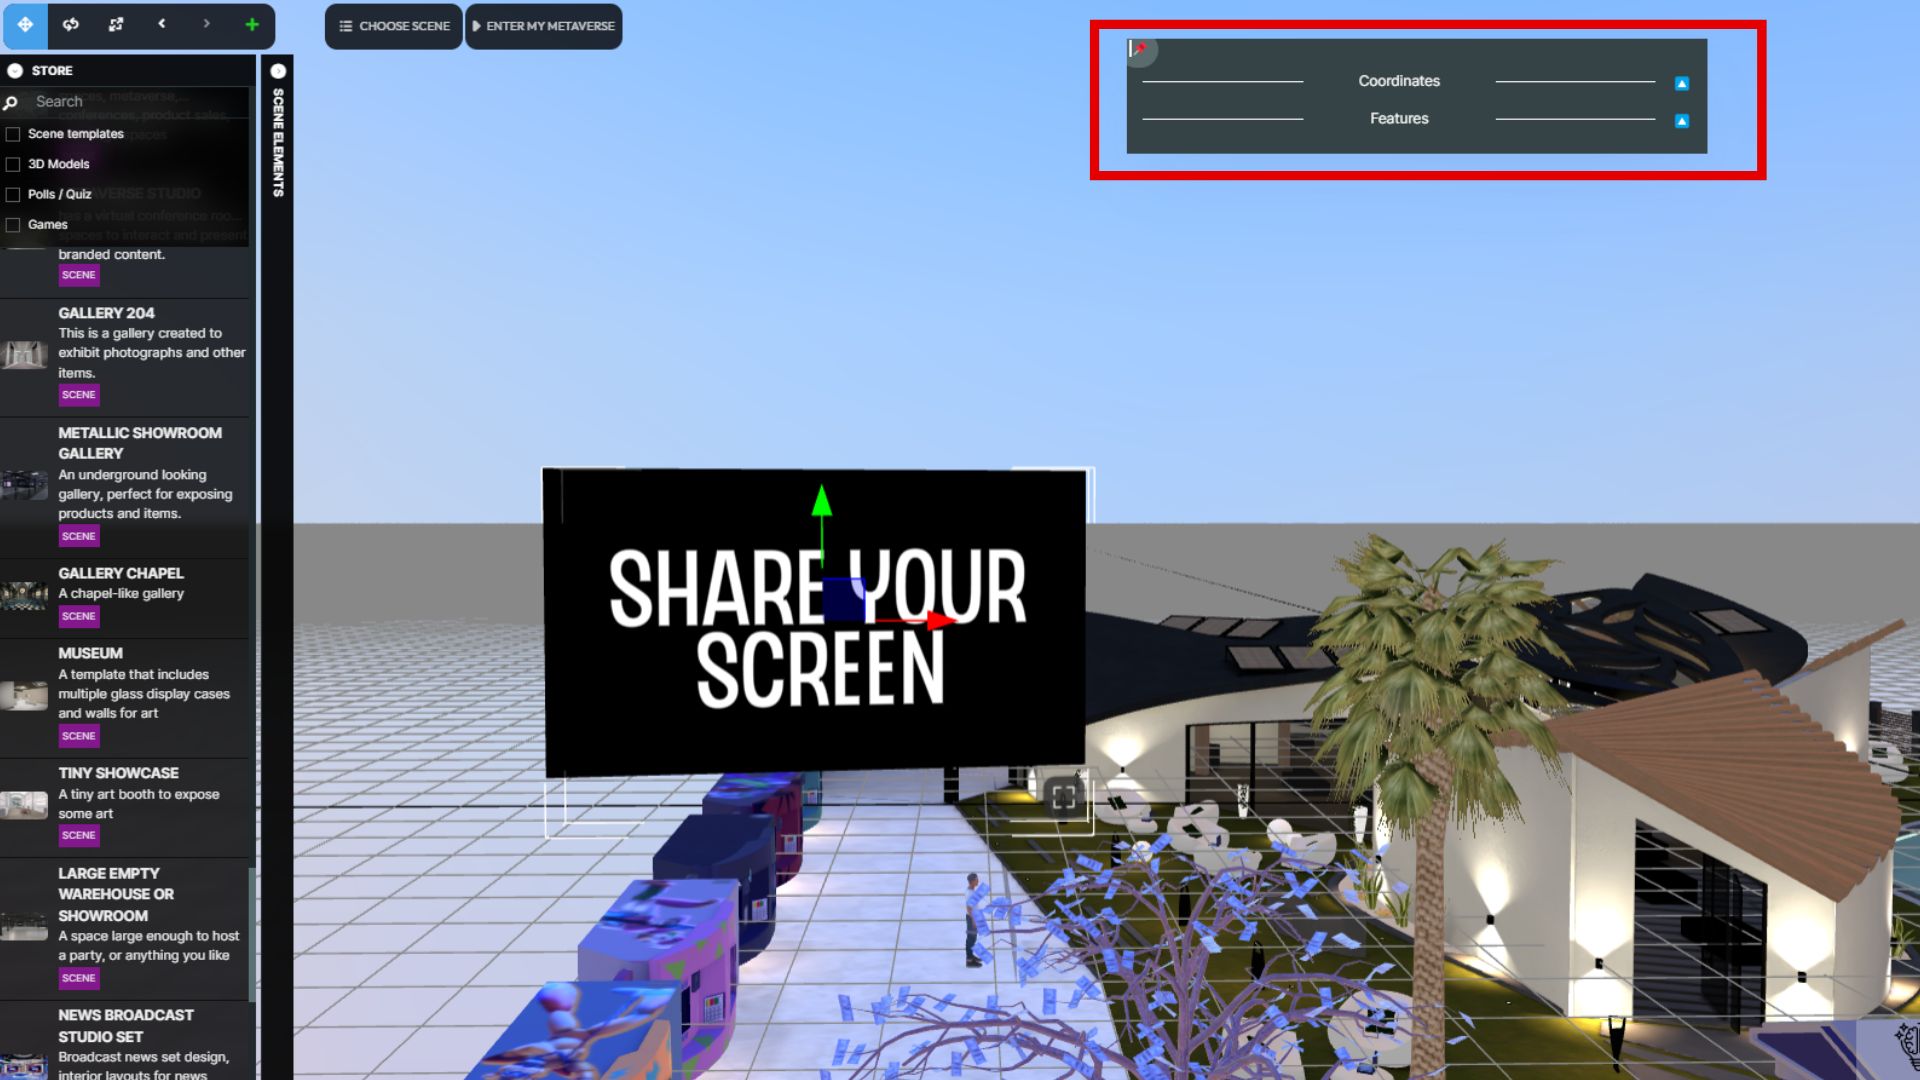
d. Use the "Element Management" menu at the top left of the Metabuilder screen to scale, rotate, and move your panel to the desired position.
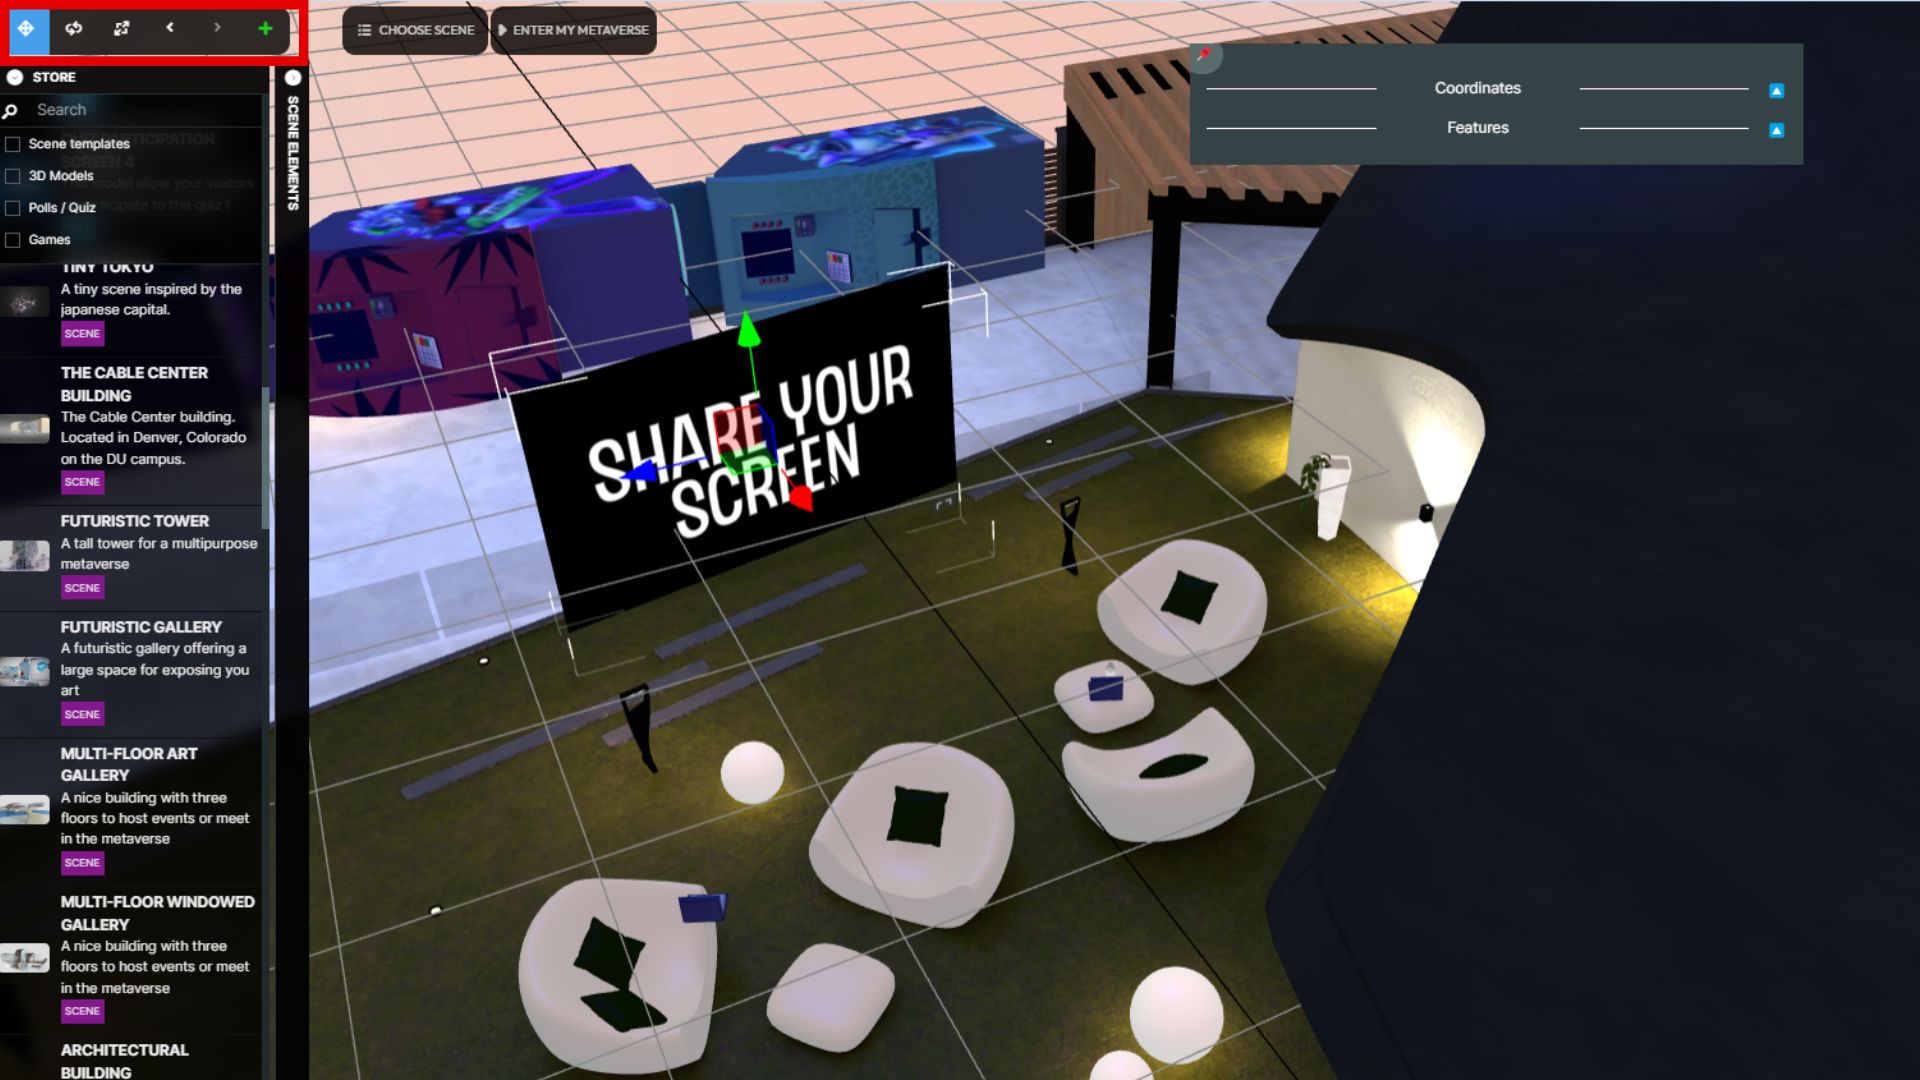
1.1.5.5.2 Basic 3D elements => Move to store
1.1.5.5.3 My imported models
Creating your own store of 3D models tailored to your needs is simple. There are various sources to acquire 3D models:
- Browse through free and paid models available on specialized websites like Sketchfab, among others.
- Commission a professional 3D designer to create custom models according to your specifications.
- Utilize Generative AI, whether through Mext Metabuilder or other AI-generative platforms, to generate unique models.
Once you have your desired model, importing it is straightforward with these steps:
1. Click on the "+" icon in the element management bar at the top left of your Metabuilder screen.
2. Select “My imported models” from the dropdown menu

3. Click on the dashed rectangle with a plus sign in the middle.

4. Fill out the form by providing a name for your model, uploading a thumbnail image (PNG, JPEG, or GIF with a size limit of 2MB), and loading your 3D model file. Then confirm to load your model.

5. Once your 3Dmodel is available in "My imported models," simply click on it to add it to your empty scene.
When importing your models, opt for low-size 3D models to prevent your scene from becoming excessively heavy, potentially affecting navigation and performance.
1.1.5.5.4 AI-Assistant
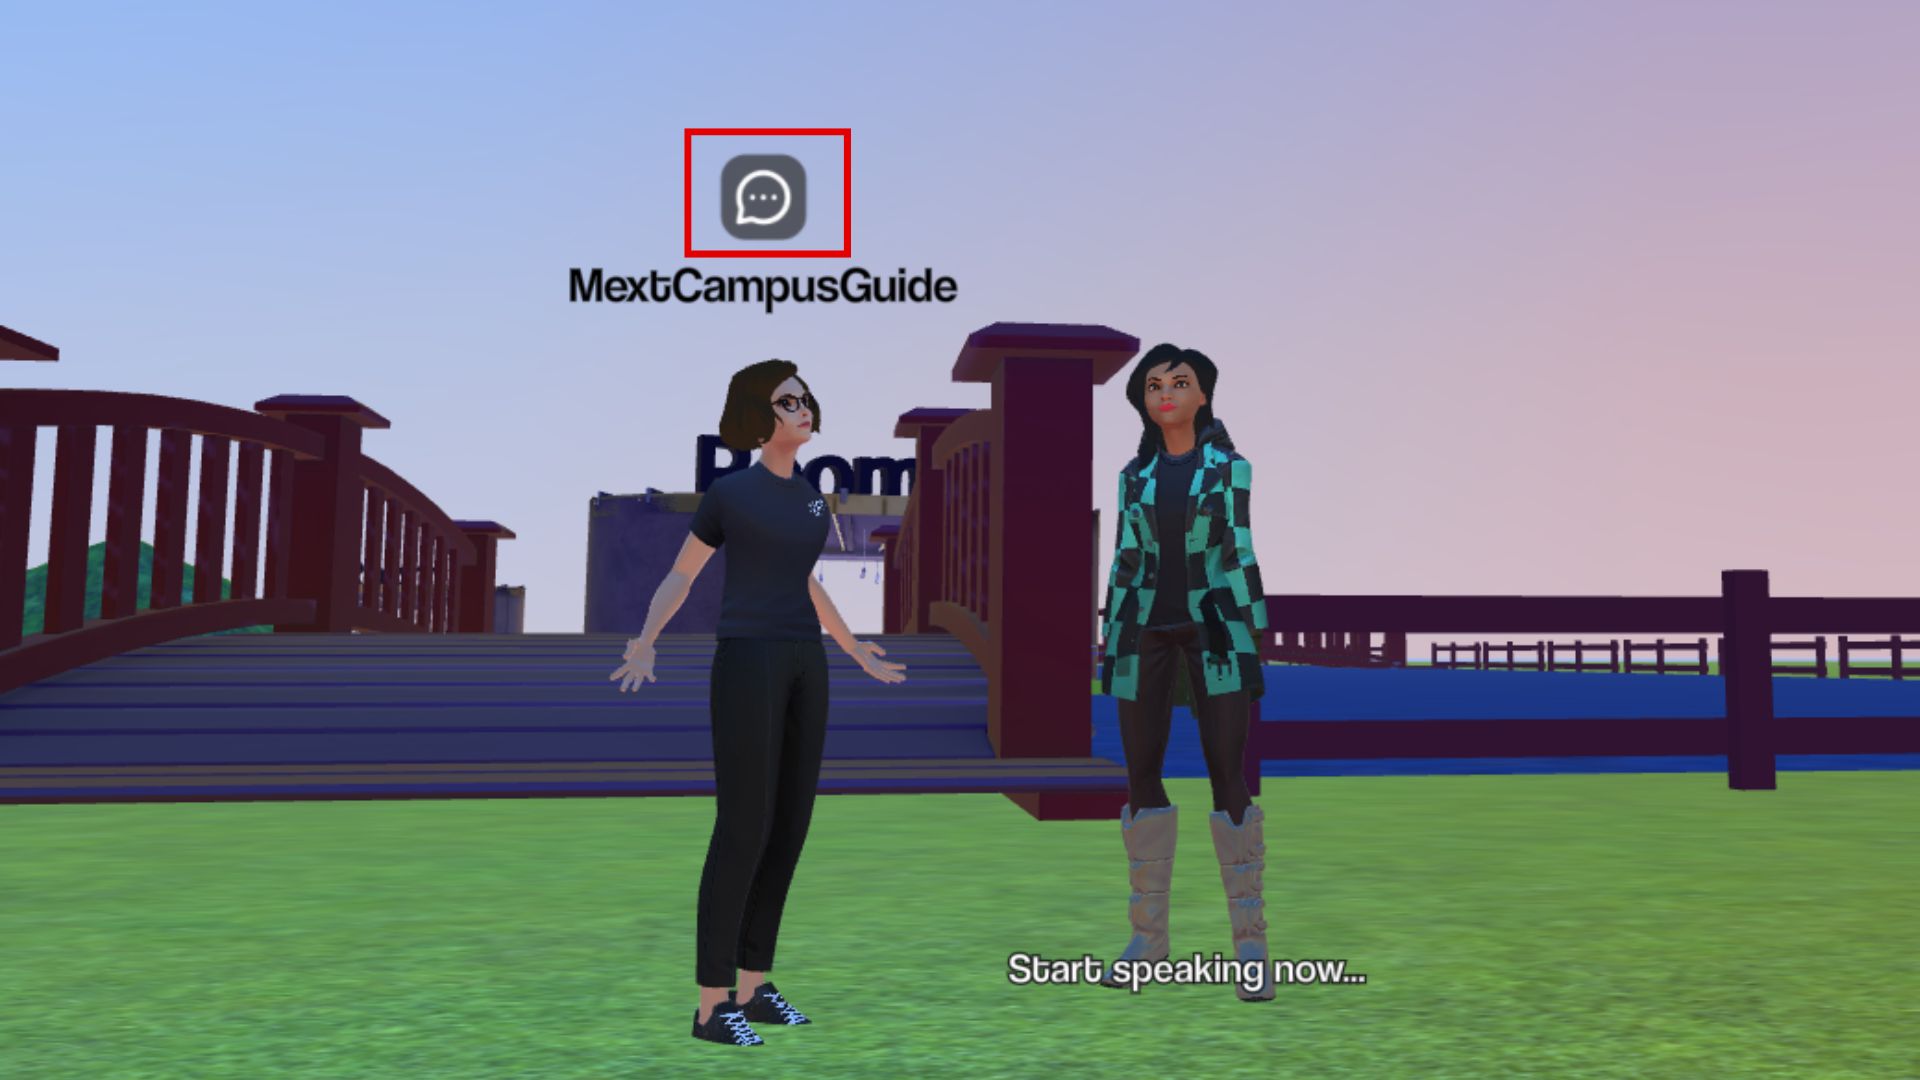
To add an AI-Assistant to your 3D immersive space, you must first create one in the AI-Assistant section of the Admin Backoffice. Once created, you can place and position your AI-Assistant within the Metabuilder. Follow these steps:
1. Click on the "+" icon in the element management bar at the top left of your Metabuilder screen and select "AI-Assistant".
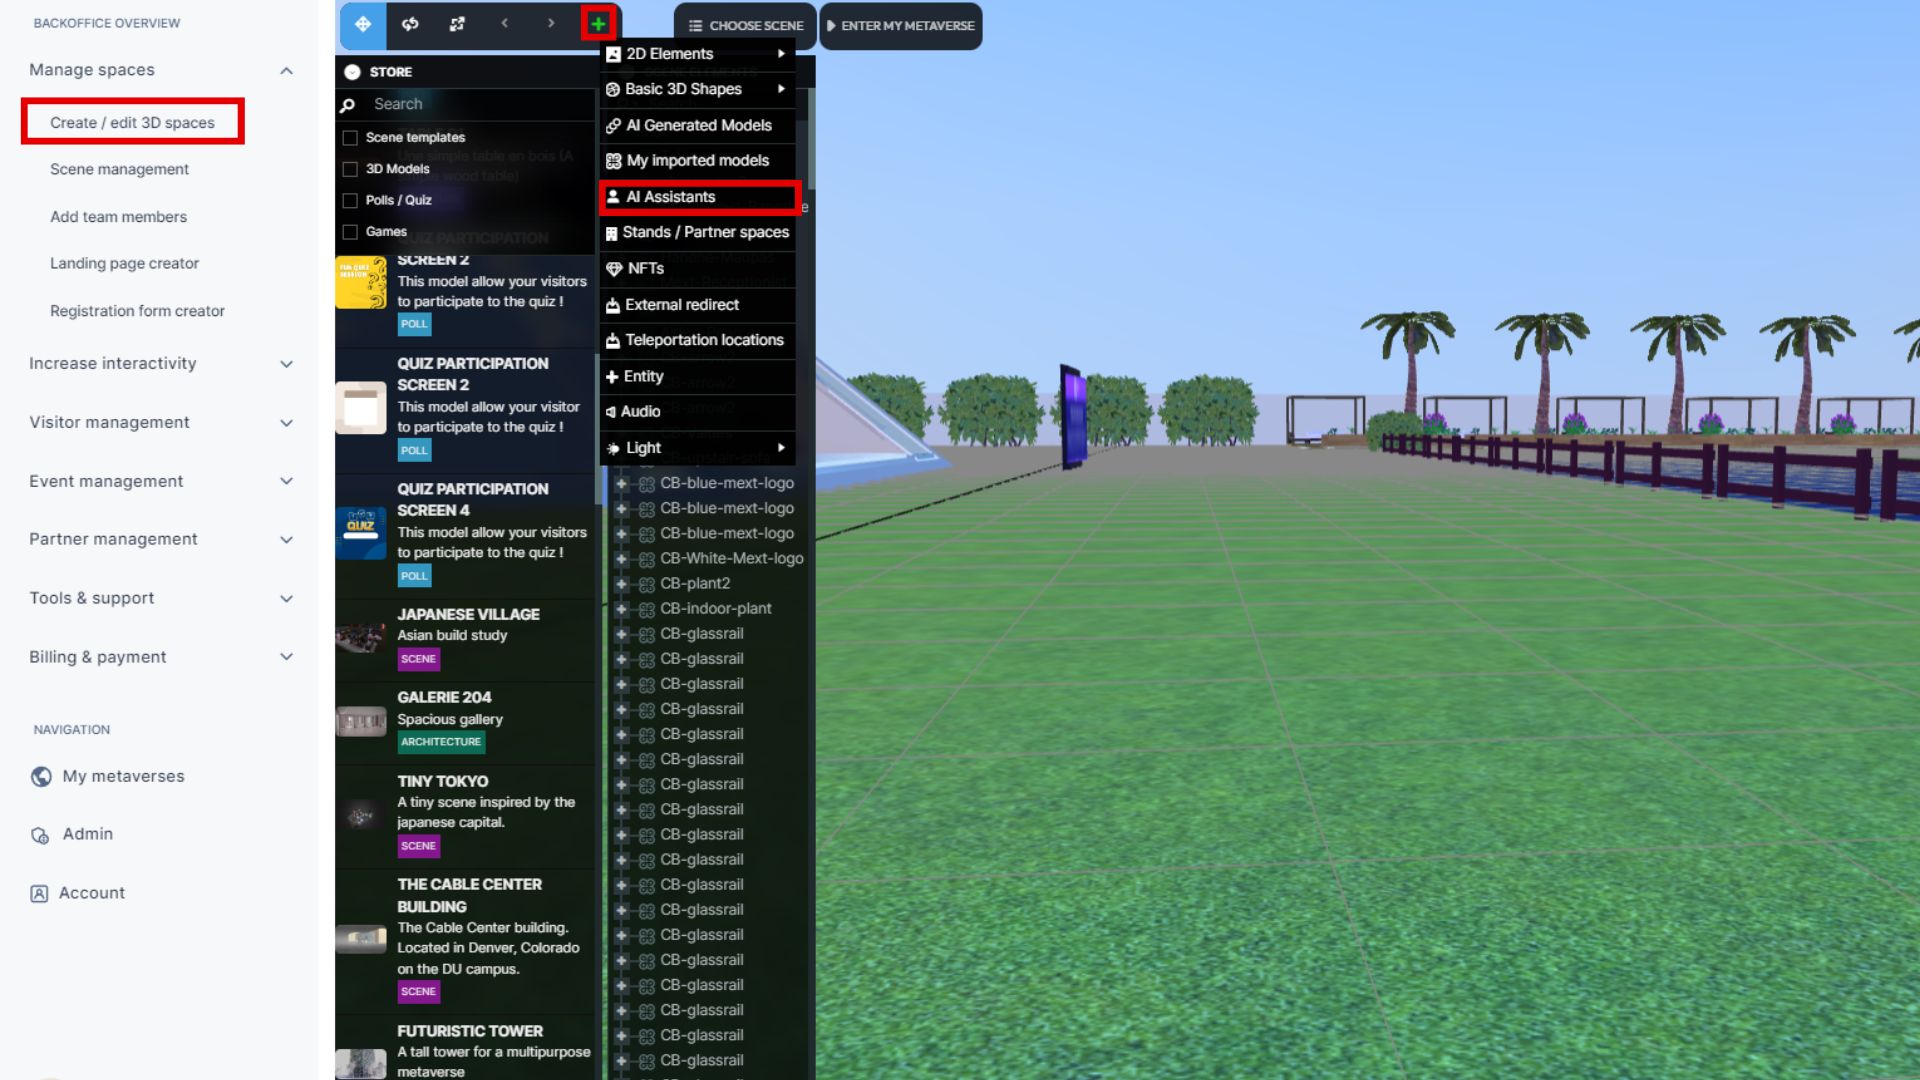
2. This opens the AI-Assistants window displaying all the created AI-Assistants for your 3D immersive space.
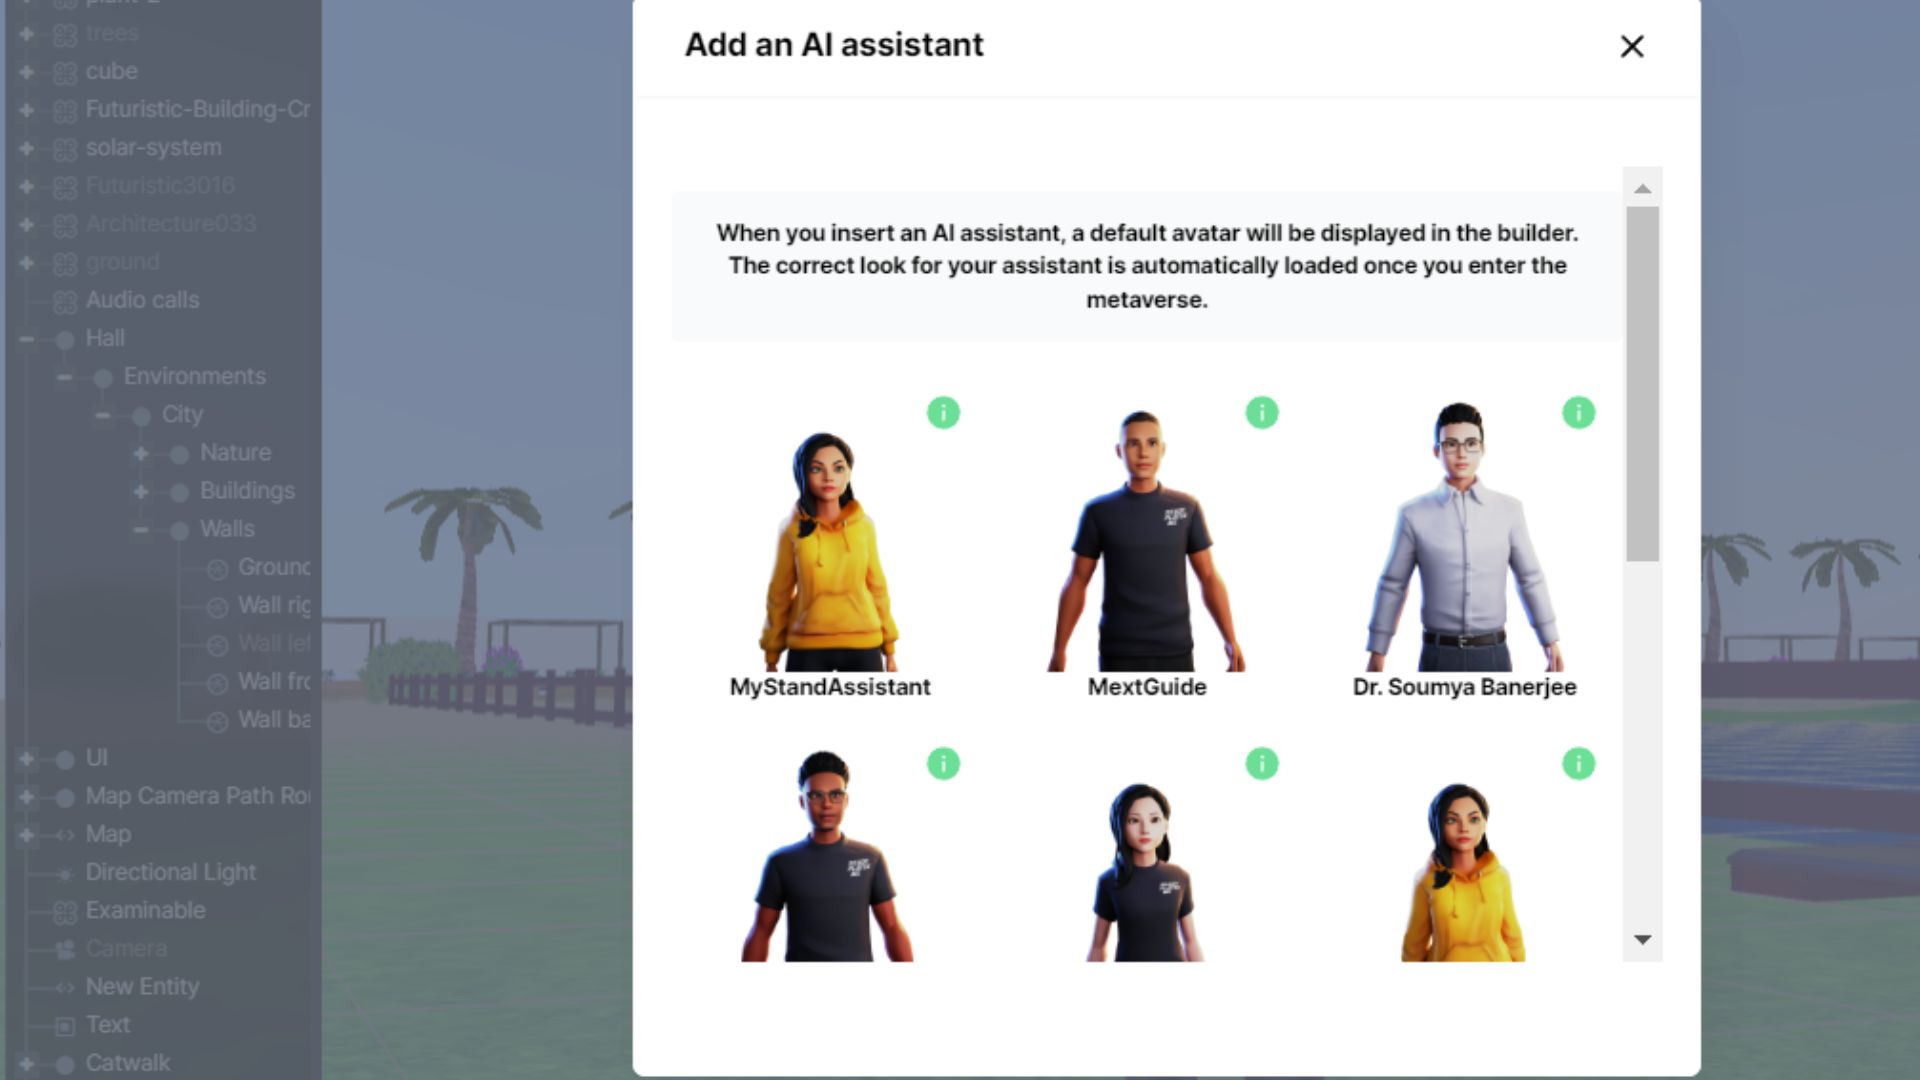
3. Select the desired AI-Assistant.
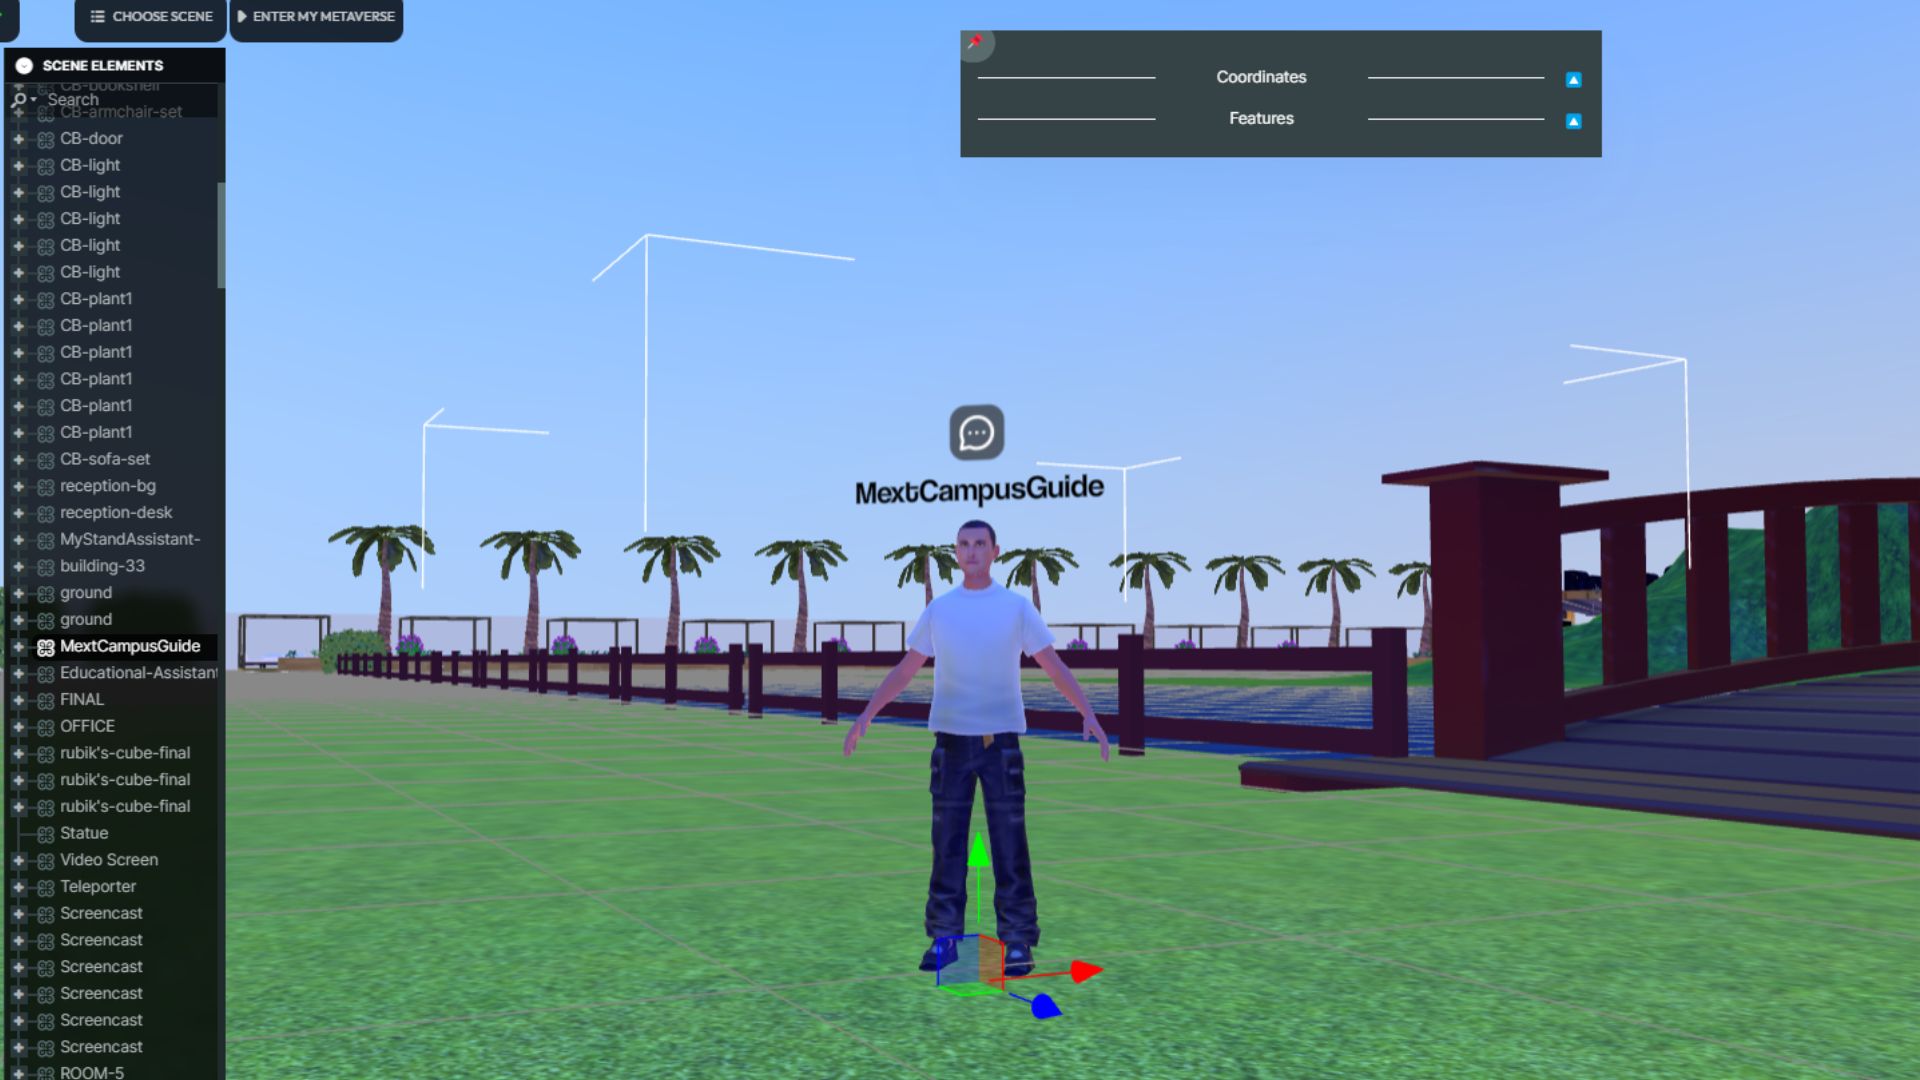
4. Once added to your space, you can easily position it anywhere you like within your 3D environment.
5. Your assistant will appear immediately, allowing you to test it from the visitor's perspective.
1.1.5.5.5 Stand/partner spaces
To place a partner space and stand into your 3D immersive space, you must first create one in the “Manage partner space” section of the Admin Backoffice. Once created, you can place and position your partner space and stand within the Metabuilder. Follow these steps:
1. Click on the "+" icon in the element management bar at the top left of your Metabuilder screen and select "Stands/Partner spaces".
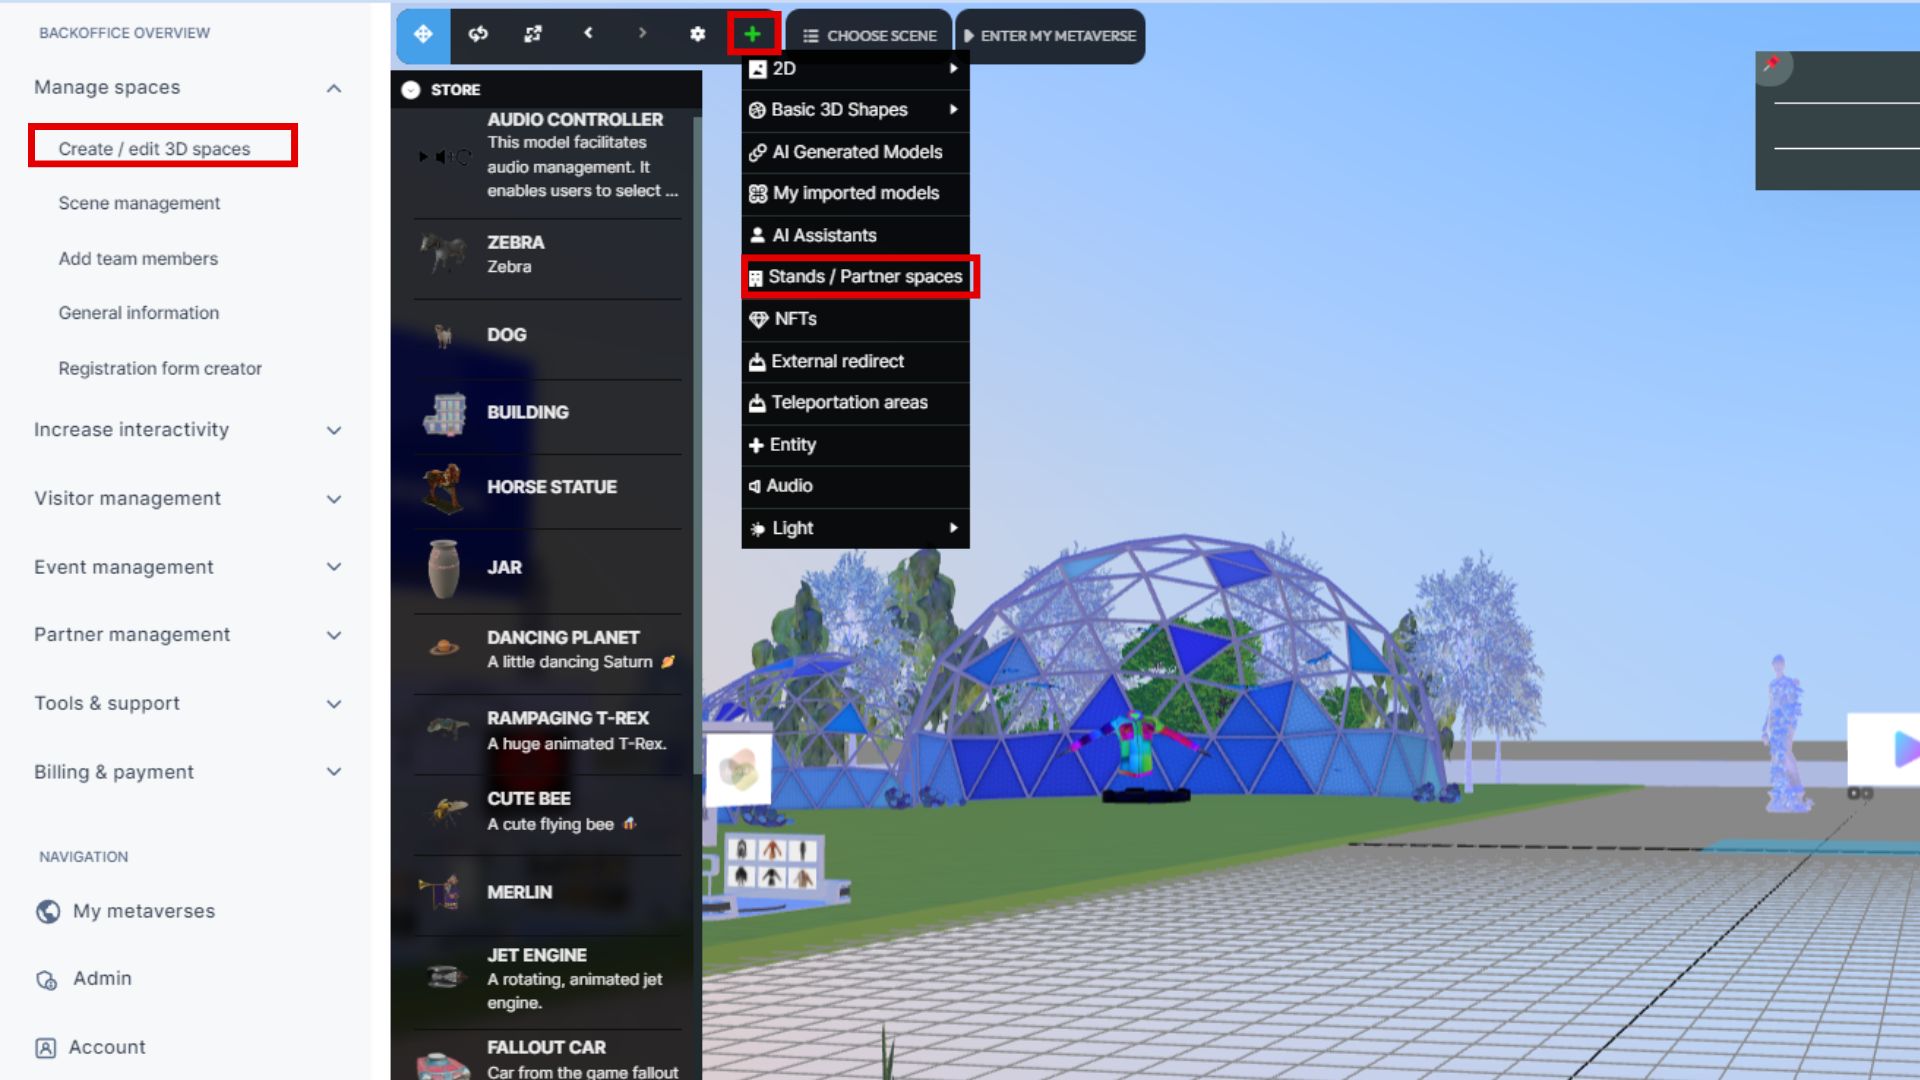
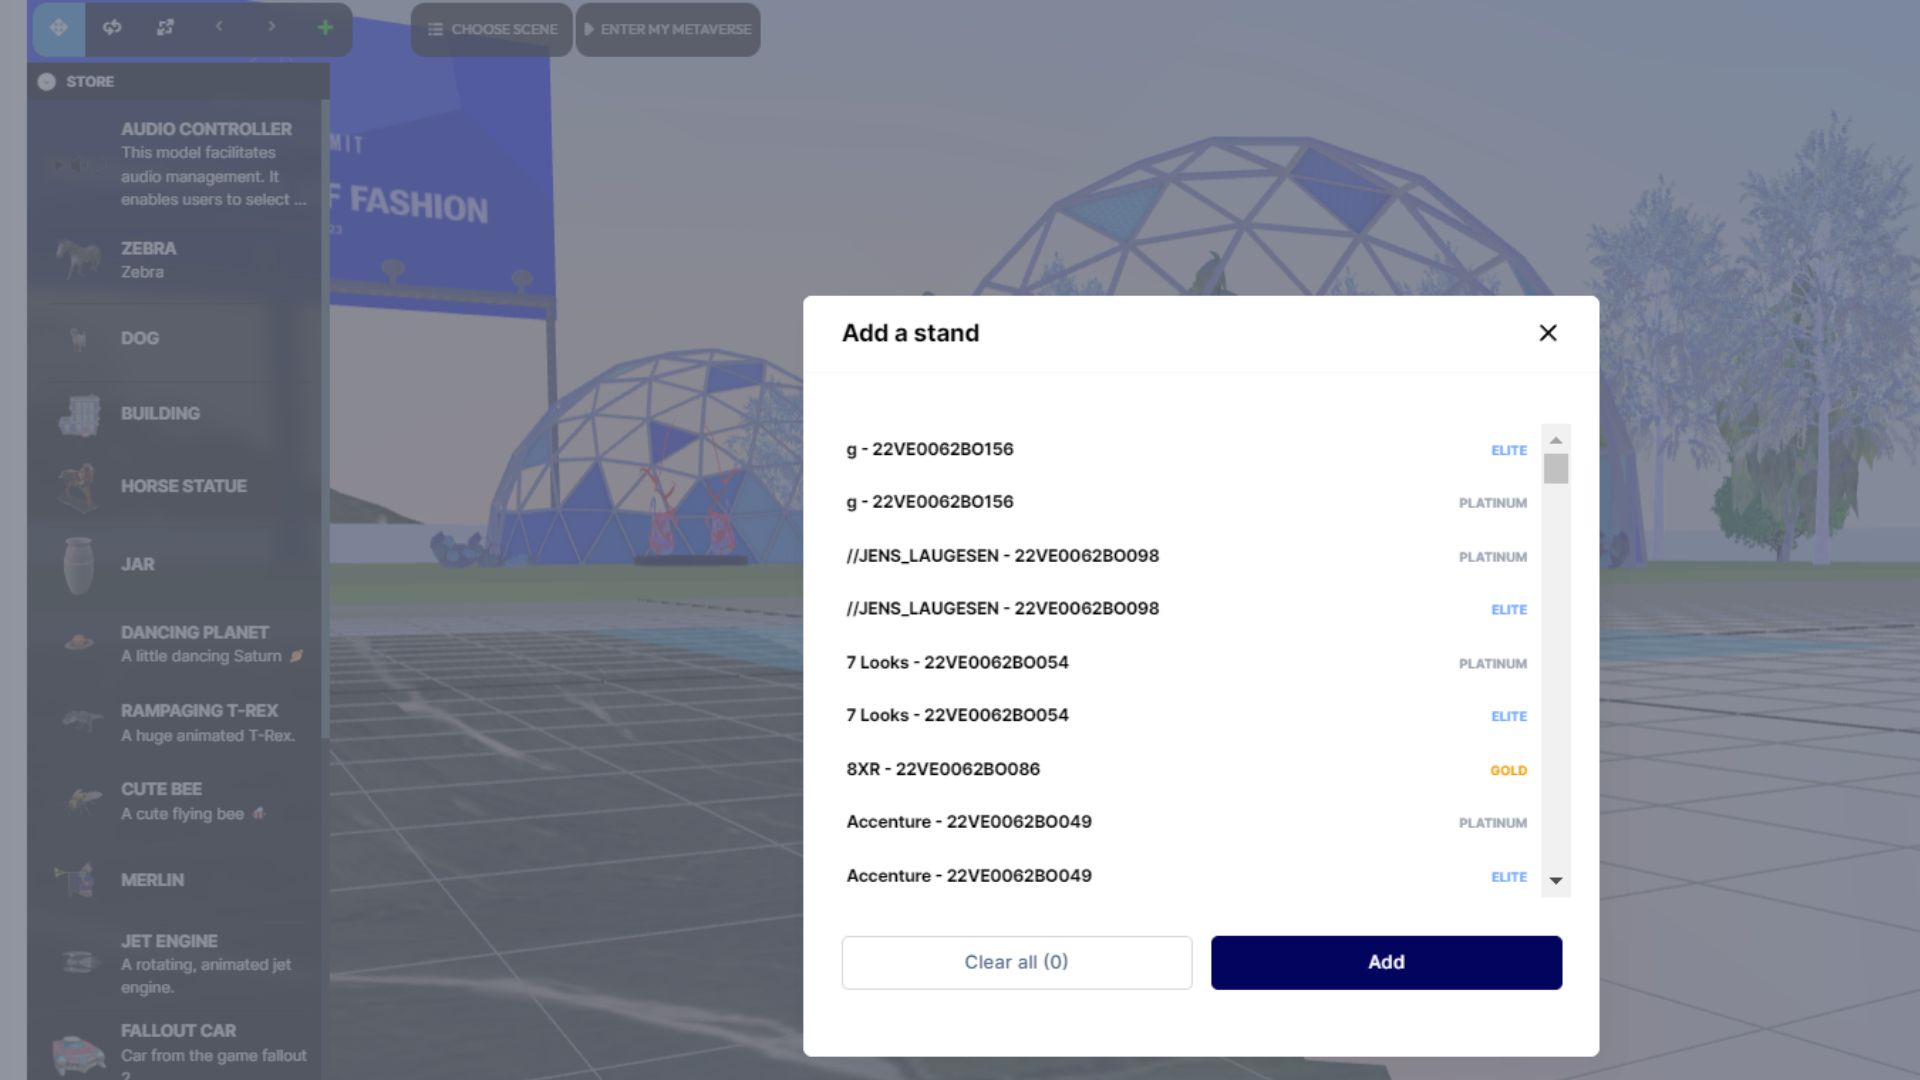
2. This opens the “stands / Partner spaces” window displaying all the created “Stands / Partner spaces“ for your 3D immersive space.
3. Select the desired Stand / Partner space .
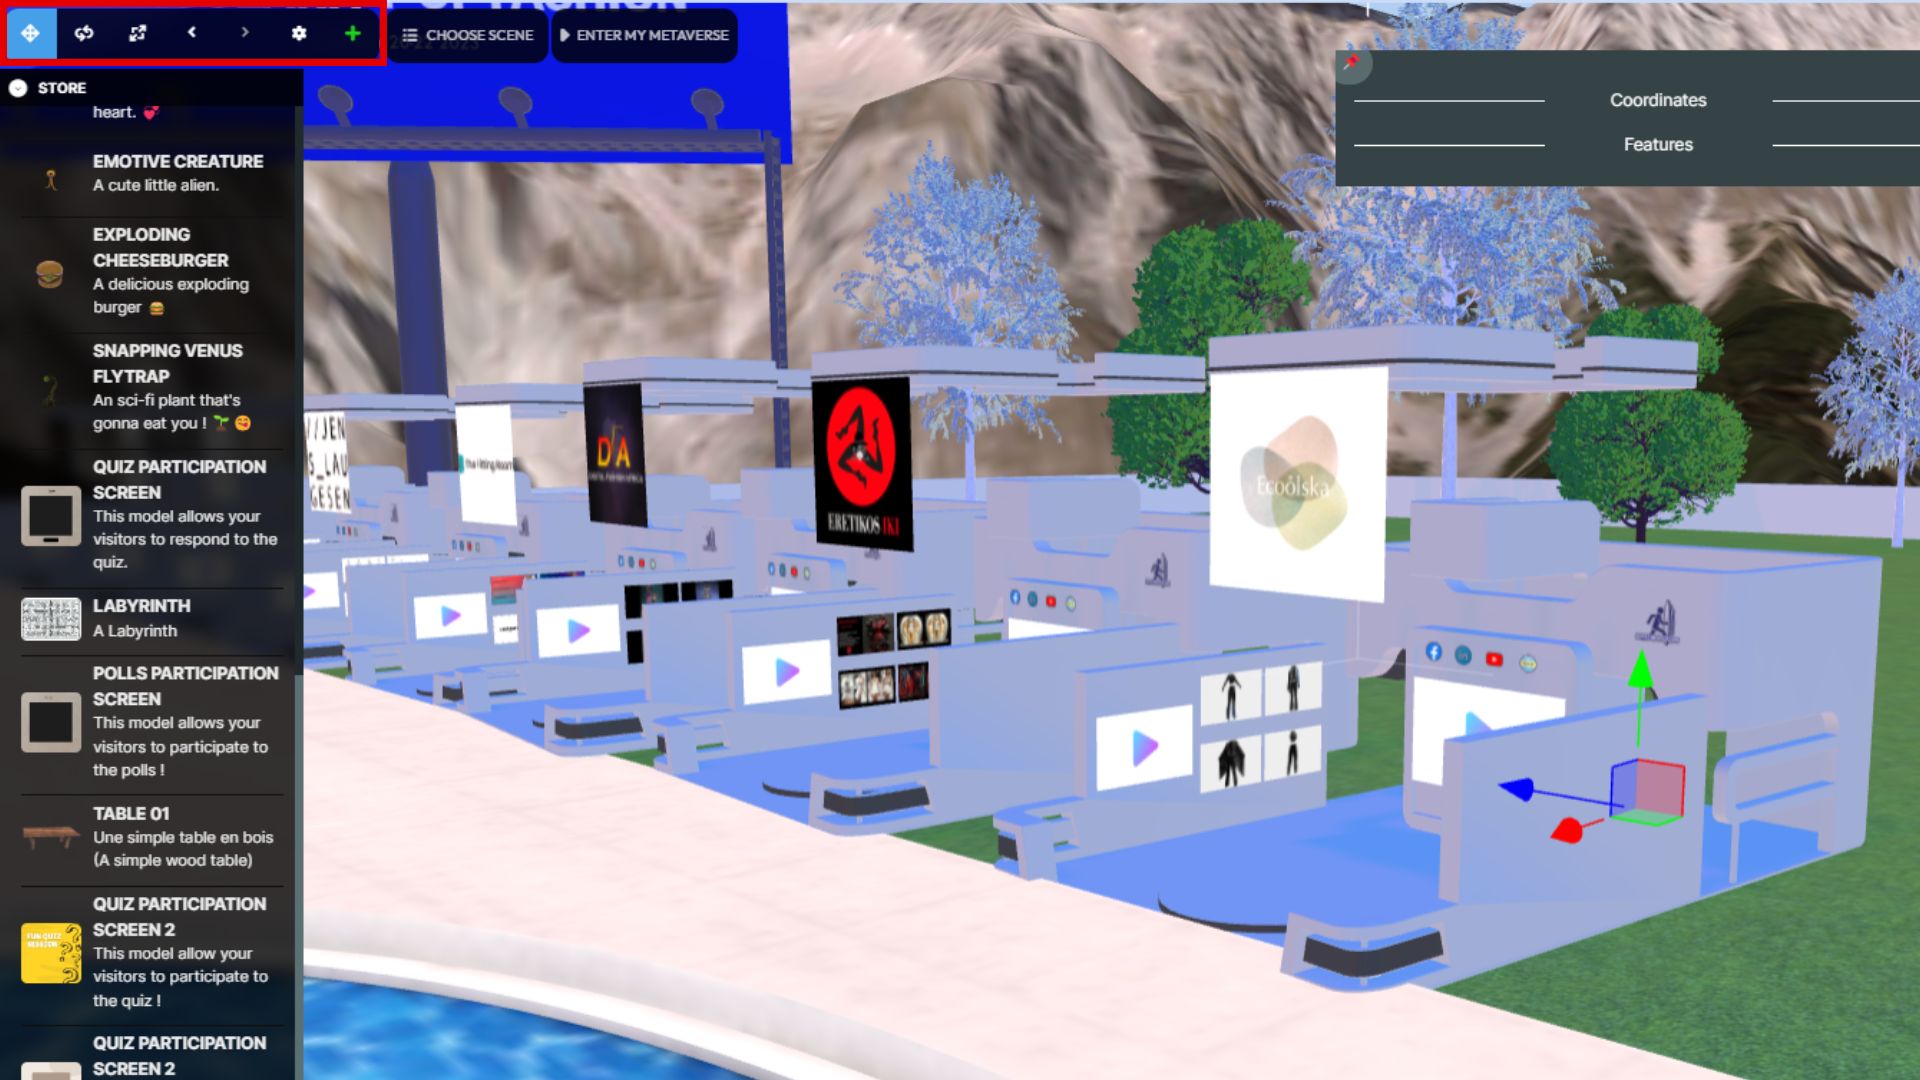
4. Once added to your space, you can easily position it anywhere you like within your 3D environment like any 3D model.
1.1.5.5.6 NFTs
On the Mext platform, you can import, display and exchange Polygon NFTs through the OpenSea platform. There are two main NFT business options available:
1. Import and exchange your Polygon NFTs on the Mext platform.
2. Transform your 3D immersive space into a Polygon NFT and sell it on the Mext Metabuilder store or any other NFT store.
For the time being only option 1 is available.
To get started, you'll need a Polygon wallet.
If you don't have one, you can easily open one by visiting the website The Ultimate Crypto Wallet for DeFi, Web3 Apps, and NFTs | MetaMask and following the instructions provided. Be sure to perform this action using the Chrome Browser. Remember to copy and securely save your secret code during the backup process, and never share it with anyone. If you lose or forget the secret phrase, you won't be able to access your account again.
Once your Polygon wallet is created, connect it to your Mext platform profile by adding your Polygon wallet address.
-0d82d320242483af5feb68be43a34a47.jpg)
Once your profile is updated with your Polygon wallet address, it will be connected to Mext, allowing you to work with NFTs within the platform.
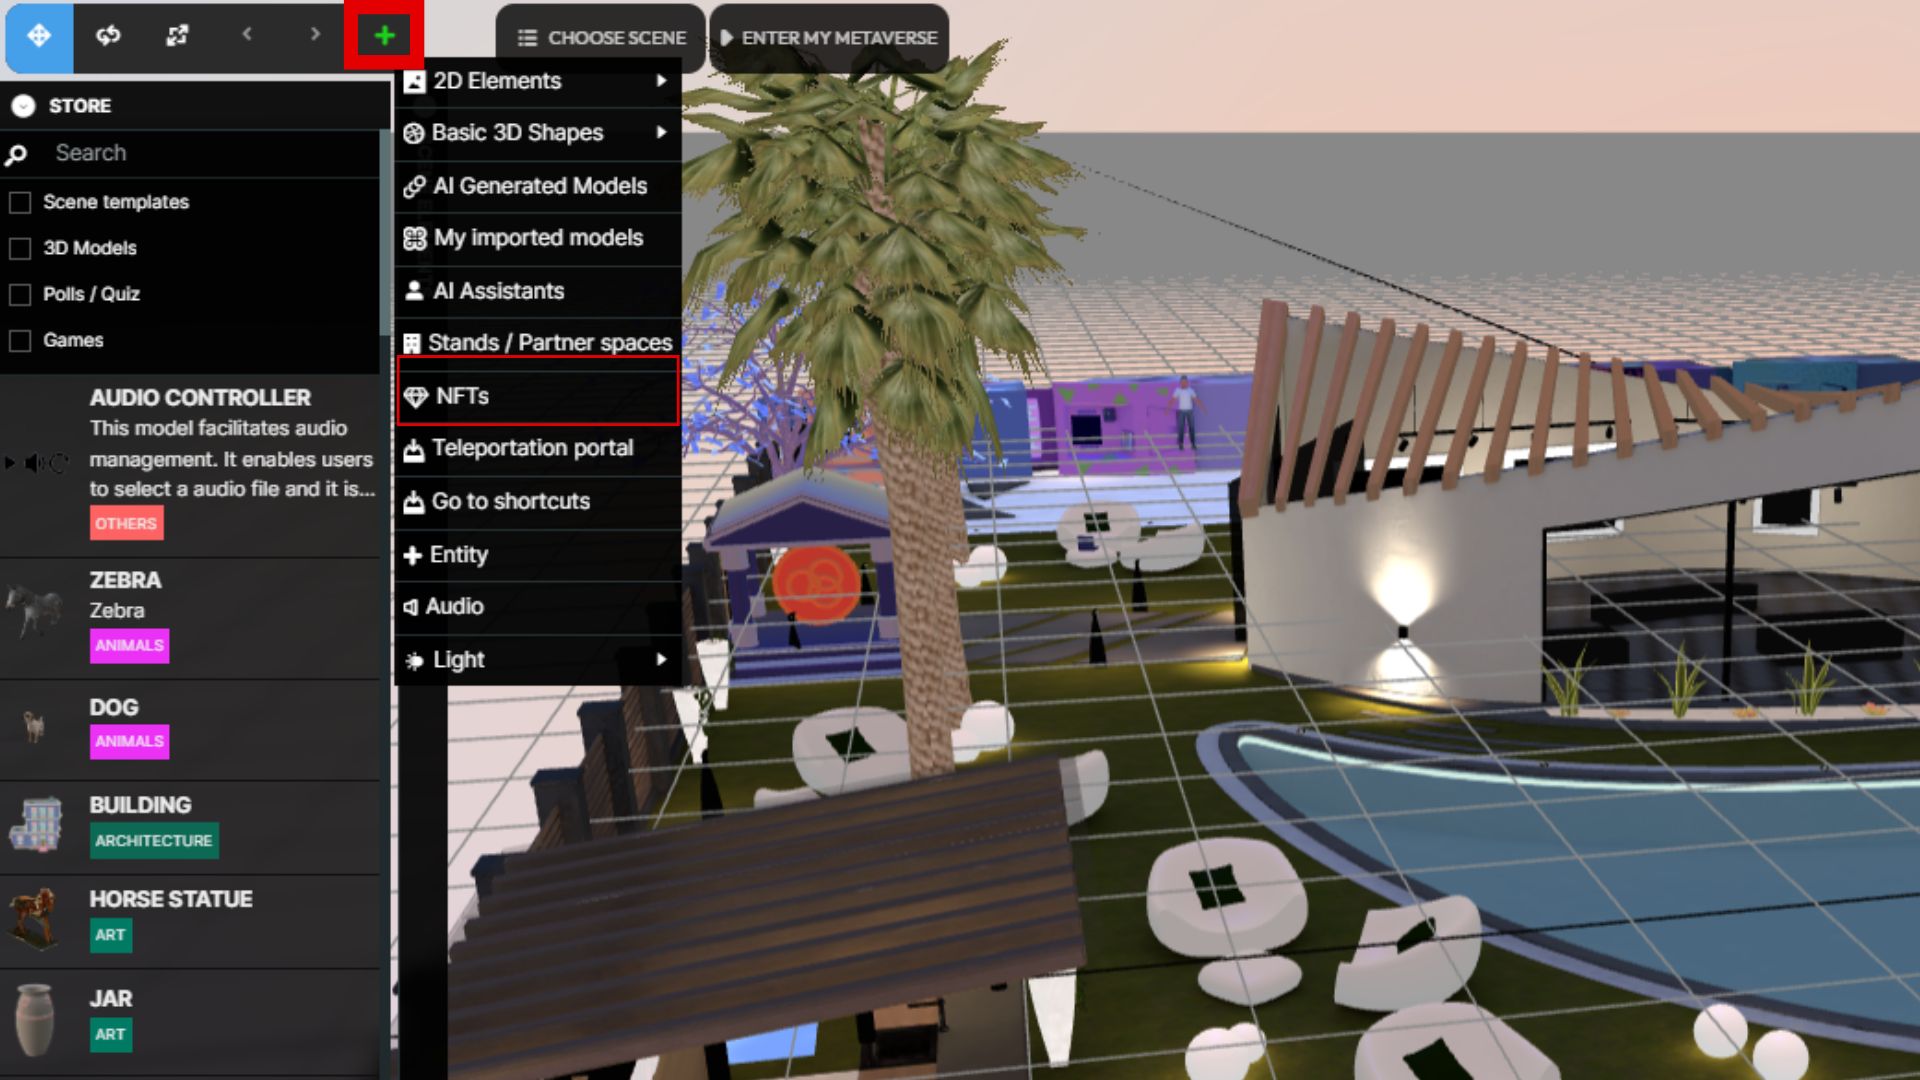
1. Click on the "+" icon in the element management bar at the top left of your Metabuilder screen and select "NFTs".
****
2.
3
1.1.5.5.7 Teleportation portal
Teleportation portal is a valuable feature for guiding your participants to other links or websites, whether it's directing them to a PDF document or seamlessly transitioning them to your e-commerce platform for transactions, utilizing your existing infrastructure.
Here's how to set it up in Metabuilder:
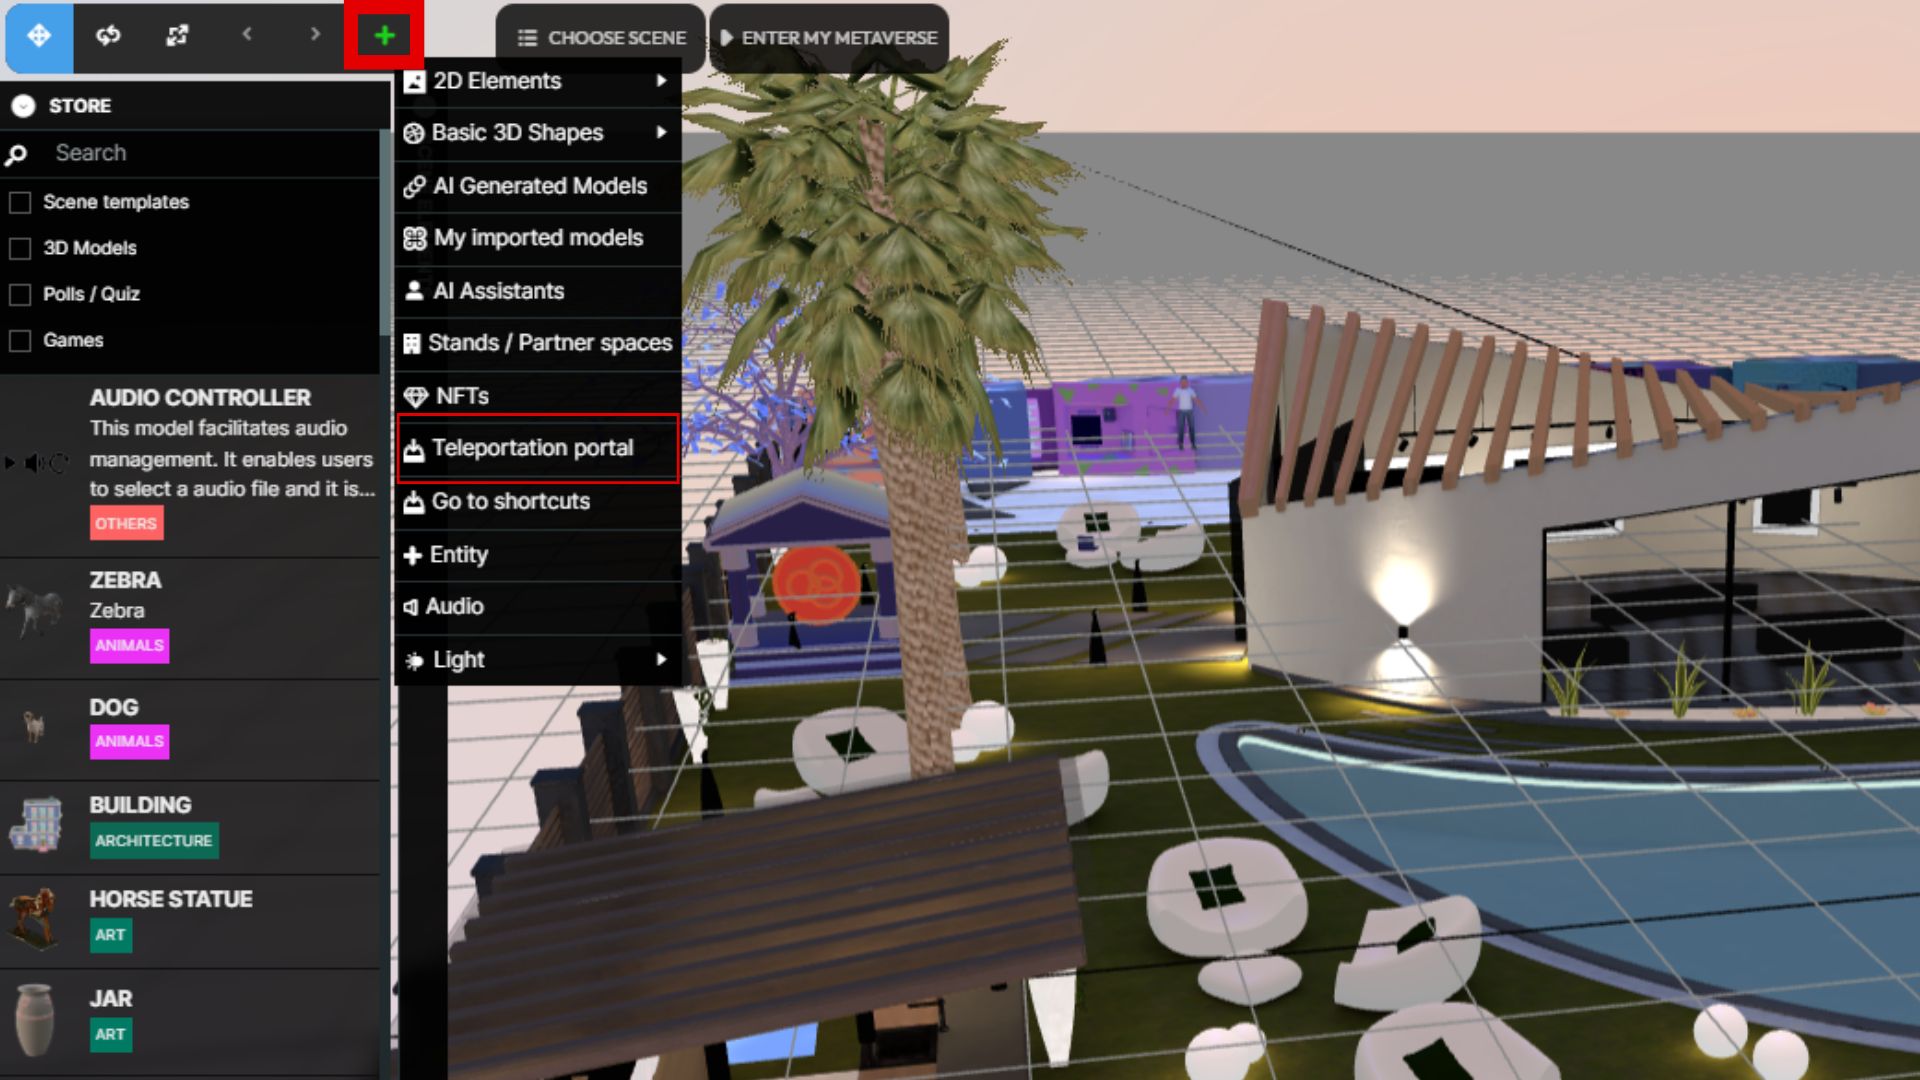
1. Start by clicking on the "+" icon located in the element management bar at the top left corner of your Metabuilder screen. From the dropdown menu, select "Teleportation portal".
****
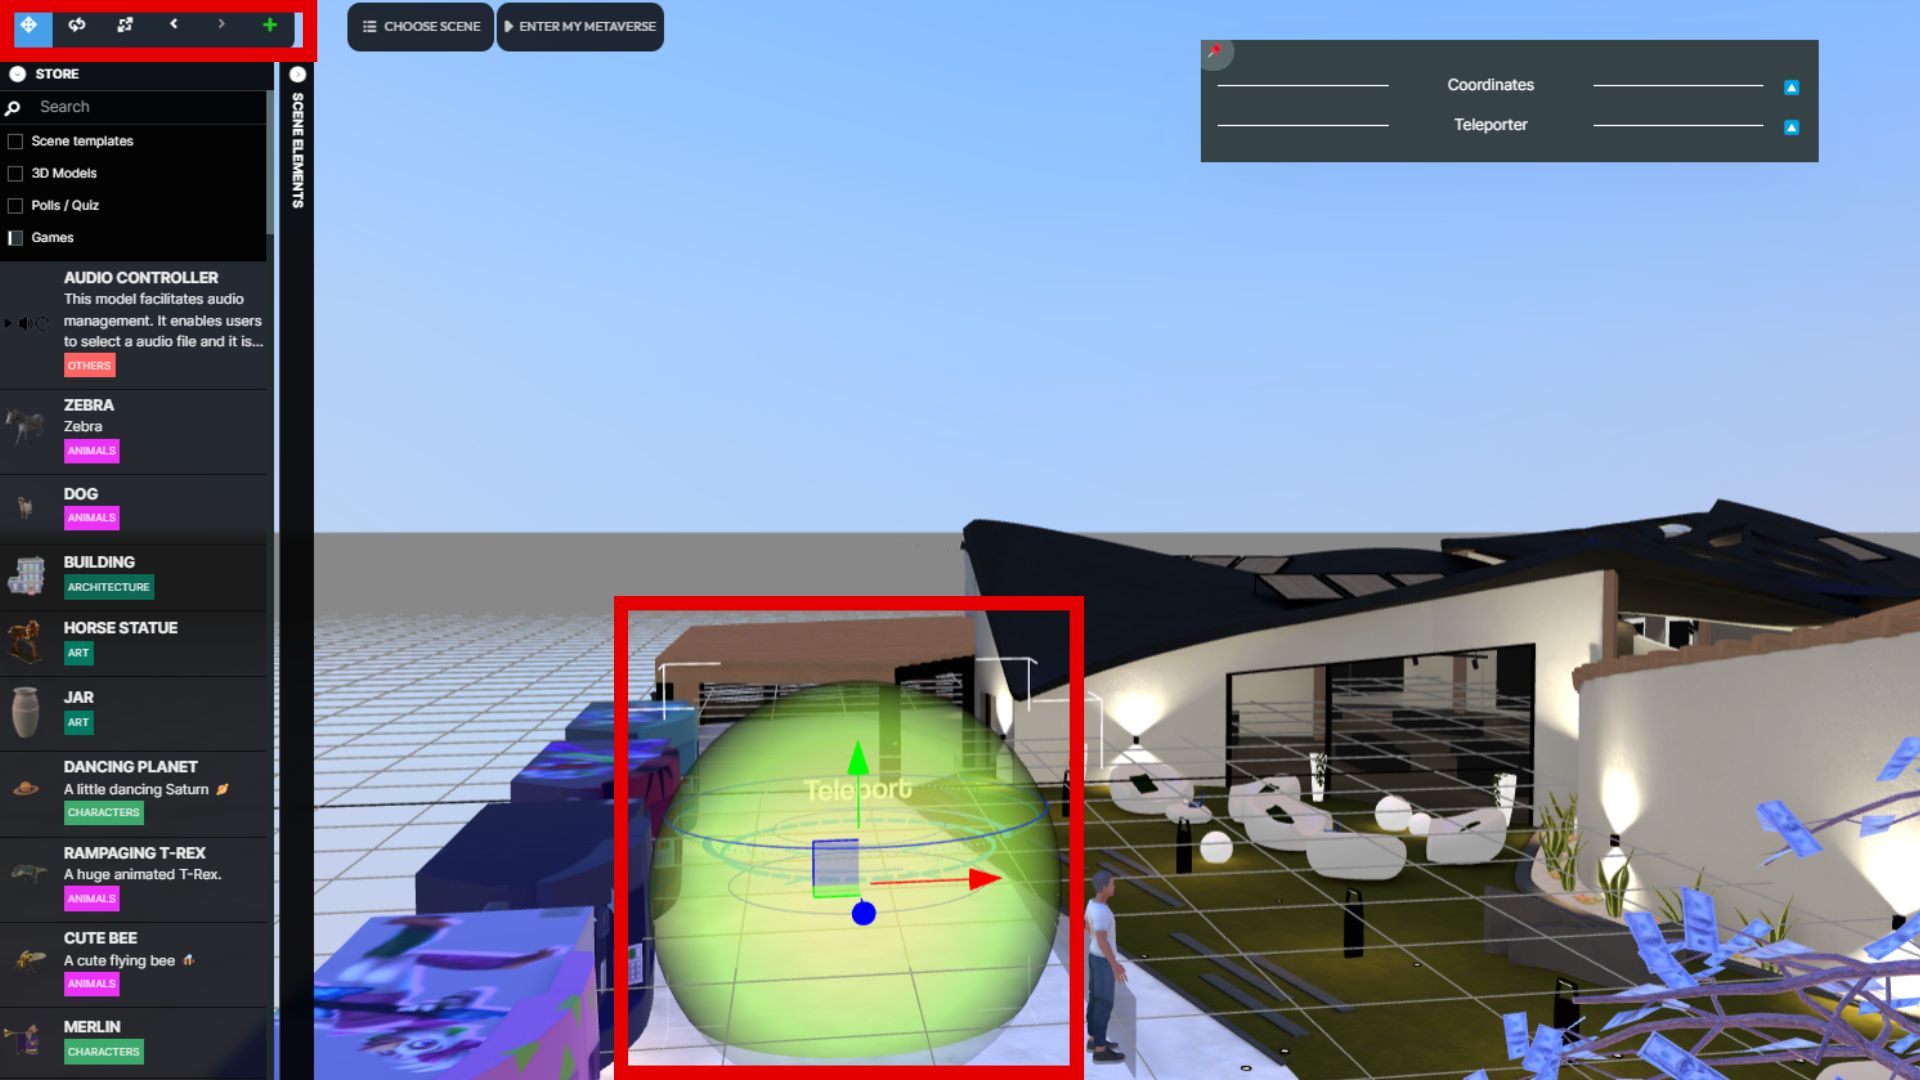
**2. This action creates a teleportation sphere. To adjust its size and position, navigate to the Element menu at the top right of the Metabuilder, treating it like any other 3D model. **
****
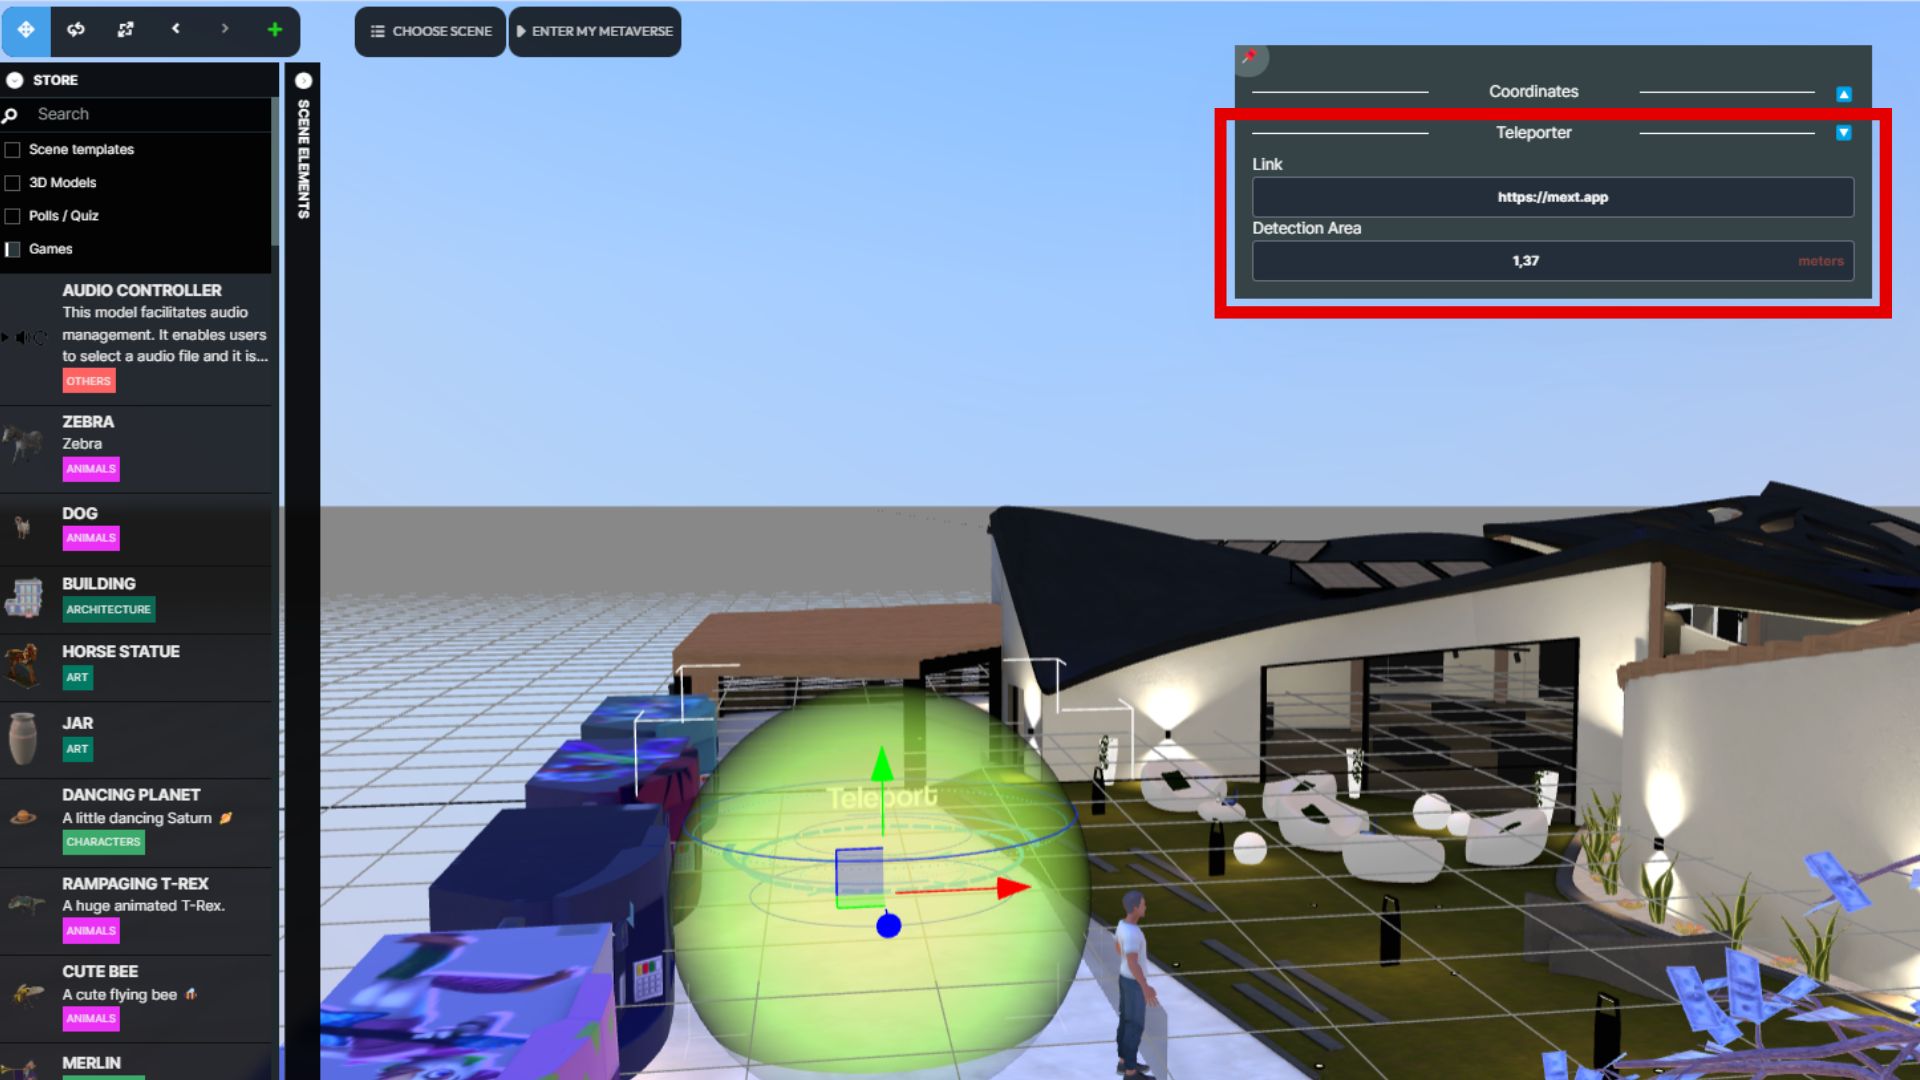
3. Within the teleporter's settings, accessed through the "Black window" associated with the new element, input the redirection link. You can also fine-tune detection sensitivity and specify the precise coordinates for the teleportation zone.
****
**4. With these steps completed, a redirection zone will be immediately available within your 3D immersive space and metaverse, ready to seamlessly guide participants to their intended destinations. **
dfffgg
1.1.5.5.8 Go to shortcuts
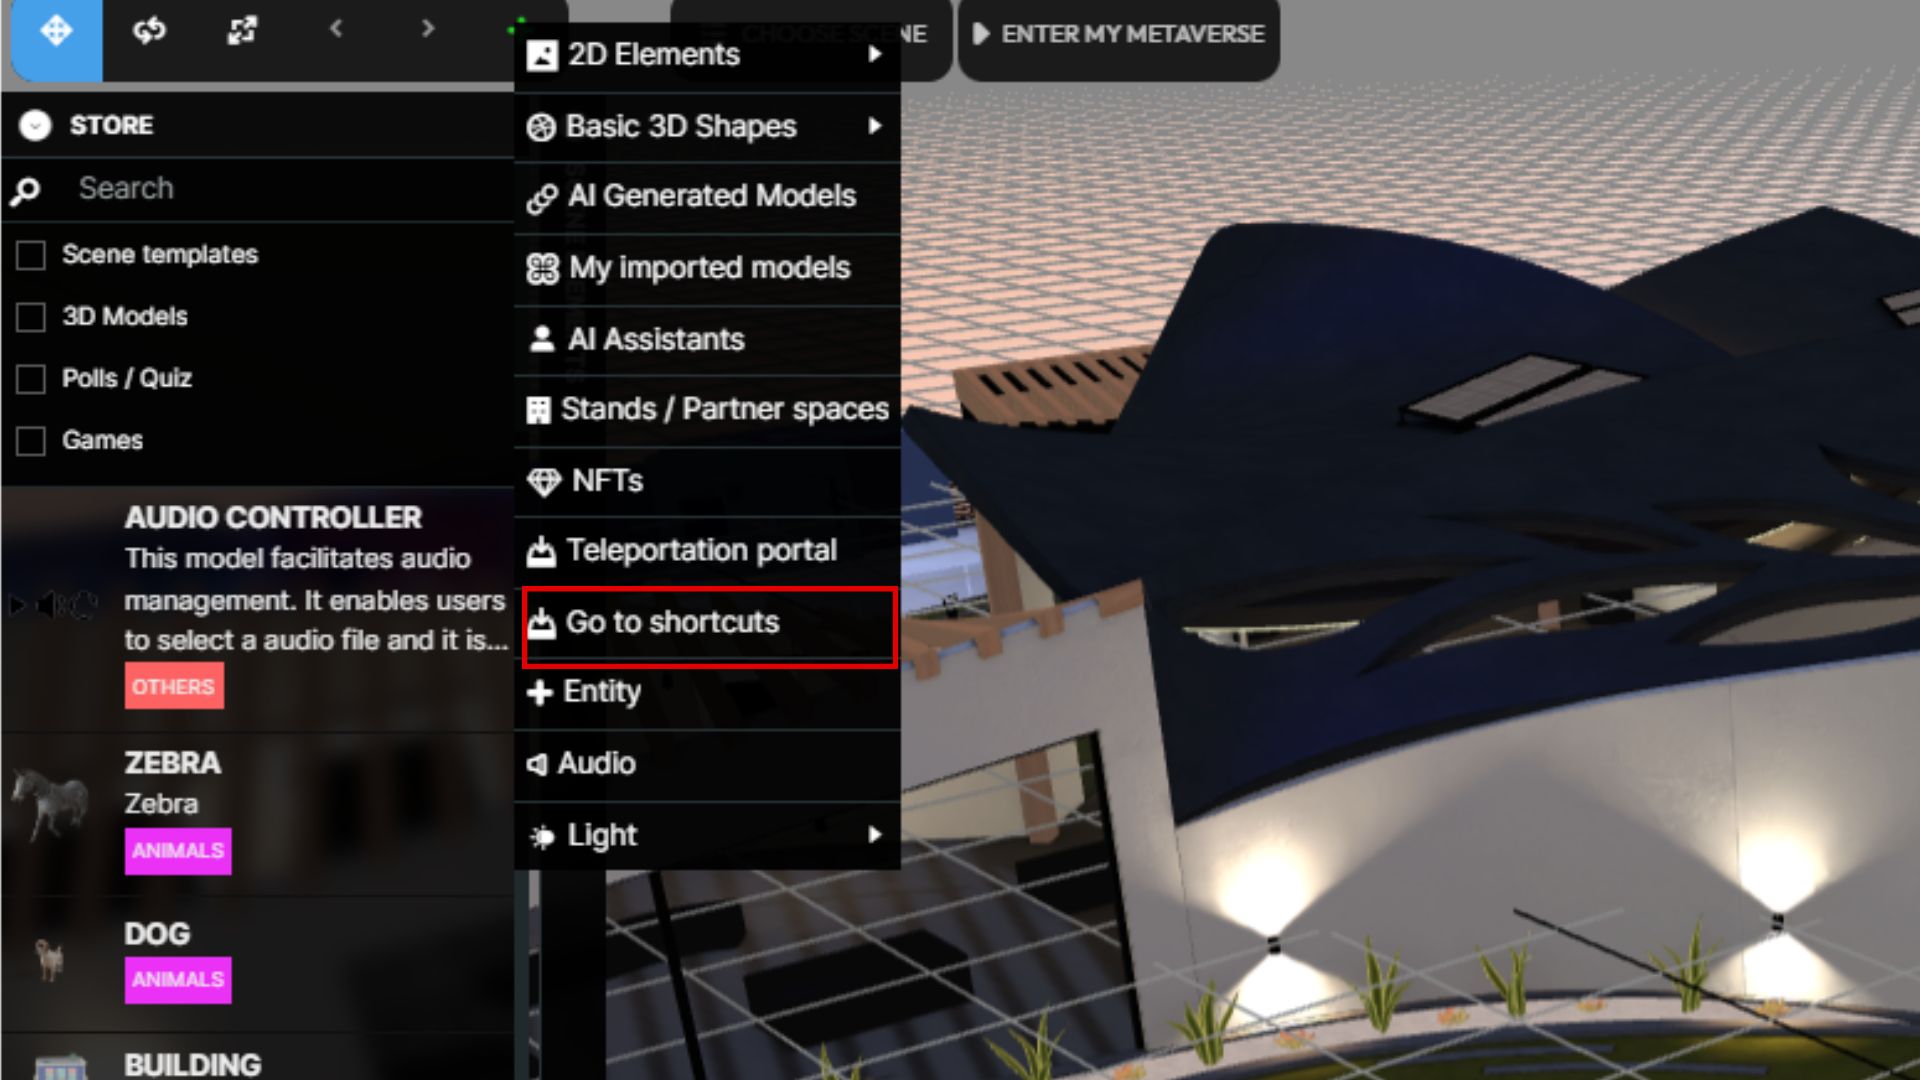
You can define shortcuts inside your 3D immersive space where your participants and visitors can teleport themselves directly to the specific location that you defines as teleportation location by going to “GO TO” in top inside of your 3D immersive space and metaverse.
1. Start by clicking on the "+" icon located in the element management bar at the top left corner of your Metabuilder screen. From the dropdown menu, select "Go to shortcuts".
****
2- By clicking, you have the window to name the teleportation zone that you want to create
****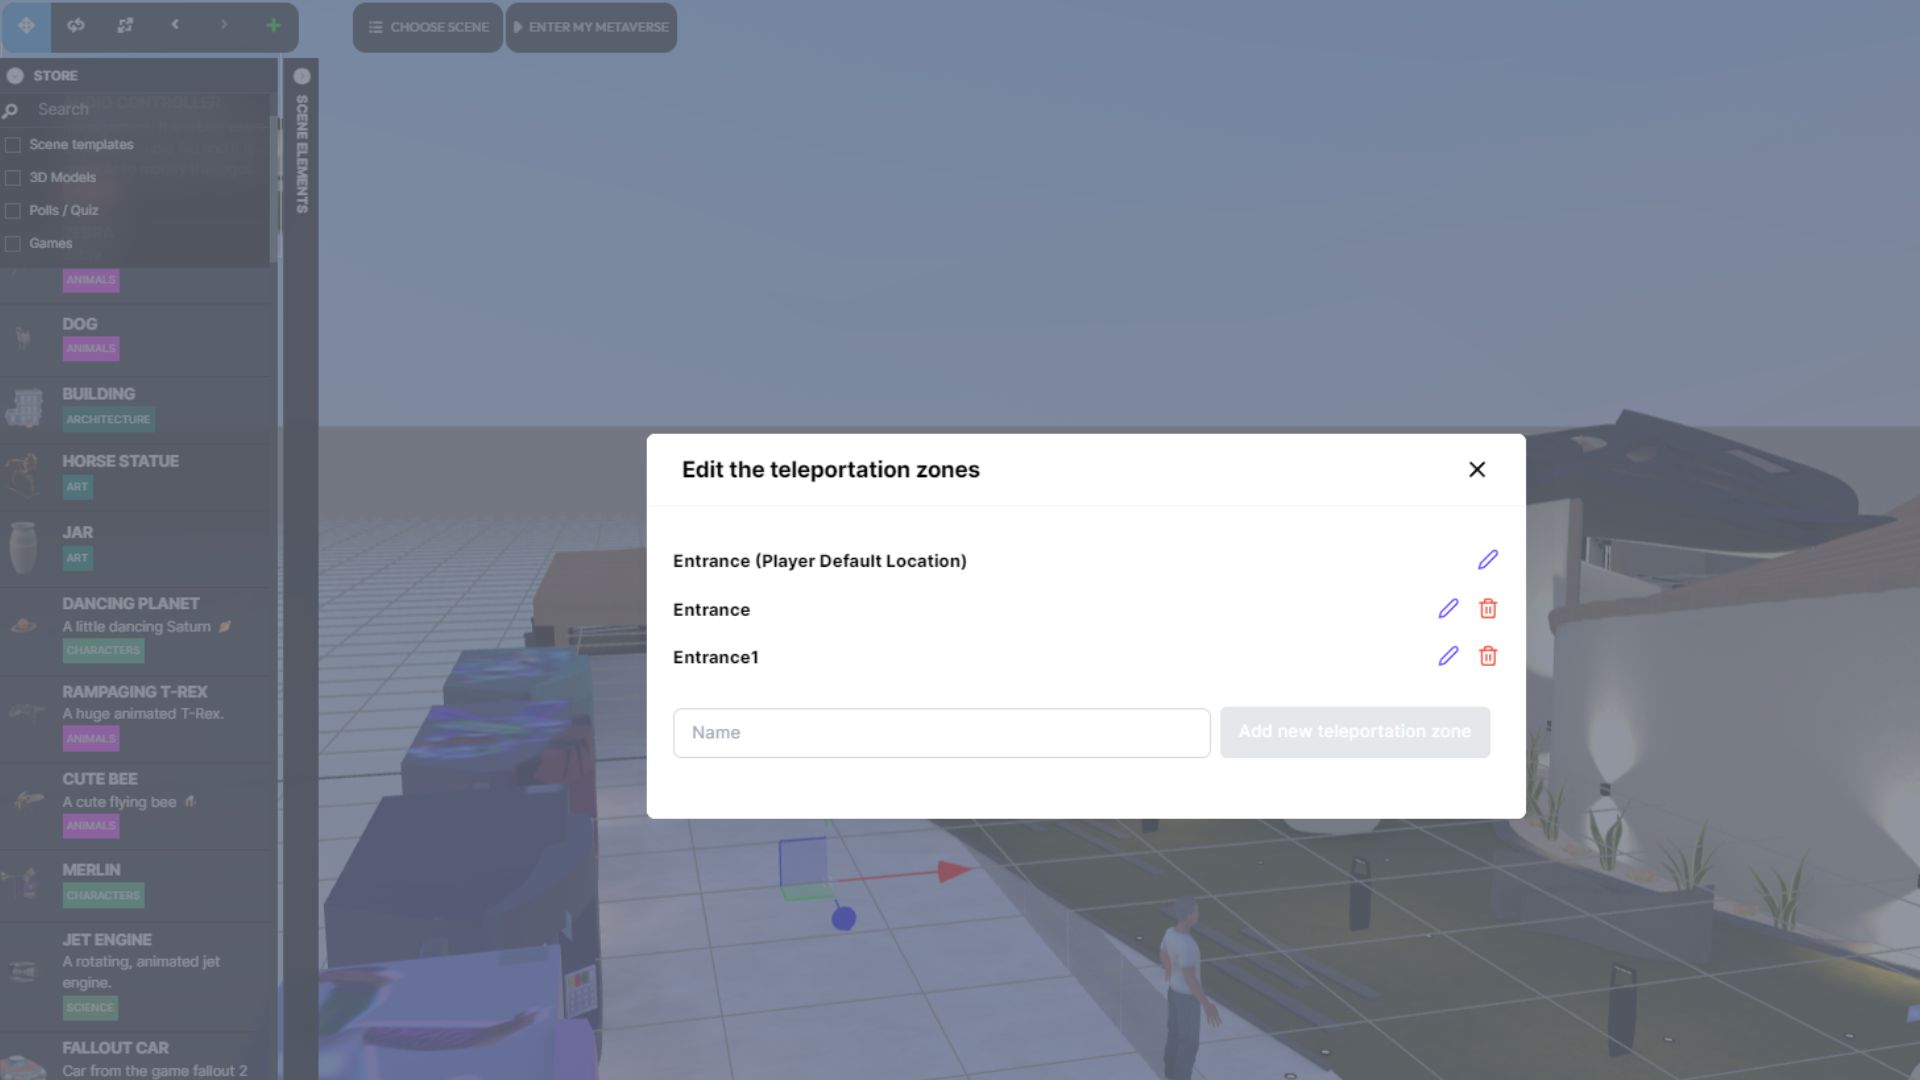
3- When you add the name of the teleportation location and click on “Add New teleportation location”, you create it:
1.1.5.5.9 Audio player (ouvrir la fenetre de l’éditeur avancé)
1.1.5.5.10 Light
In the Metabuilder you have 3 light options to help you to improve lighting and create good lighting effects
To access to light
1.1.5.5.11 Creating an Entity
Tutorial: Creating an Entity
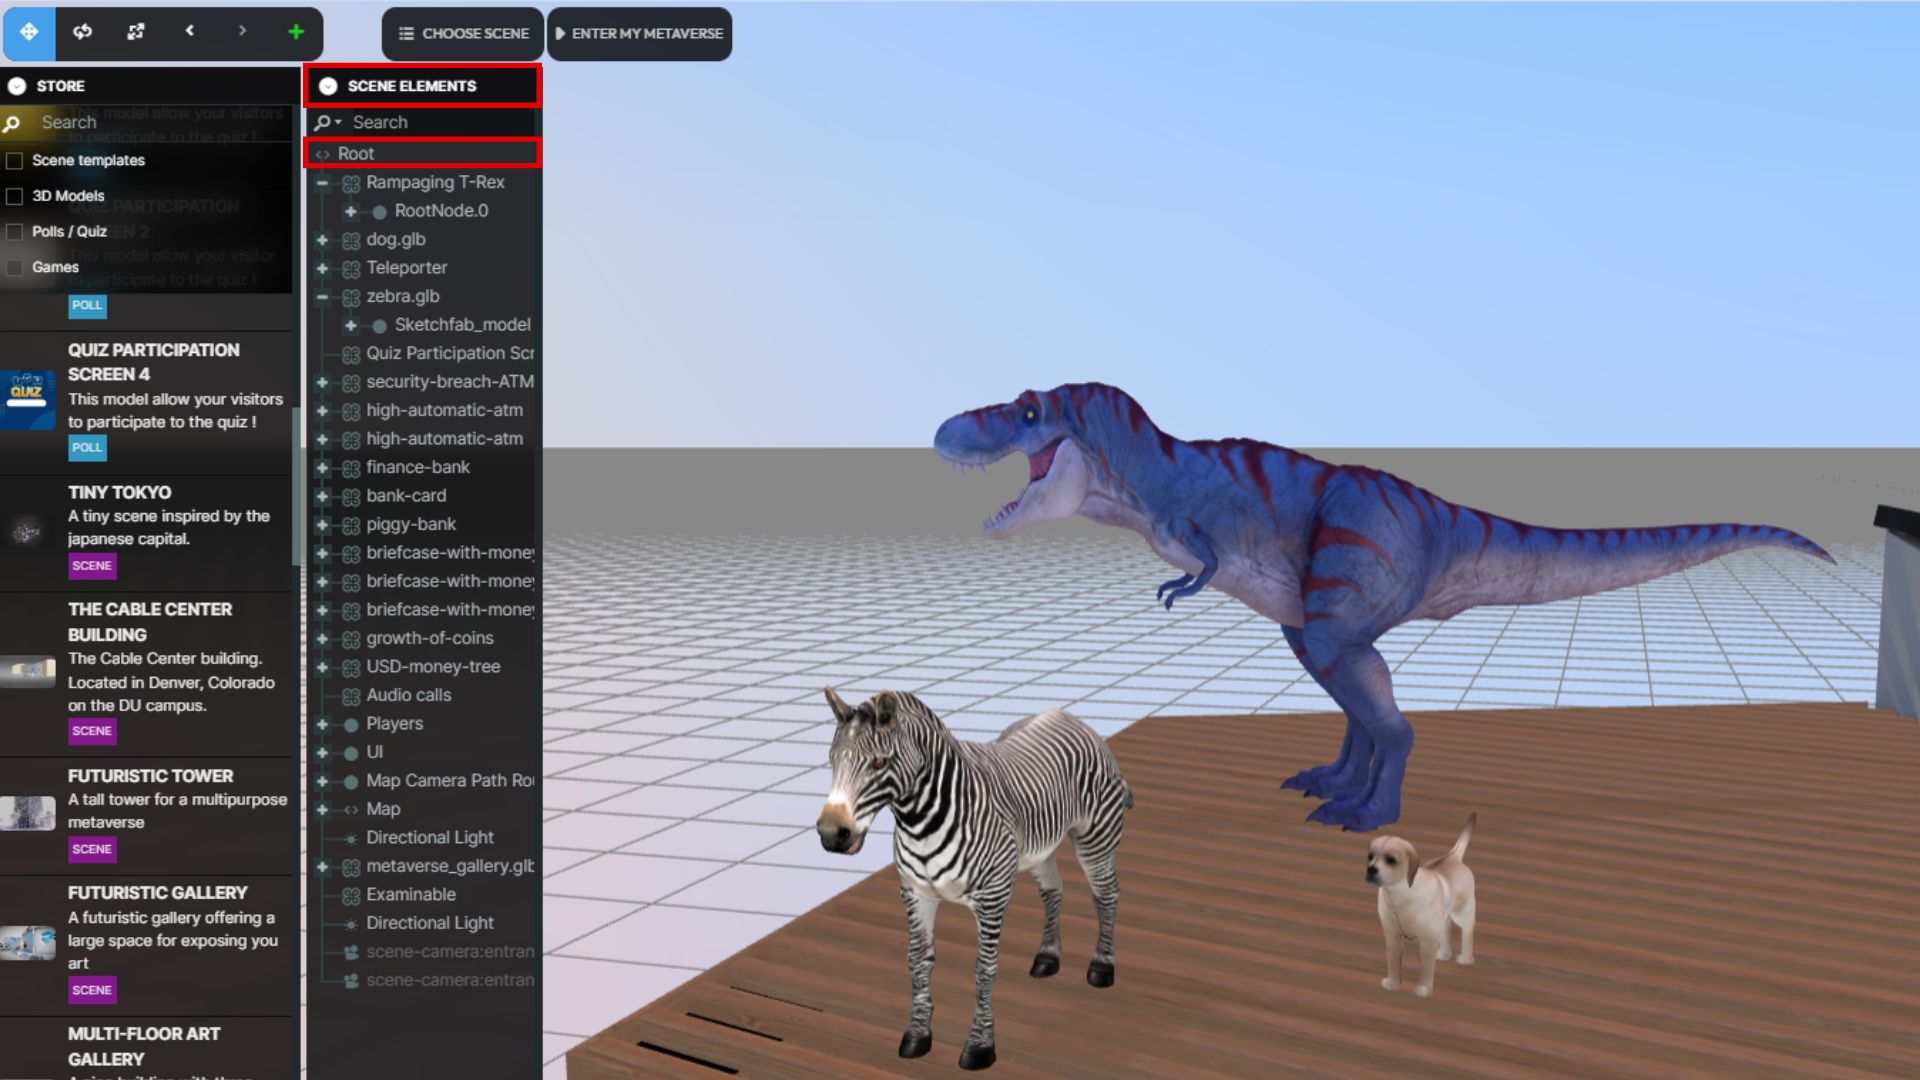
Creating an entity involves grouping several elements together to facilitate simultaneous movement and proportional resizing. Here's how to do it:
1. Begin by accessing the scene elements bar and selecting "Roots".
****
2. Next, navigate to the element management bar menu at the top right of Metabuilder. Click on the "+" icon, then choose "Group Entity" from the dropdown menu.
****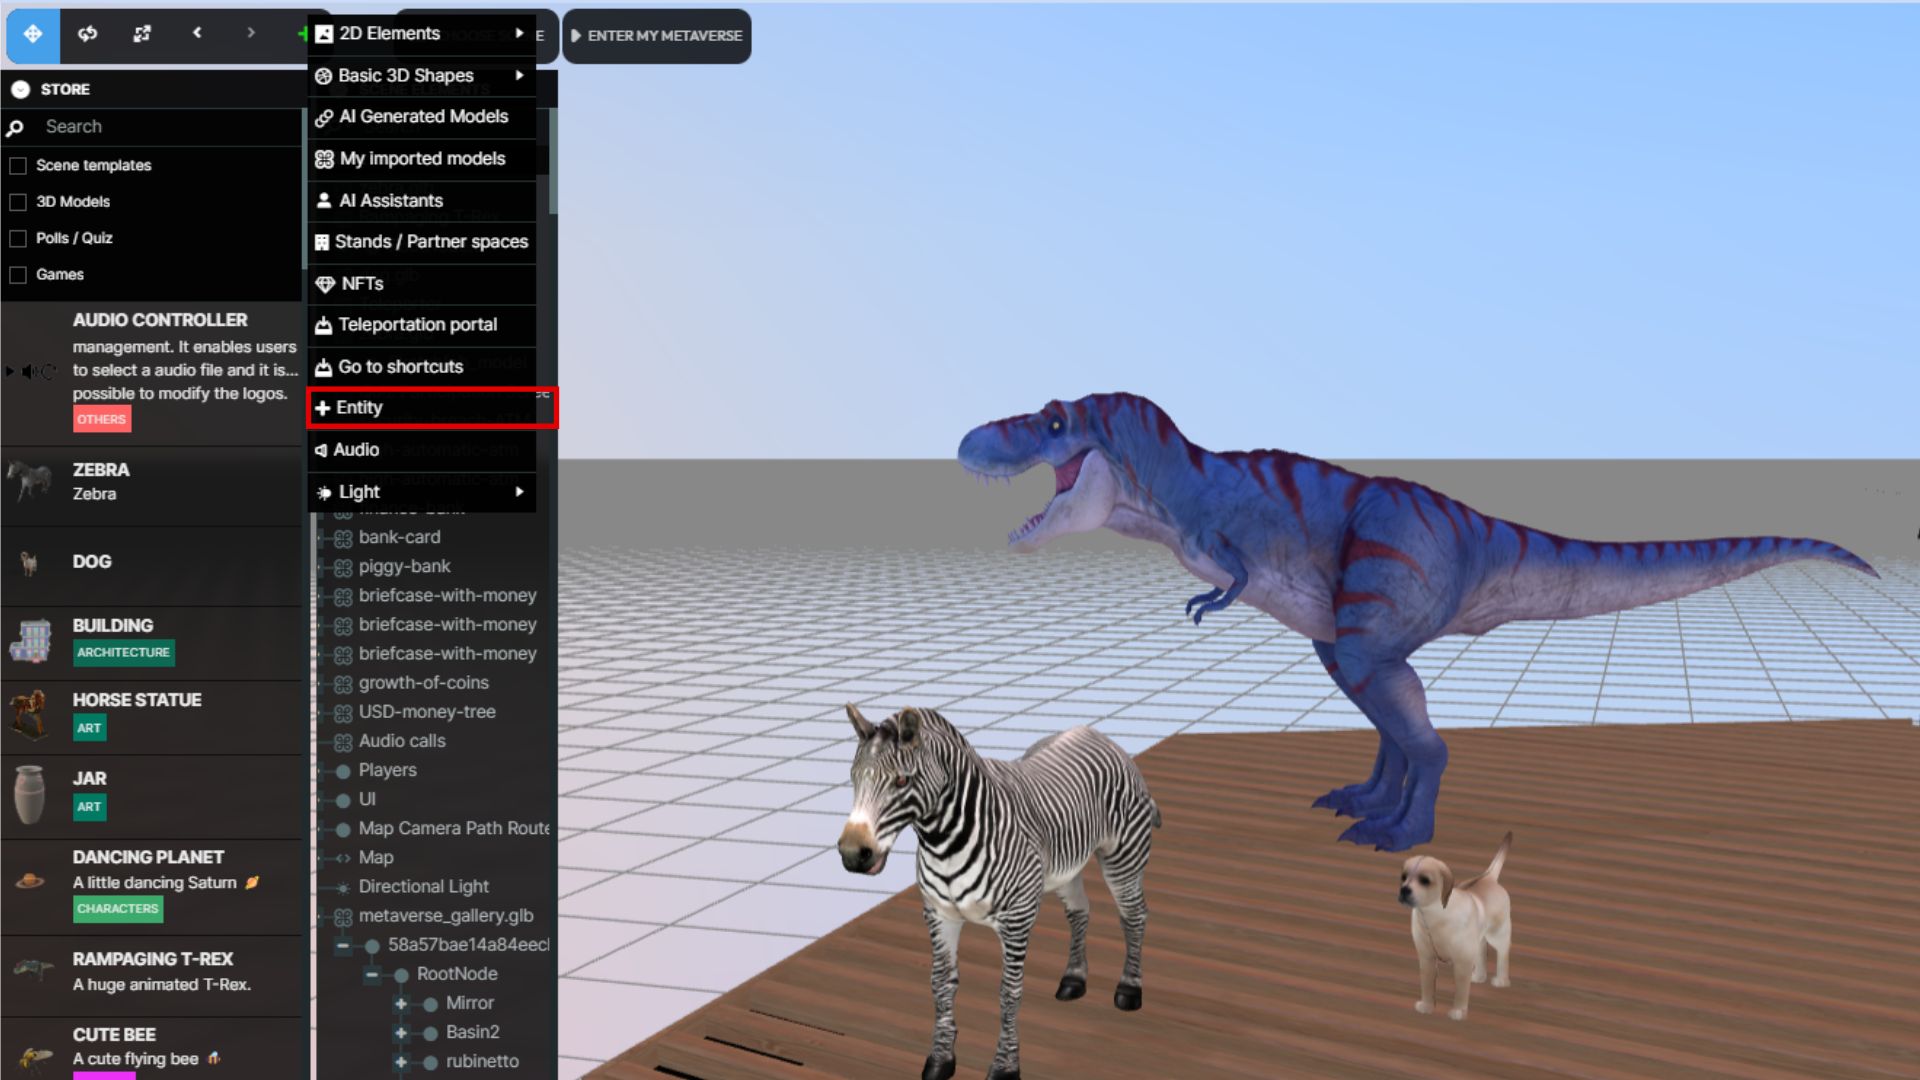
3. This action creates a new entity within "Scene Elements".
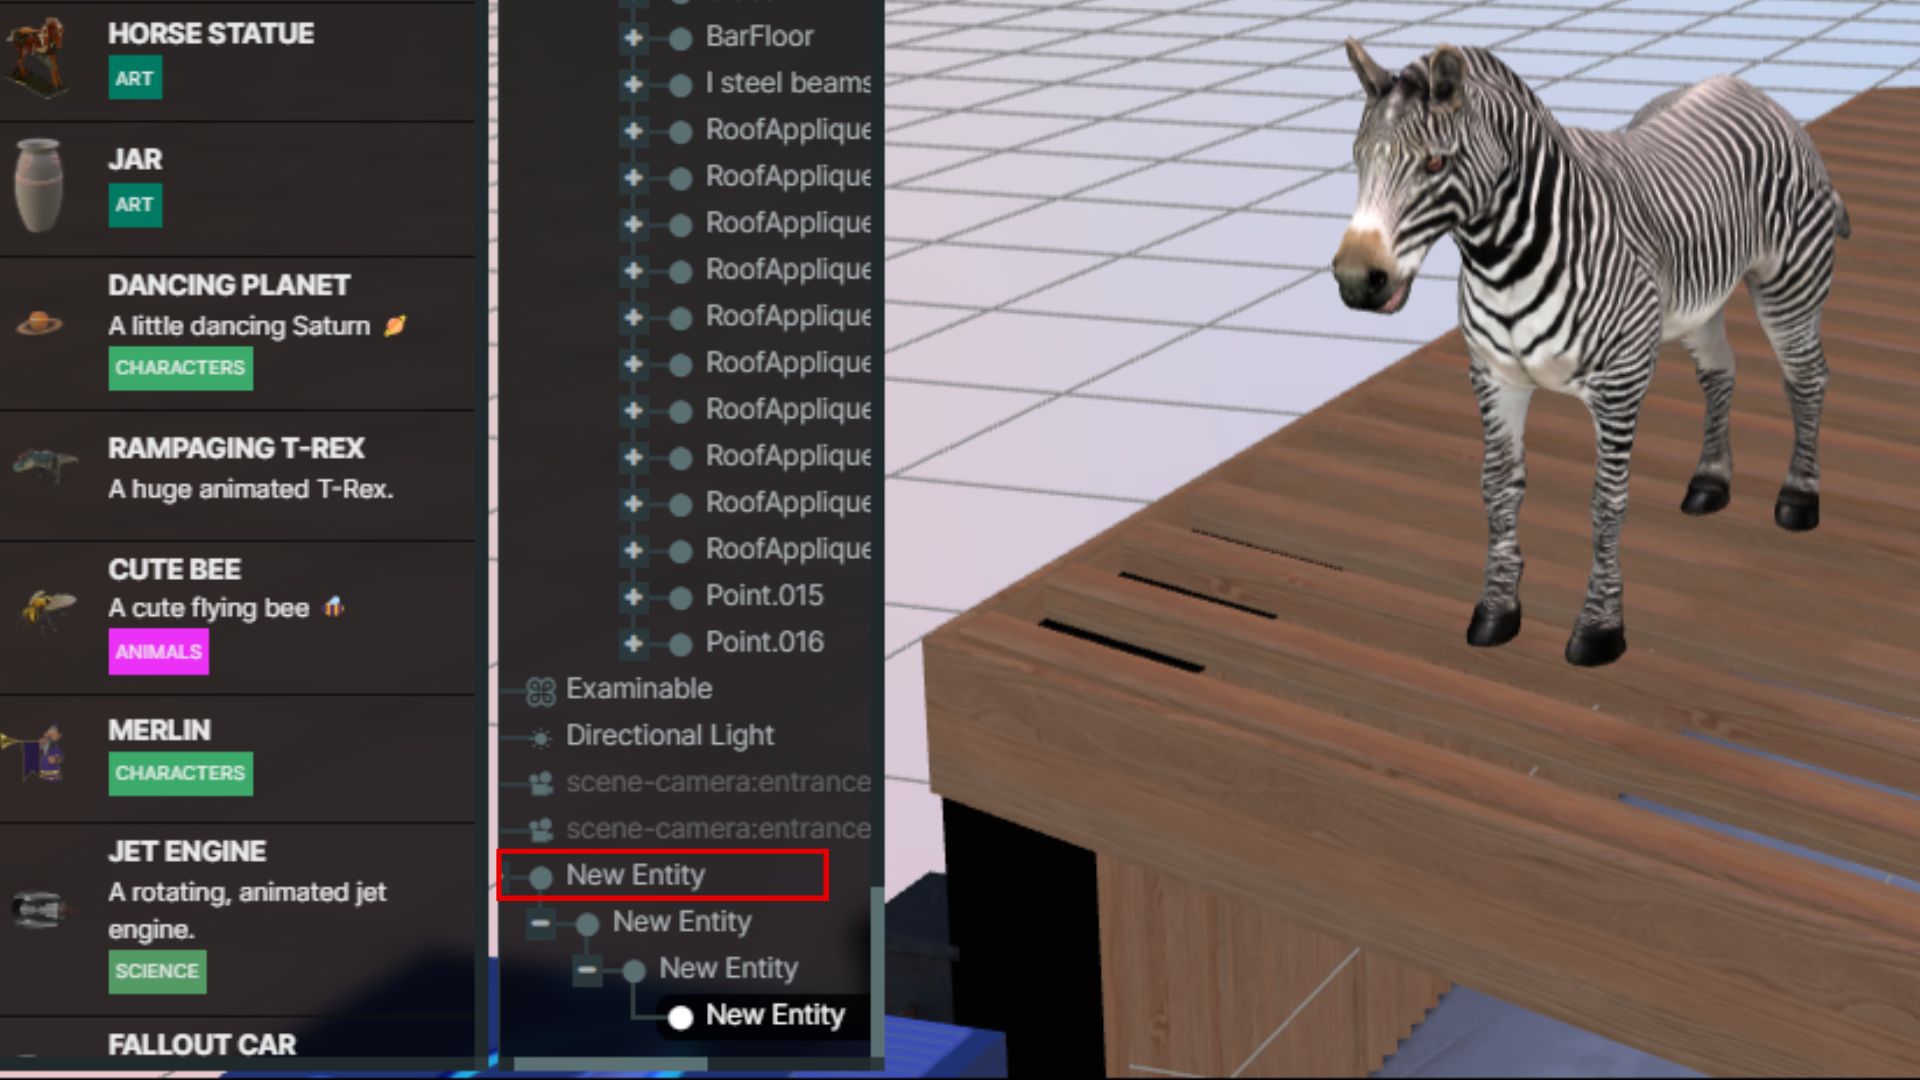
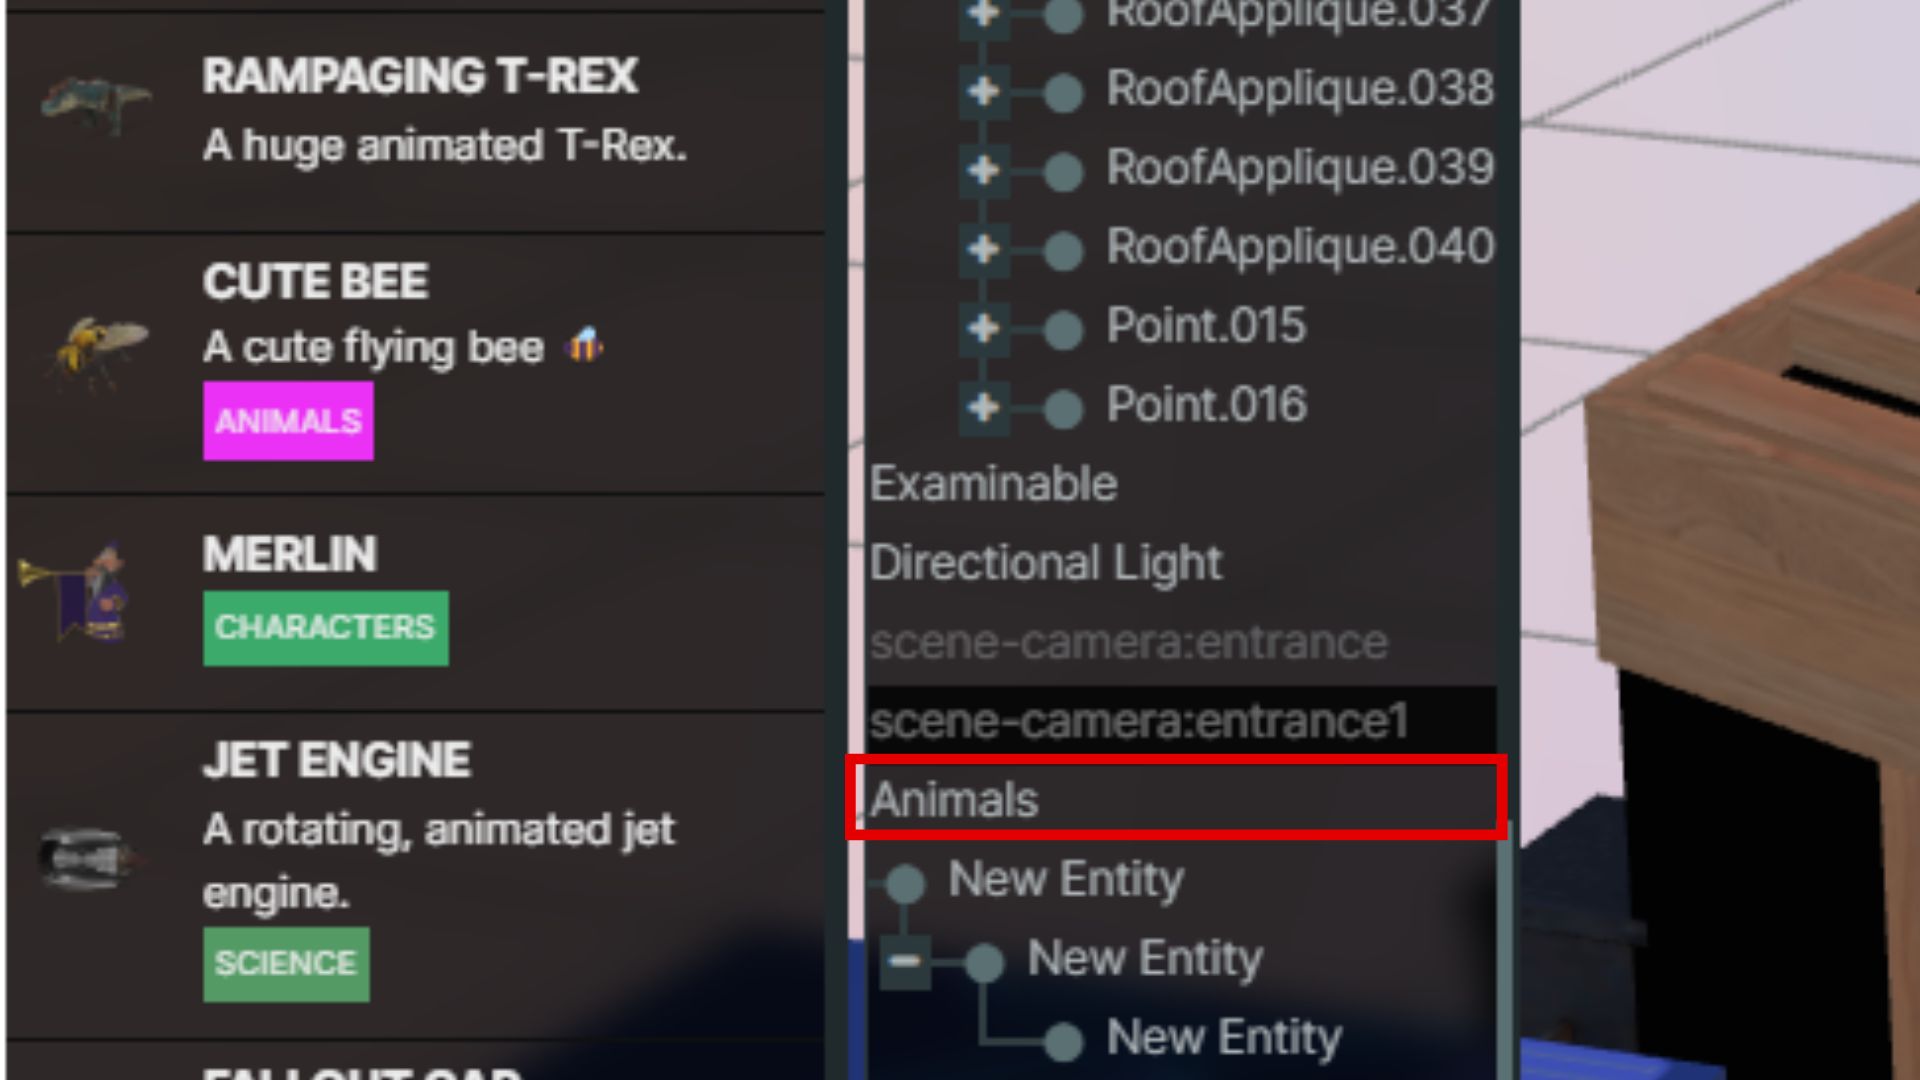
4. Give the new entity a name by clicking on it and typing a suitable name.
****
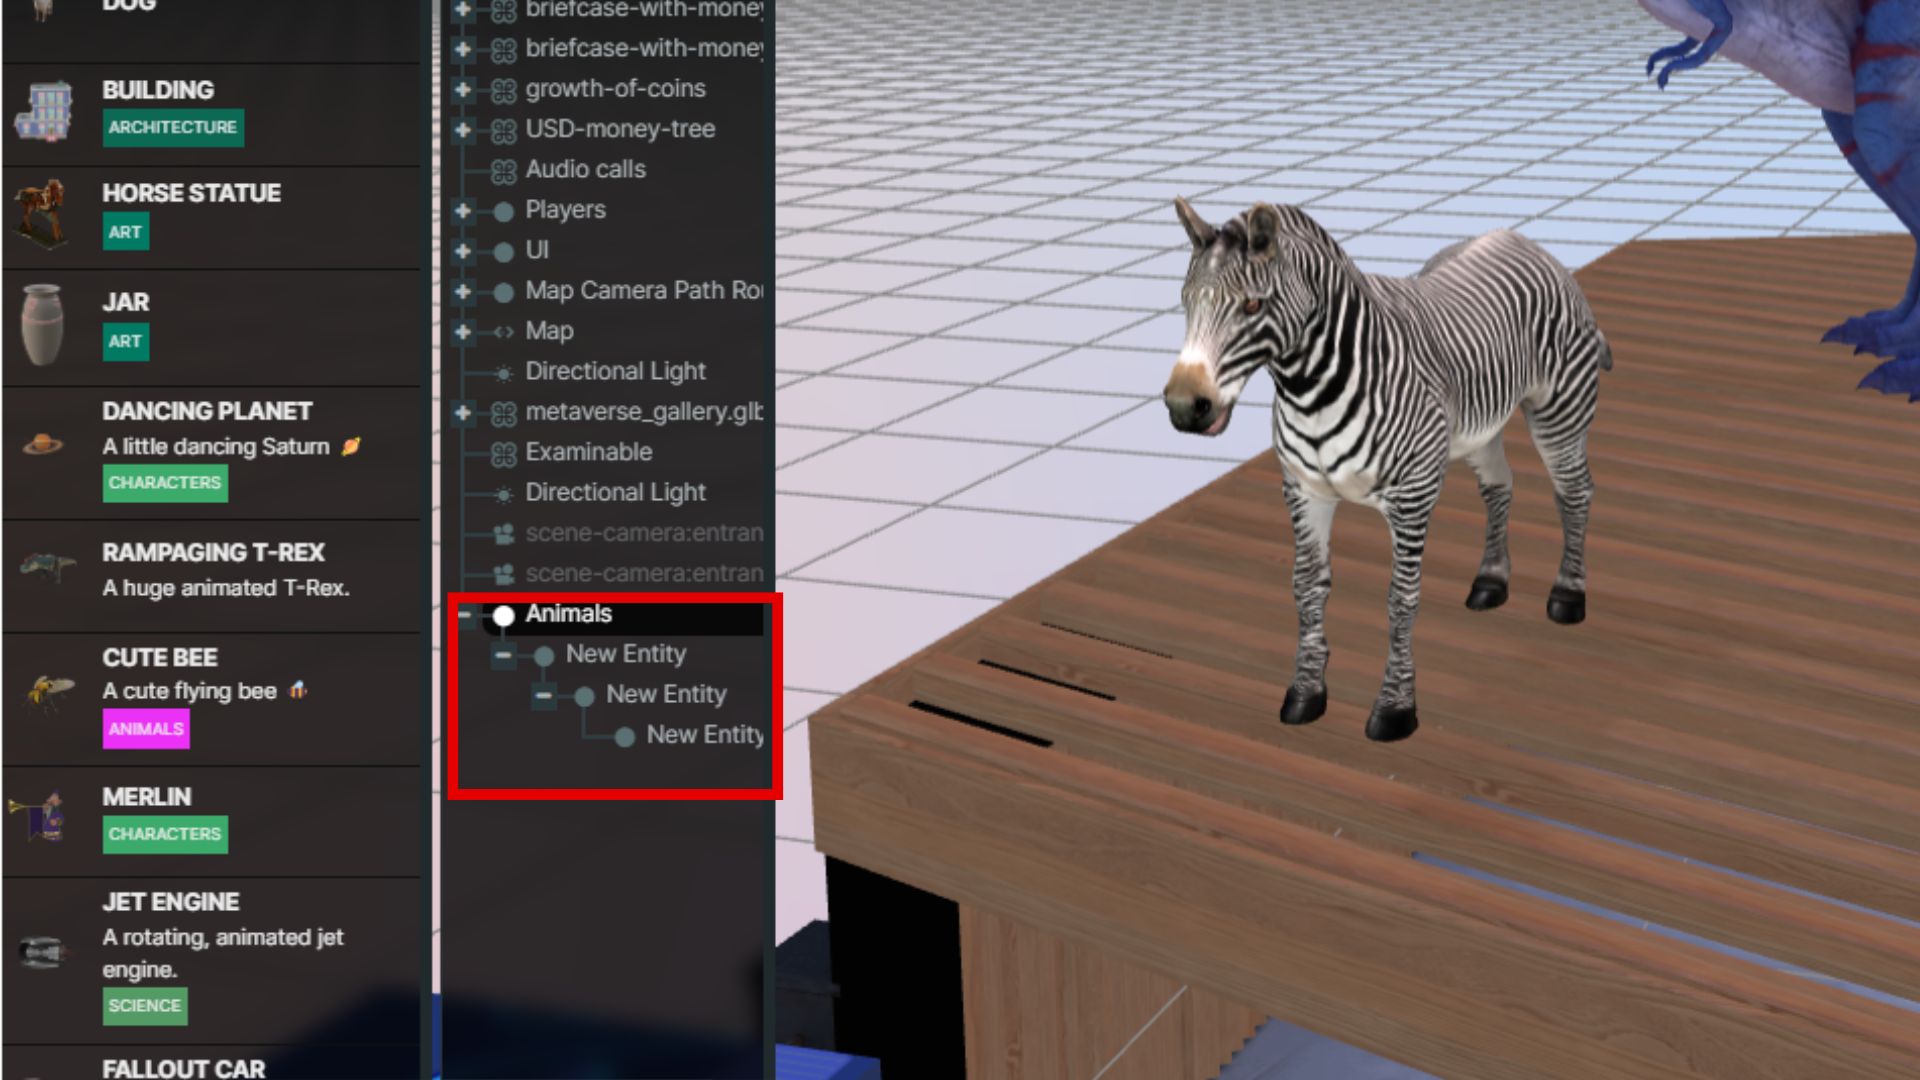
5. Now, drag and drop the desired elements from the scene element list into the newly created entity.
****
6. Once the elements are grouped within the entity, you can select the entity to move, rotate, and resize all grouped elements proportionally.
Follow these steps to efficiently manage and manipulate multiple elements as a single entity!
1.1.6 Scene Element List
The Scene Element List initially appears as a closed bar adjacent to the store section.
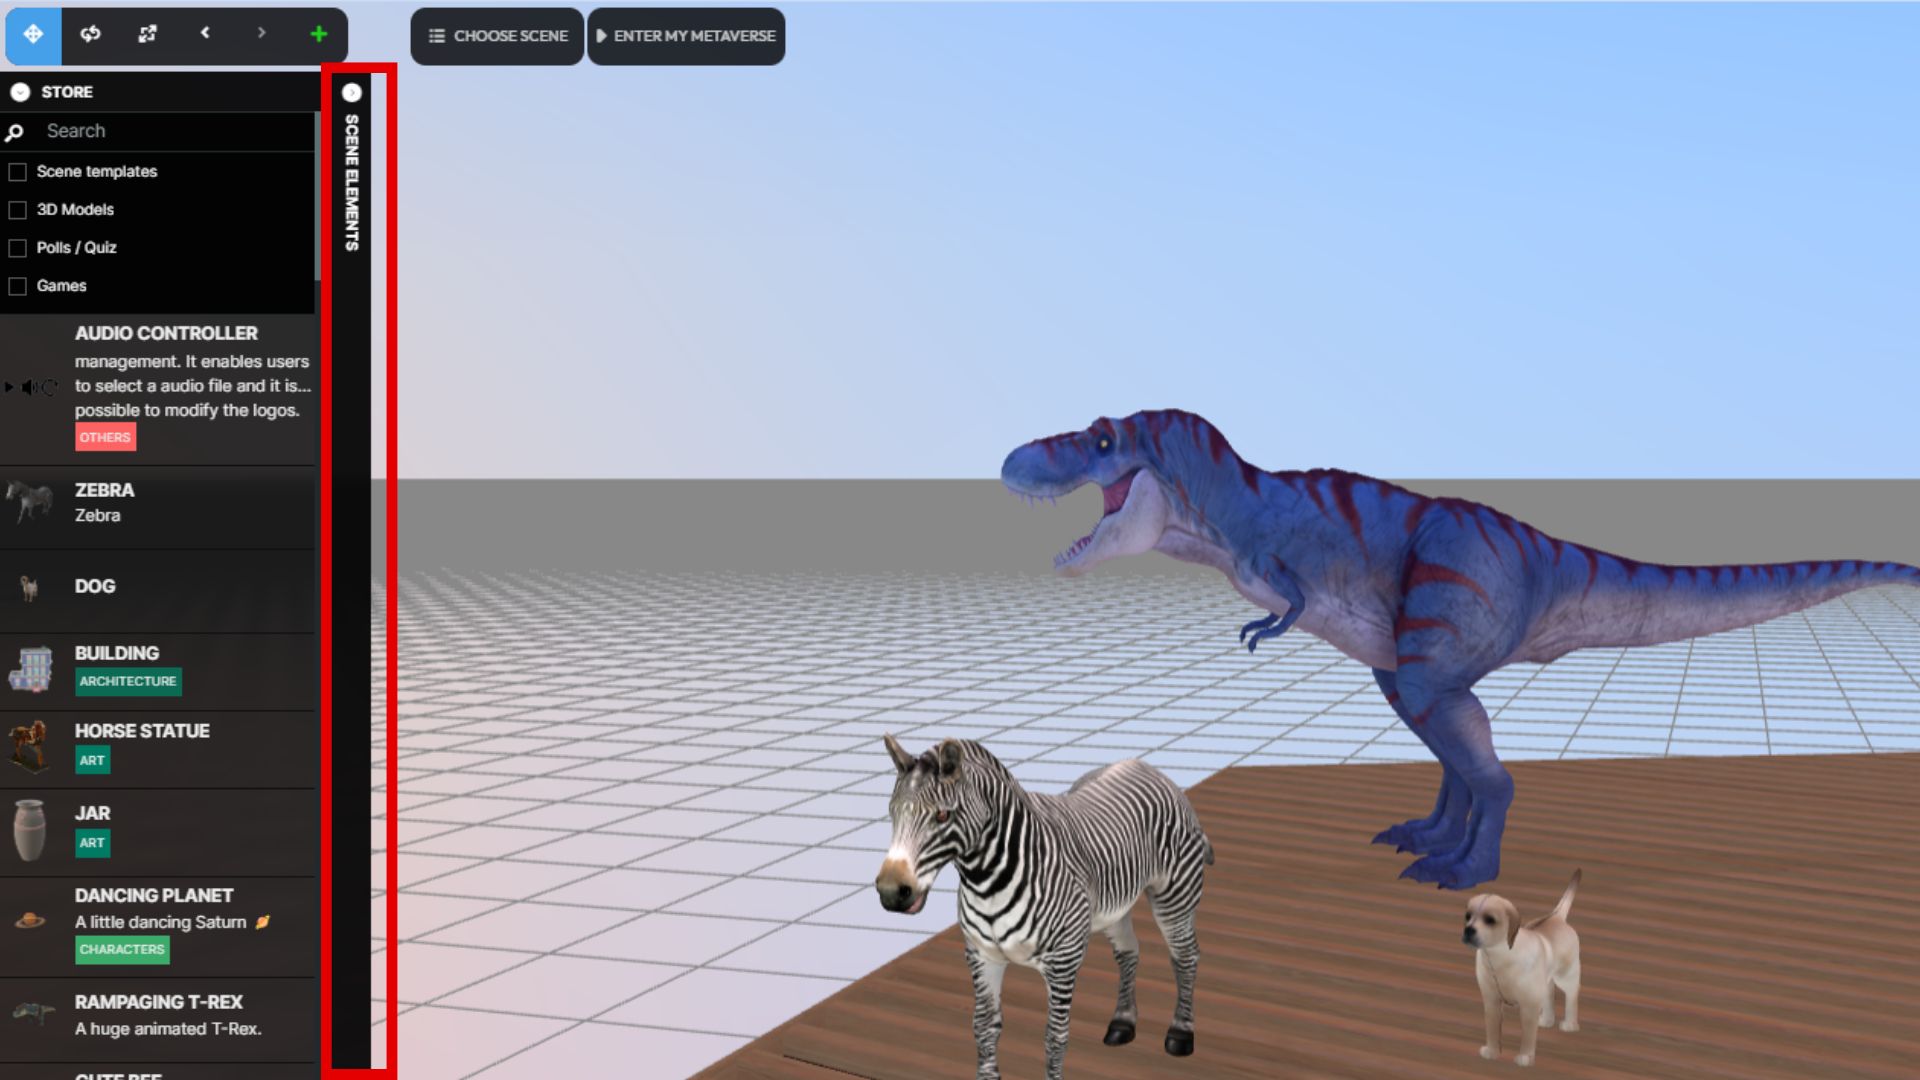
To access it, simply click on the closed bar to expand its contents.
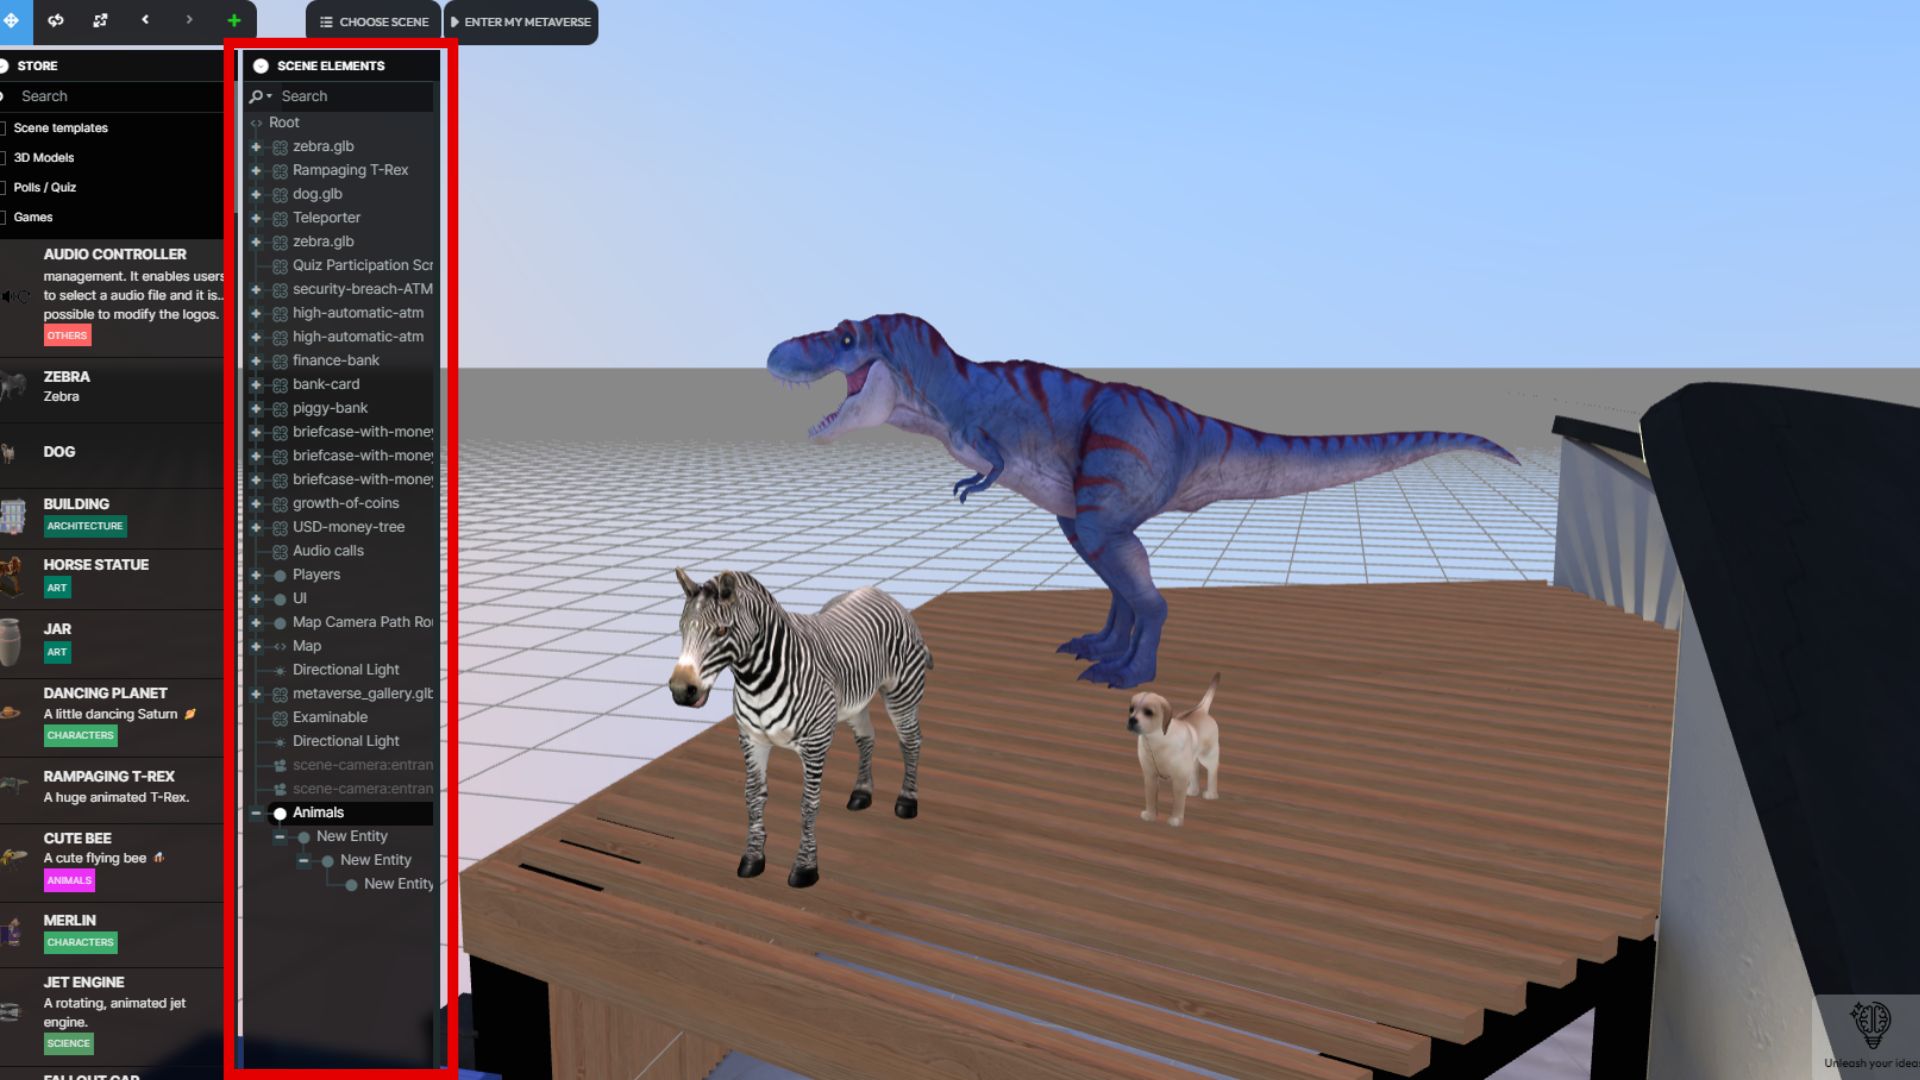
Within the Scene Element List, you'll find a comprehensive inventory of all your elements, including 3D models, screens, AI assistants, quizzes, polls, and more, as well as grouped entities comprising multiple elements.
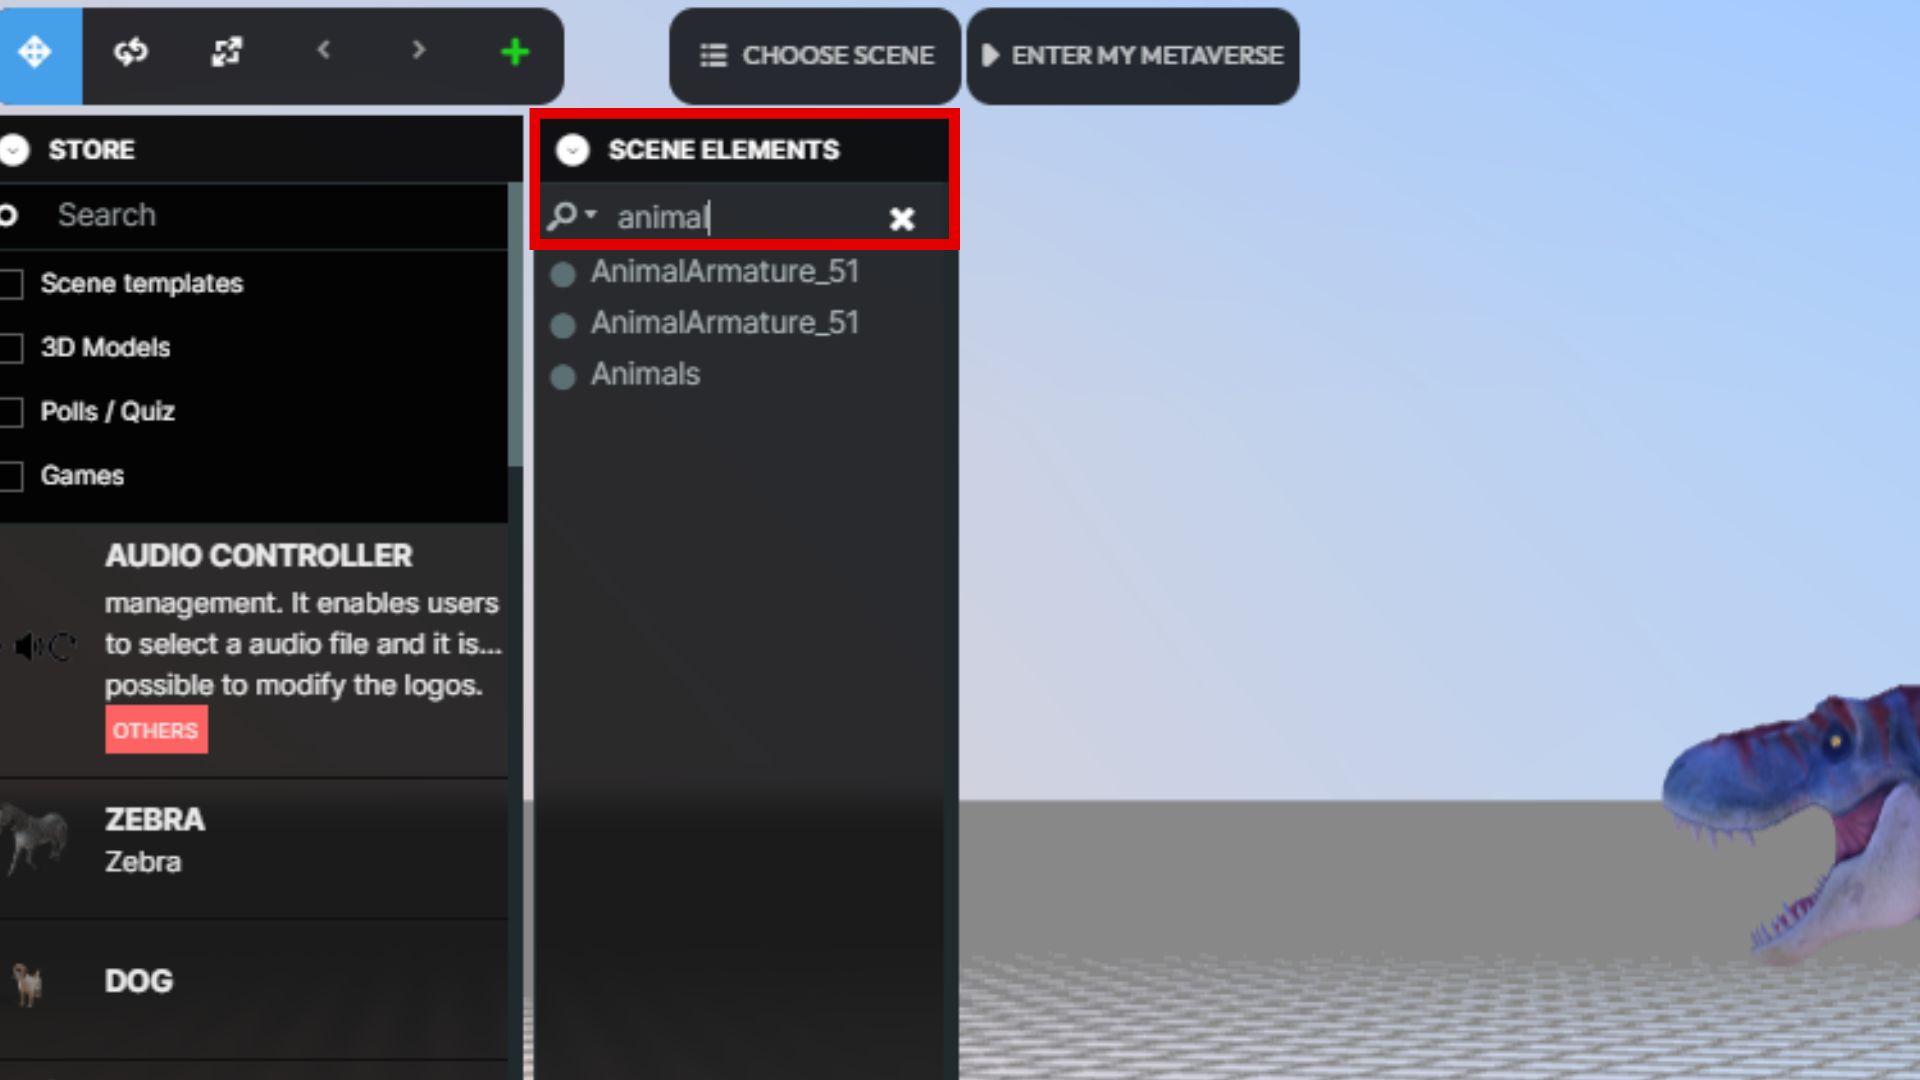
1. By utilizing the search field, you can quickly locate specific elements by typing keywords. For instance, typing "tree" will generate a list of all elements related to trees.
****
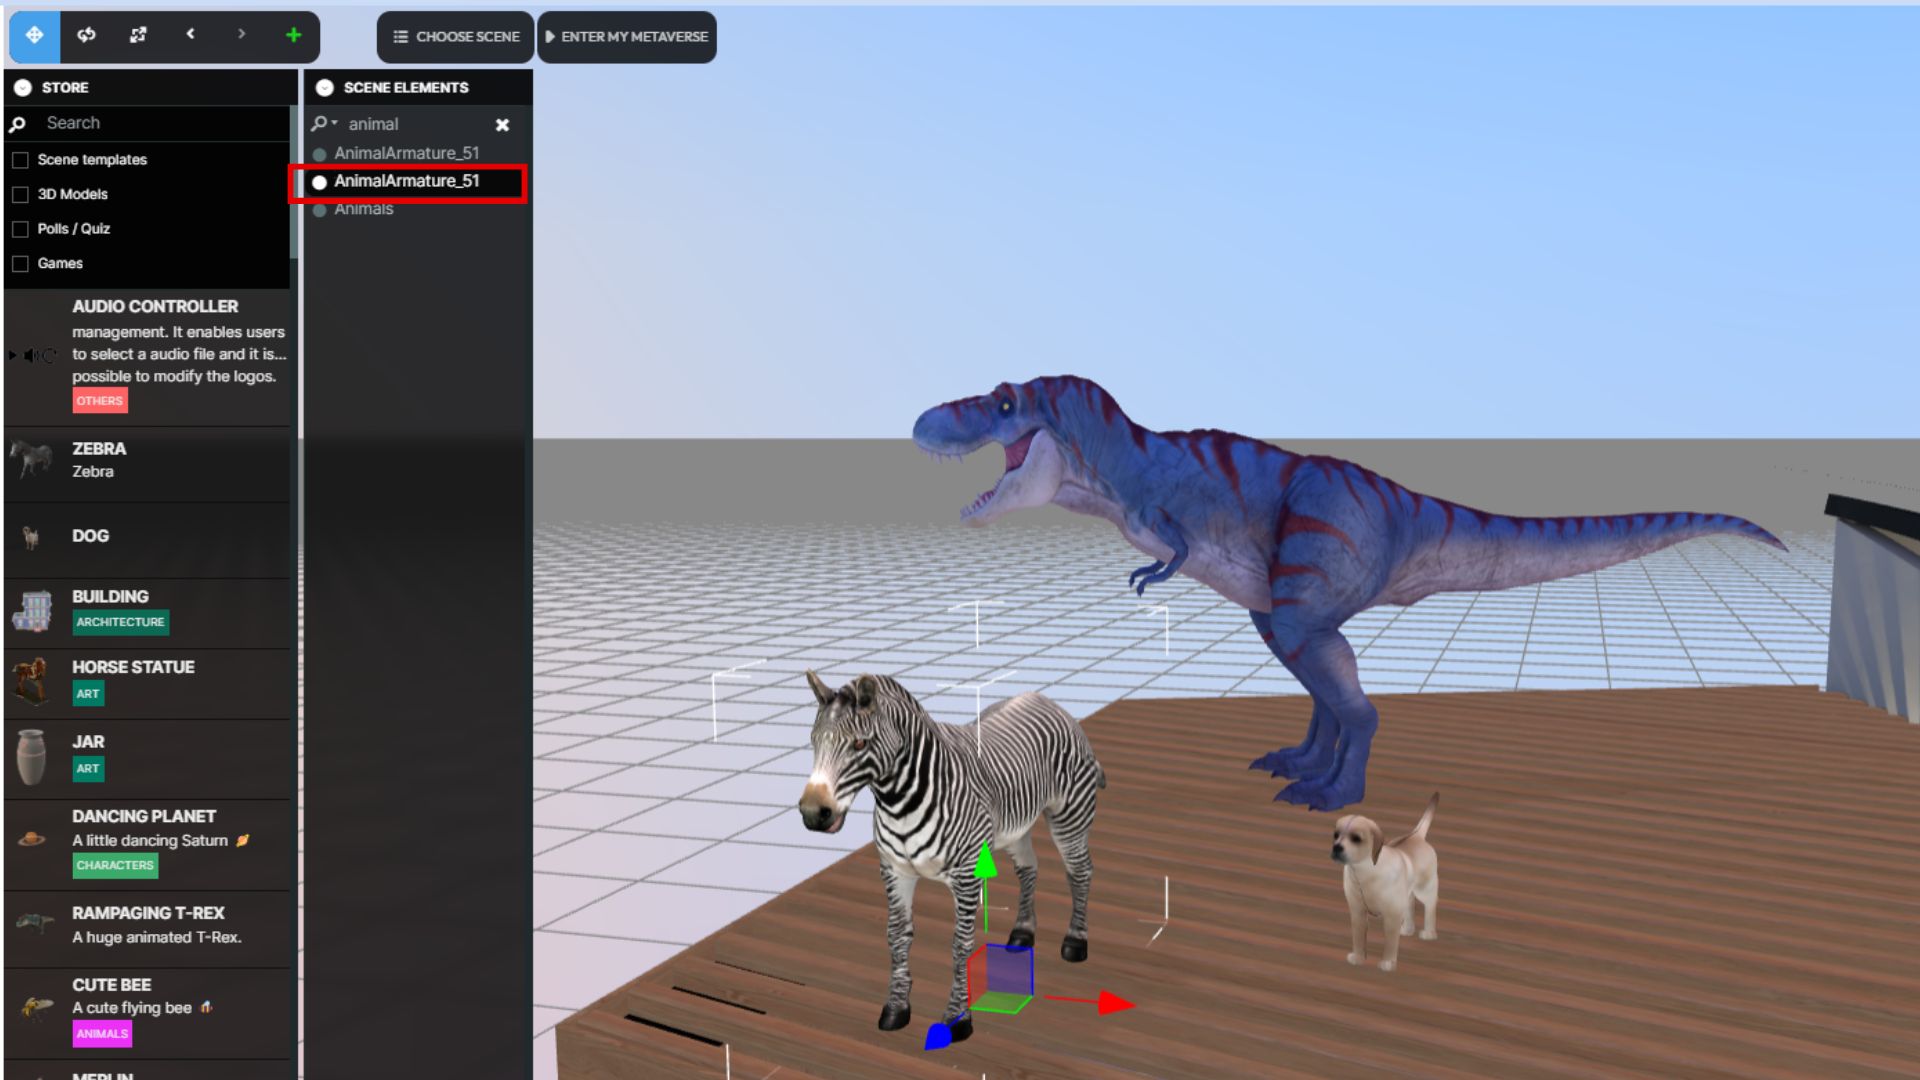
2. Furthermore, clicking on any element within the list will instantly locate it within your scene in the Metabuilder.
****
1.1.7 AI-Generated Models
1- A quoi sert :
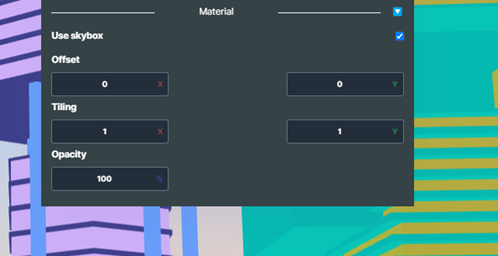
- Offset , déplacer la position initiale d’une image
- Tiling, quadriller une image
- Use sky box, tester si la skybox a un effet sur mon image.